
This article is intended for customers considering a Vault migration project. It provides suggestions and best practices for planning, developing, and executing a Vault migration.
A Vault migration refers to the loading of large volumes of data or documents into Vault. There are two common migration use cases:
When replacing a legacy system with Vault, it is common to migrate data from the legacy system into Vault. This type of migration usually occurs during the Vault implementation project for a new Vault, but can also happen when implementing a new application in an existing Vault.
Any business event which requires adding new data to Vault may require incremental migration. For example, a phased rollout, system consolidation, or a company acquisition. Incremental migrations occur independent of an application implementation and can affect a live production Vault application.
At a high level, data migration into Vault generally requires the following steps:
The complexity, effort, and timing of these steps vary depending on the data volume, data complexity, system availability requirements, and tools. Choosing the correct approach is the key to a successful migration project.
It is critical that you select an approach that is appropriate for the size and complexity of your migration project. Migrations can be performed by customers or with assistance from Veeva Migration Services and Certified Migration Partners who use validated tools and have experience performing Vault migrations. We recommend speaking with your Veeva account team to understand these options prior to starting your project.
The migration plan should consider dependencies between the Vault configuration and data preparation and provide adequate time for testing and validation. It is important that you conduct performance testing to properly estimate the time it will take to complete migration activities.
Before carrying out a migration, it is necessary to inform Veeva at least three business days in advance or at least one week for large migrations by completing the Vault Migration Planning Form. This notifies Veeva technical operations and support teams of your migration project and allows them to prepare. Fill out this form for any migration that includes over 10,000 documents, 1,000 large (greater than 1 GB) documents (like videos), 500,000 object records, or any migration where the customer or services has concerns. Complete the form for each environment you will be migrating into.
Migrations using multiple threads are not supported, and we strongly recommend factoring this into project timelines, including the execution time for migration runs. While we support multi-threading on File Staging downloads, the following restrictions apply when executing API calls during a migration:
This section identifies the common practices that should be considered when migrating documents, objects, or configuration into Vault.
Source data for a migration can come from legacy applications, file shares, spreadsheets, or even an existing Vault. The details of extracting data from its source format will depend on the system itself. Customers who are migrating from a complex source application often choose to work with a Certified Migration Partner who has experience extracting data from that application.
A key consideration for data extraction is minimizing downtime during the cutover from the legacy application to Vault. Often the cutover is done over a weekend. To support this, it is recommended to migrate the majority of data or documents in batches beforehand while the legacy system is still running and then only do a delta migration, extracting and loading only the data that has changed since the batch run, on the cutover weekend once you have turned the legacy system off. If the target Vault is already live, you can use user access control to hide the batch documents until the cutover.
Data extracted from the legacy system needs to be transformed before being migrated into Vault. Vault API and Vault Loader accept data in comma-separated values (CSV) format. During this process it’s necessary to map data between the legacy system and Vault. Review these Data Transformation Considerations before transforming your data.
When populating document or object fields which reference object records or picklists, first ensure the reference data exists in Vault. This reference data can be linked using either object lookup fields or picklist fields. This eliminates the need for system-generated IDs for related records.
To understand what document metadata values need to be populated during a migration, review the structure of the Vault Data Model. This can be achieved by running the Vault Configuration Report or via the Document Metadata API.
Vault automatically assigns major and minor document version numbers. The major version starts at one and then increments each time a new steady state is reached. At that time the minor version resets to zero and then increments with each minor change. Some legacy systems allow users to manually assign their own version numbers. Other legacy systems start version numbers at zero instead of one. As a result, the version number from the legacy system may not match those for documents created in Vault.
To understand what document annotation metadata values need to be populated during a migration and to create annotations in bulk, see the Create Multiple Annotations endpoint. You cannot create line (line__sys) annotations with Vault API. Following the creation of their parent annotations, you must use the Add Annotation Replies endpoint to create annotation replies (reply__sys). Rather than a CSV, prepare input for these endpoints in the form of a JSON-formatted list of annotation objects.
When migrating document annotations, load annotation types in the following order:
anchor__sys)note__sys), document link (document_link__sys), external link (external_link__sys), and permalink (permalink_link__sys) annotations in the same API request.reply__sys)For Vault to Vault migrations, we advise populating annotation external IDs (external_id__sys) in the format {document_version_id}_{annotation_id}. For migrations from external systems, utilize the MD5 checksum of the annotation in order to track data for your integration.
Lifecycle names and target states must be considered when mapping states. Source documents in “In” states (In Review, In Approval, etc.), other than In Progress, should not be migrated into Vault. Vault will not apply workflows to migrated documents.
Legacy Signature Pages must be in PDF format to be migrated into Vault.
Migrating legacy audit trails can significantly impact the time and performance of the migration, depending on the number of documents. The recommended process for migrating legacy audit trails is:
The audit trail can only log events that take place in Vault. You cannot insert external records into your Vault’s audit trail.
If you have an existing production Vault, you must assess which data needs to be staged in sandboxes. This is usually only reference data, but depending on the nature of the migration, you may also need to stage transactional data and files. Without staging, missing references may produce errors during the import of object records and documents.
Transactional data is created as a result of a transaction or represents data that doesn’t have a steady state and changes frequently. For example, new documents or object records are considered transactional data. In contrast, reference data is stable and can be governed by change controls that are not the result of a transaction or user event. This type of data is used in object reference fields and in the Vault configuration (e.g., entry criteria, user actions, entry actions). Reference data records may sometimes be created as a result of a transaction, in which case you can evaluate whether the project requires regular updates to these records. The reference data may vary between Vault application families and may contain customer-specific reference data as part of a customization.
We recommend customers use either Vault Loader or Certified Migration Partners to load data into Vault. These tools have been tested and certified as best practice.
However, if you develop your own migration tool using the Vault API, consider the following:
Vault Loader API endpoints or the Loader command line allow you to automate migration tasks. The Loader service handles processing, batching, error reporting, and is developed and tested by Veeva. Utilizing Vault Loader API endpoints or the Loader command line can greatly reduce the migration time.
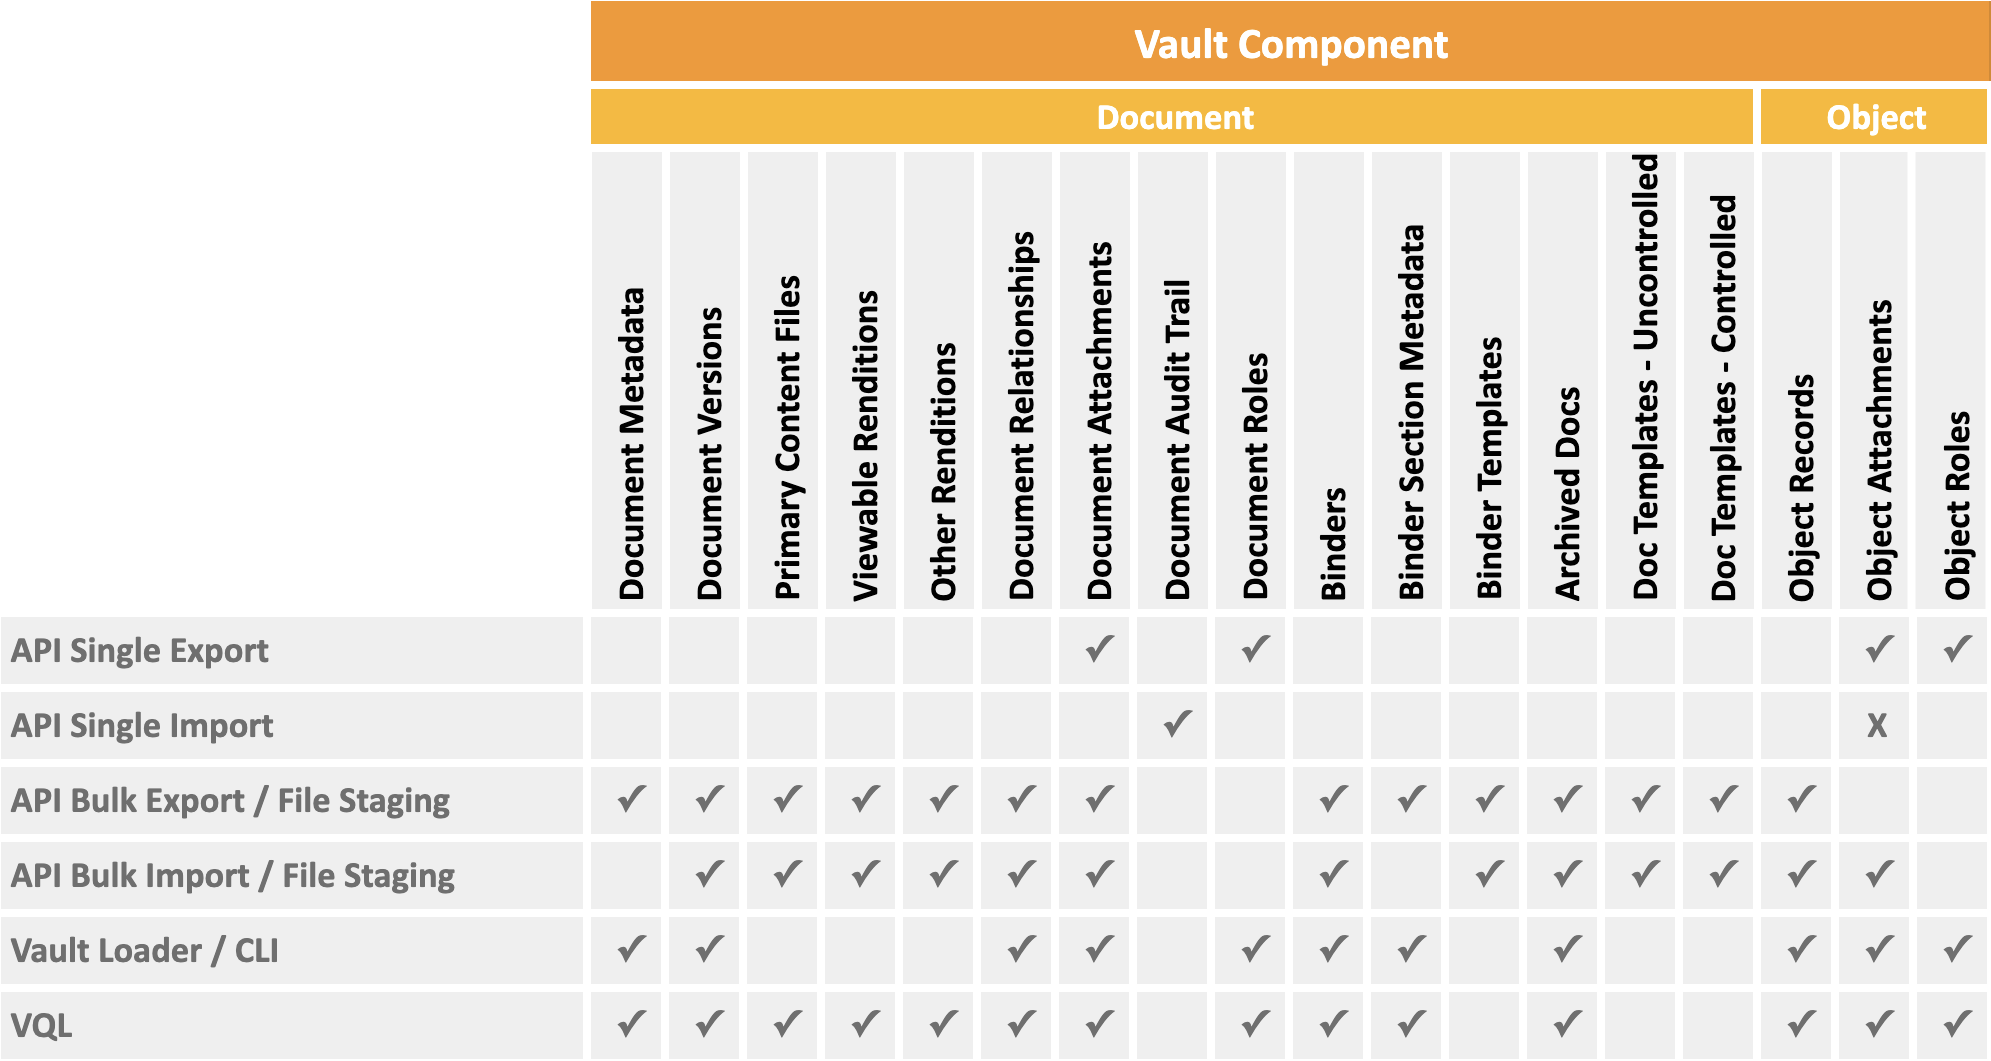
Migration should be performed using Bulk APIs for data loading and data verification. Bulk APIs allow you to create a large number of records or documents with a single API call. These APIs are designed for higher data throughput and will minimize the number of calls required. Refer to the table below to see which data types have Bulk APIs.
In any migrations that use Vault API, it’s recommended to set the Client ID. If any errors occur during the migration, Veeva will be better able to assist in troubleshooting.
When migrating data via Vault API, it’s important to consider API rate limits. If API rate limits are exceeded, integrations will be blocked from using the API. To mitigate exceeding limits, bulk versions of APIs should be used whenever possible. Migration programs should be written in such a way so that the limits are checked for each API call. If the burst or daily limit are within a 10% threshold of breaching, this is handled by either waiting until limits are available or stopping the migration process.
Consider creating a user specifically for performing migration activities so it’s clear the data creation and any related activities were done as part of the migration. Any record of a document that is created will clearly show that it was done as part of a migration.
FTPS should not be used for migrations, as it requires additional configuration, is slower, and puts your solution at risk.
Using FTPS requires additional firewall configuration, which is time-consuming and can be rejected by customer network teams. Vault PODs have a limit on the number of FTPS threads, and your migration can be at risk of being blocked by other legacy FTPS users. By contrast, the Vault API’s file staging endpoints support up to 10 threads. Additionally, the API Usage Logs include calls to these endpoints for better traceability and visibility.
Consider the impact on existing users when migrating data into a live Vault.
Migrations can often be a computing-intensive process. For large or complicated migrations, you should schedule migration activities during periods of low user activity such as evenings or weekends.
When enabled, Configuration Mode prevents non-Admin users from logging into Vault. Use Configuration Mode if you need to prevent end-users from accessing Vault during a migration.
You can configure user access control to hide migrated data from existing users until the cutover is complete.
Migrating documents into Vault can be done using the Create Multiple Documents endpoint. An alternative is to use the Vault Loader Command Line Interface (CLI) or API by following the tutorial for Creating & Downloading Documents in Bulk.
When loading documents into Vault, first upload the files to Vault file staging. This includes the primary source files and document artifacts such as versions, renditions, and attachments. This should be done far in advance, as the upload can take time. After the preloading of the files is completed, you can use Vault Loader or one of the bulk APIs for documents to process the files and create documents in Vault.
In order to streamline dry runs, validation testing, and production deployment, we recommend uploading files to a Vault that you do not plan to refresh for the duration of the migration. This Vault is usually the environment where validation activities take place. Vault Owners and System Administrators can use File Staging Linking to link a Vault’s file staging to a different Vault. For example, you can use File Staging Linking to link a production Vault to a sandbox Vault. This way, you can refresh the linked Vault without affecting its file staging. Learn more about File Staging Linking in Vault Help.
Document Migration Mode is a Vault setting which loosens some of the Vault constraints that are typically enforced to make the migration of data into Vault run more smoothly. To avoid email flooding during migrations, Vault does not send notifications in Document Migration Mode. Use the Create Multiple Documents or Load Data Objects endpoints to enable this setting using the API.
To use this setting, the migration user must have the Vault Owner Actions : Document Migration permission in their security profile’s permission set.
You should disable custom functionality (such as entry actions, custom Java SDK, or jobs), if required. Ensure reference values, such as Lists of Values (LOVS), exist and are active if referenced in migration data.
It can take time for documents to appear in Vault searches, renditions, or thumbnails once they have been migrated in. For large migrations, document indexing can take several hours. Account for ingestion delay when verifying the existence of migrated documents in Vault.
It is common to suppress document rendition generation or provide your own renditions for Vault migrations. If you choose not to suppress renditions, it will take a significant amount of time for Vault to process large quantities of renditions. See the Rendition Status page to monitor the progress of rendition jobs.
We do not recommend migrating documents from a legacy system into binders. This operation can be slow and complex to perform. Instead, we recommend reviewing the structure of the documents in the legacy system and utilizing filters on fields to achieve similar functionality in Vault.
After migrating documents, jobs run that provide notifications to users via email, such as periodic review or expiration. Users for each environment should be forewarned that this may occur. Some users may receive a large number of emails.
Migrate objects into Vault using the Create Object Records endpoint. An alternative is to use the Vault Loader Command Line Interface (CLI) or API by following the tutorial for Loading Object Records.
Record Migration Mode allows you to migrate object records in non-initial lifecycle states and set custom and system fields, including the record ID. To avoid email flooding during migrations, Vault does not send notifications in Record Migration Mode. Additionally, when using Record Migration Mode, you can set the No Triggers flag to bypass all system, standard, and custom Vault Java SDK triggers. Learn more about Record Migration Mode in Vault Help.
Use the Create Object Records or Load Data Objects endpoints to enable this setting using the API.
To use this setting, the migration user must have the Vault Owner Actions : Record Migration permission in their security profile’s permission set.
Record triggers execute custom Vault Java SDK code whenever a data operation on an object occurs. If custom functionality isn’t needed during the migration, disable the record triggers to prevent them from running. These can be re-enabled once the migration is complete.
Administer a sandbox Vault from the production (or validation) Vault and perform any custom configurations. This is typically done in conjunction with an implementation. At this stage, you can determine the structure of the environment into which the data will be migrated.
Reference data, such as picklists and Vault objects are included with the sandbox, but you will need to load other reference data that your migration depends on. Use Test Data packages to create packages of reference data.
Perform a dry run migration to test the migration logic, data, and approximate timings. It’s not necessary to dry run full data volumes. Logic and timings can be validated using smaller datasets. If the migration fails, correct the issues in the development environment before migrating to the test environment.
Once data has been migrated into Vault, verify the data is as expected. This involves a number of different checks, such as:
Several complications can occur when populating Vault metadata. Consider the following best practices to transform data before a migration.
CSV files used to create or update documents using Vault Loader must use UTF-8 encoding and conform to RFC4180.
Dates migrated into Vault must use the format YYYY-MM-DD.
Date/time conversion must use the Coordinated Universal Time (UTC) format YYYY-MM-DDTHH:MM:SS.sssZ, for example 2019-07-04T17:00:00.000Z. Hence it must end with the 000Z UTC expression, although the zeros can be any number. Ensure that date/time fields map to the correct day. This may be different depending on the time zone.
If Vault metadata is case-sensitive, convert it to match the expected format.
Metadata must not contain special characters, for example, tabs and smart quotes. These special characters can be lost when migrating data into Vault.
Saving Excel files in CSV format for use with Vault Loader can corrupt the file in an undetectable manner. If the file becomes corrupt, your load will fail. Failure logs contain a record of each row that has failed and are accessible by email or Vault notification. Correct the CSV files to continue loading.
If the data being migrated is multilingual, ensure your Vault is configured to support different languages.
When mapping multi-value fields, values with commas can be entered through quoting and escaping. For example, “veeva,,vault“ is equivalent to “veeva,vault“.
Data formatting can differ per environment. For instance, a line separator behaves differently when being from Windows™ or a MacOS™.
Format Yes/No fields as true or false when migrating using the API. This doesn’t apply to Vault Loader, as it handles boolean values regardless of case.
Remove any trailing spaces from metadata. These are commonly found after commas.
Migrate numbers in String fields as String values to preserve leading zeros and prevent their conversion to integers.
On documents or object records where Name is not unique or is system-managed, set the External ID (external_id__v or external_id__c) to relate it to the original ID used in the legacy system. Additionally, this field helps distinguish between records in success and failure logs.
Values in Long Text fields must not exceed the maximum length configured in Vault. Vault Loader does not truncate these values.
Documents and objects can reference users (user__sys) and persons (person__sys) records. These records must be active in order to be referenced. If referencing people who have left the company or had a name change, reference a person record as it does not have to be linked to a Vault user account. User name and person name are not unique, therefore, external IDs must be referenced for these objects.
Many object records have relationships with other records. For example, the Study Site object has a field called study_country__v of data type Parent Object which links it to the Study Country object. If you create a new Study Site record using Vault Loader or the API and happen to know the ID for the desired Study Country record,you can populate it. However, these IDs will change based on the Vault environment. Use a lookup table to obtain the Vault record IDs from the name__v or external_id__v fields. An alternative is to use an object lookup field in the form study_country__vr.name__v = 'United States'.
This section provides best practices on migrating Safety data into Vault. The general best practices and data transformation considerations covered in Vault Migrations apply to all application families.
The primary use case for a Safety Migration is a Legacy Migration. This involves migrating Safety Cases from a legacy system to Vault. This commonly includes migrating the most recent versions of Cases, but may include migrating previous versions as well.
Safety Migration Configuration is a feature that allows a designated user to migrate safety data into Vault via ETL Vault Loader or API, while ensuring performance and data integrity. This also allows Cases to be migrated into a live Vault without altering the migrated data by applying Case processing automation (such as calculations or record auto-creations).
Safety Migration User will be used consistently in this article, and it will always refer to the user selected as the Migration user in the Safety Migration Configuration.
Safety Migration Configuration bypasses most triggers and actions available only for the designated Safety Migration User. Only a small subset of key triggers continue to execute, required for creating object records. This improves the performance of loading in Safety Cases. See the list of Bypassed Auto-Calculations for more information.
If the user attempts to execute a trigger that is not allowed during migration, the following error message appears:
You do not have permission to modify {0} records. Contact your administrator if changes are required.
To enable the Safety Migration Configuration feature, create and change the lifecycle state to Active for the Safety Migration Configuration (safety_migration_configuration__v) record and assign it to a Safety Migration User.
Because the Safety Migration Configuration is not shown in Business Admin by default, you can create a record using one of the following methods:
https://{vault_dns}/ui/#object/safety_migration_configuration__vSafety Migration Configuration records contain the following fields.
| Name | Description | Type |
|---|---|---|
name__v | The system automatically generates a name for the record. | System managed |
user__sys | (Required) Select the User record that corresponds to the migration user. | (unique) Object reference to user__sys object |
enabled__v | To activate this configuration and allow this user to bypass triggers for migration, set to Yes. | Yes/No |
safety_migration_configuration__v) records: enabled__v field to NoVeeva Safety product triggers are bypassed by default when they are triggered by the Safety Migration User.
Additional code needs to be written for custom triggers to have the same behavior. Failure to do so will result in major performance issues during migrations.
The following code snippet illustrates how to bypass a trigger in migration mode:
@RecordTriggerInfo(object = "case_version__v", events = {RecordEvent.BEFORE_INSERT, RecordEvent.BEFORE_UPDATE})
public class SampleTrigger implements RecordTrigger {
    @Override
    public void execute(RecordTriggerContext recordTriggerContext) {
        final QueryService queryService = ServiceLocator.locate(QueryService.class);

        // Get the current user ID from the context
        final RequestContext context = RequestContext.get();
        final String currentUserId = context.getCurrentUserId();

        // Query safety migration configuration for enabled users
        final String queryMigrationUsers = "SELECT user__v FROM safety_migration_configuration__v WHERE enabled__v='true'";
        final QueryResponse queryResponse = queryService.query(queryMigrationUsers);
        final boolean isMigrationUser = queryResponse.streamResults()
                .anyMatch(queryResult -> Objects.equals(currentUserId, queryResult.getValue("user__v", ValueType.STRING)));

        if (isMigrationUser) {
            return;
        }

        // Perform remaining trigger logic
    }
}
The following Auto-Calculations do not calculate when using a Safety Migration Configuration.
_idate__v) to Normalized Dates (_date__v)This section provides best practices for migrating clinical study data into Vault. The general best practices and data transformation considerations covered in Vault Migrations apply to all application families.
The primary use case for a Clinical Study migration is an Incremental Migration. This commonly involves having one set of studies and then going live with a second set of studies. In this case, you must migrate additional data to accommodate the second set of studies.
Study Migration Mode helps load studies faster and reduces downtime during migrations. We recommend using Study Migration Mode for all CTMS migrations, particularly when handling large volumes of object data. Study Migration Mode is intended to be additive with Record Migration Mode. Learn more about Record Migration Mode in Vault Help.
When a Study enters Study Migration Mode, Vault makes study-related object data for that study hidden and uneditable for non-Admin users. This locks down target studies that are being migrated while allowing users to update documents and input data for the remaining studies. See the list of objects with the Migration field for more information.
Study Migration Mode also bypasses productized triggers for the target studies, such as calculating metrics and generating related records.
Certain jobs exclude studies that are In Migration from processing.
Standard Vault to Vault Connections exclude studies that are In Migration. Vault to Vault Connection jobs continue to process updated records that were bypassed while the study was being migrated.
If your study uses an object lifecycle, Admins in your Vault must configure user actions that mark a study as In Migration. Learn more about status and archiving studies in Vault Help.
You can enable Study Migration Mode for Study records using the following methods:
study_migration__v field with the value m__v.study_migration__v with the value m__v for all existing Study object records and related clinical object records that are within the scope of the migration. To enable Study Migration Mode for multiple studies in a single operation, use Vault API.Consider the following when conducting a Clinical Study migration:
study_migration__v field populated) from all users except Vault Owners, System Admins, and users with the Application: All Object Records: All Object Read permission.When Study Migration Mode is enabled, Vault also bypasses the Clinical App SDK by default.
You must write additional code for a custom SDK to have the same behavior as the Clinical App SDK. Because Study Migration Mode is controlled by the study_migration__v field on a record, you should update the custom SDK to read this field and check if a study is in Study Migration Mode.
The following objects have a study_migration__v field available for use in a Clinical Study migration:
budget__vcdx_agreement__vcentral_monitoring_event__ctmsclinical_user_task__clincrm_activity__vctn__vctn_data__vctn_data_change_log__vctn_ip_name__vctn_remarks__vctn_site_ip__vcycle_time__vedl__vedl_item__vedl_item_template__venrollment_status__ctmsfee__vfee_schedule__vfee_schedule_template__vfee_template__vform_answer__vicf_site_effective_tracking__ctmsinformed_consent_tracking__ctmsmetrics__ctmsmetrics_over_time__vmilestone__vmilestone_package_document__vmonitored_informed_consent_form__ctmsmonitored_metrics__ctmsmonitored_subject__ctmsmonitored_subject_event__ctmsmonitored_subject_visit__vmonitoring_compliance__ctmsmonitoring_event__ctmsmonitoring_schedule__vmonitoring_schedule_template__vpayable_item__vpayee_override__vpayment__vpdv__ctmsprocedure__vprocedure_def__vquality_issue__vresponse__ctmsreview_comment__vsafety_distribution__vselected_site__ctmssite__vsite_fee__vsite_fee_def__vsite_sae_tracking__ctmssite_checklist__syssite_checklist_pal__vsite_section__sysstudy_arm__vstudy_cohort__vstudy_communication_log__ctmsstudy_country__vstudy_critical_data__vstudy_critical_process__vstudy_organization__vstudy_person__clinstudy_product__vstudy_risk__vstudy_risk_assessment__vstudy_risk_category__vstudy_risk_mitigation__vstudy_site_location__ctmssubject__clinsubject_informed_consent_form__vteam_assignment__vtrip_report_question_response__ctmstrip_report_template__ctmsvisit__vvisit_def__vThis article provides best practices for migrating Quality data into Vault. The general best practices and data transformation considerations covered in Vault Migrations apply to all application families.
Quality migrations may be necessary for the following applications:
The primary use case for a QualityDocs Migration is a Legacy Migration. QualityDocs migration commonly involves migrating document versions, renditions, signature pages, audit trails, and document relationships. This guide covers the most common aspects of migrating data into QualityDocs.
We recommend cleansing the data if possible, by deduplicating documents in the source system and normalizing field picklist values on documents to a standard list. For example:
The migration approach can vary greatly depending on the size of the migration and other factors. Avoid migrating in-flight processes, such as document change controls (DCCs). The following sections provide additional considerations and recommendations when migrating content to QualityDocs.
When migrating version-specific document relationships, you must specify the versions. To obtain information for existing relationships, send a request to the Retrieve Document Relationships endpoint.
You can migrate legacy signature pages by importing them as renditions. Before migrating legacy signature pages, enable the Disable Vault Overlays setting to prevent Vault from automatically generating an overlay on the first document version. After migrating the legacy signature pages, disable this setting for later versions to allow Vault to manage signature pages and overlays.
Depending on the number of documents in migration, the time it takes to generate renditions can affect time and performance. To improve performance, you can suppress renditions when creating documents until a user views the document from the UI.
When updating previous document versions, you cannot update lifecycle states using Vault API, which may increase the time and complexity of the migration and require manual effort to remedy issues that occur. For example, if a previous document version was migrated to Vault in the wrong lifecycle state, you must delete and reupload the previous versions.
We do not recommend migrating document change controls (DCCs). If you must migrate DCCs, you can migrate them to Vault in a steady state, such as Initial or Final.
You can migrate document change requests (DCRs) that are not yet implemented, but implemented DCRs may not function properly since the associated DCC does not exist in Vault.
Documents in the legacy system may be midway through a period review (PR) cycle. When migrating these documents, consider the legacy PR period when setting the next PR date on the migrated document.
The primary use case for a Training Migration is a Legacy Migration. Training migration usually involves migrating Training Matrices and Training Assignments.
Vault Training has many standard automated processes which cannot be customized. These automated processes should not affect most migration projects from legacy systems but should be considered when evaluating expected outcomes after the migration.
For the duration of the migration, inactivate the update_training_assignment__v job definition to prevent Vault from issuing incorrect assignments. When the migration is complete, you should reactivate the job. Observe what happens on the first job run following the migration to confirm that Vault is issuing Training Assignments as expected.
When migrating a training matrix from a legacy system, you should not attempt to adopt it as is. Before migration, you should conduct a mapping exercise to convert the legacy matrix to the Vault Training Matrix Model, which consists of Learner Roles, Curricula, and Training Requirements.
A thorough understanding of the Training Matrix is necessary, especially when preparing Training Requirements for migration since the Training Matrix drives the automation that creates Training Assignments.
If any part of the legacy training matrix migration is incorrect, we recommend deleting the part that is incorrect and migrating it from the beginning. Attempting to remediate bad data after migration to Vault can create unintended complications.
We recommend migrating one (1) document per training requirement. This provides a simpler configuration, with one (1) signature per training requirement. If a training requirement requires sequencing or prerequisites, implement Curriculum Sequencing and Prerequisites. If additional documents must be associated with a training requirement, most use cases are covered using Supplemental Materials.
Training Requirements have a set of metadata and related objects that tell Vault how to treat Recurrence, Initial Assignment Date, Prerequisites, and other fields. While these fields may be optional, you should consider setting their values during the migration process to save time for Training Administrators after the records have been created.
Most Vault Training migrations also include document migration into QualityDocs. Ensure all the documents are present in the system before migrating Vault Document Training Requirements and their related Content Sets. These Content Sets are also used when migrating Training Assignments.
We recommend only migrating the latest version of completed Training Assignments. We don’t recommend migrating previous versions of completed assignments; however, you should prepare a report of this data from the legacy system and save it externally for compliance reasons. We do not recommend migrating open Training Assignments since Vault assigns them when the Training Matrix goes live.
When importing completed Training Assignments, ensure that Vault does not assign them again to users. You can achieve this by mapping Training Assignments to the correct Training Requirements. Additionally, you should map Vault Document Training Assignments to the correct Content Sets.
Vault uses a combination of field values on related objects associated with the Training Assignments to determine whether a new training must be assigned:
Within the Quality suite, it is a common use case to migrate documents from legacy systems, and there may be use cases where you must migrate records to Veeva QMS.
When migrating QMS records, consider how long they need to be retained. QMS migrations often involve migrating records with a lifetime of several months or longer, such as Change Controls. There is less commercial justification for migrating records with a lifetime of less than a few months, such as CAPAs, as they are usually closed in the legacy system and archived. We do not recommend migrating closed records.
To ensure a smooth migration, we recommend closing old in-flight records before data extraction.
Closed records are records that are not actively being worked on. They might need to be migrated into Vault because the source system is being decommissioned, or they may be required for reporting purposes. We do not recommend migrating these types of records into Vault. If you must migrate closed records, we recommend using the legacy data model for QMS. These legacy objects provide a standardized framework allowing organizations to import legacy data uniformly.
Open records are in the previous source system and must be migrated before they are closed. Typically, you would load these records into the implemented Vault Quality data model. You can only migrate open records into a lifecycle state that allows for a workflow to be started.
Along with migrating open records, it may be necessary to migrate Quality Team assignments. If this is a requirement for your migration, please contact Veeva Support to enable the feature. Learn more about Quality Teams in Vault Help.
The following guides provide best practices for migrating Veeva RIM data into Vault. RIM migrations vary depending on which Veeva RIM application or combination of applications are affected. In each instance, the primary use case for a RIM Migration is a legacy migration. For all applications, there is a common element of both reference data and documents which gets migrated, in addition to application-specific elements. The general best practices and data transformation considerations for Vault migrations apply to all application families.
RIM migrations may be necessary for the following applications:
RIM contains a set of objects that customers may choose to migrate from a legacy system into Vault via ETL Vault Loader or Vault API, while ensuring performance and data integrity. These objects can be grouped into three distinct categories:
The reference product hierarchy data is typically not “owned” by RIM but consumed from other data sources within the organization, which can be populated either manually, via custom integrations or via migrations from legacy systems. Once in RIM, product hierarchy data can be synced to other Vault application families via Vault Connections. This data is a prerequisite for transactional application specific data and documents that reference them.
These product hierarchy objects consist of:
product__v)drug_product__v)product_detail__v)drug_substance__v)excipient__v)manufacturer__v)organization__rim)contact__rim)Like product hierarchy data, the reference study data is not typically owned by RIM, but consumed from other data sources within the organization, which can be populated either manually, via custom integrations, or for customers with Veeva Clinical Operations via the RIM-Clinical Operations Connection.
These objects consist of:
clinical_study__v)nonclinical_study__v)The application data objects are the transactional objects owned by the business, and are typically updated during their day-to-day operations. Application objects can either span across RIM applications or be application specific. These objects often reference product hierarchy or study data and are also typically referenced by application specific functionality and documentation.
These objects consist of:
application__v)submission__v)regulatory_objective__rim)commitment__rim)health_authority_question__rim)Veeva RIM contains a number of common document types you may choose to migrate in from a legacy system. You must upload each document and assign it to a particular document hierarchy (Type > Subtype > Classification) in Veeva RIM. These will vary by application.
For each document type it’s important to consider any fields that are mandatory as these must be populated during the migration. Certain document type fields are also object lookups that need to point to object data already within Vault. Therefore, you must populate the RIM object data first.
We recommend transforming and cleansing the document data prior to loading it, by deduping the data in the source system, deciding what doctype it maps to, and ensuring any mandatory set format fields (such as picklists or related objects) are correctly populated.
If document states were available in the legacy system these can be migrated too. You should not migrate documents that are currently in active states (such as In Review, In Approval).
Depending on the number of documents to migrate, the time it takes to generate renditions can affect time and performance. To improve performance, you can suppress renditions when creating documents until a user views the document in the Vault UI.
You should consider whether different versions or renditions of documents need to be included in the migration.
When updating previous document versions, you cannot update lifecycle states using Vault API. For example, if a previous document version was migrated to Vault in the wrong lifecycle state, you must delete and re-upload the previous versions.
Permissions should also be considered for migrated documents to ensure only the correct users can access the appropriate documents.
The primary use case for a Veeva Submissions migration is a legacy migration. A Submissions migration commonly involves migrating data, correspondence documents and source documents. This guide covers the most common aspects of migrating data and documents to a Submissions Vault.
The RIM product model offers some flexibility with the RIM objects that are typically populated, which are used by the application and any associated documents. For Veeva Submissions customers, these objects consist of the core product hierarchy, core study data, and application objects.
In addition, consider the following objects:
clinical_site__v)therapeutic_indication__v)Special consideration should be given when migrating into the objects Application, Regulatory Objective, Submission, and Health Authority Interaction.
Each Application record contains a superset of all information regarding a request made to a Health Authority for approval. This approval is necessary to market a product or conduct a trial in a particular country or region that falls under that Health Authority’s jurisdiction.
You should give special consideration when populating the following Application object fields:
After you have created an Application record, you should associate it with the other reference records by creating the appropriate Application detail records:
* These details are not necessary for Veeva Submissions, but are used for Registrations.
The usage of several Application detail objects is dependent on the Enable Application Relationships application setting. These detail records will be reused in future Regulatory Objectives and Submissions using the Submission Wizard. You should review and plan any relationships to prepare for the use of the Submission Wizard for Publishing.
Regulatory Objectives identify goals for active and future registration data, group submissions that were sent to the Health Authority to achieve similar goals, and track approval of these goals. These objectives are a prerequisite for Veeva Registrations and Active Dossier functionality and also support the automation of many activities across the Veeva RIM application family.
You should give special consideration when populating the following Regulatory Objective fields:
After you have created the Regulatory Objective record, you should associate it with the other reference records by creating the appropriate Regulatory Objective detail records:
* These details are not necessary for Veeva Submissions, but are used for Registrations.
These detail records are most important for the planned and in-progress Regulatory Objectives you plan to work with after the migration. You should populate the Application Source field on applicable detail records to reference their corresponding Application detail for the Submission Wizard to enforce control as intended.
Before creating Submission records, you should understand the relationship between the Submission Type and Application Type, as the Application Type value constrains the Submission Type values.
You should give special consideration when populating the following Submission fields:
After you have created the Submission record, you should associate it with the other reference records by creating the appropriate detail records. Without them, it would restrict the ability to correctly generate Submission Content Plans and prevent some of the wizards (specifically the Create Registrations wizard) from running. These Submission detail records are:
* These details are not necessary for Veeva Submissions, but are used for Registrations.
These detail records are most important for the planned and in-progress Submissions you plan to work with after the migration. You should populate the Application Source field on applicable detail records to reference their corresponding Application detail for the Submission Wizard to enforce control as intended.
For a customer with Veeva Publishing, ensure Submissions are migrated into the Planned state.
Typically, Submissions are migrated into the Planned state and are moved through the Submissions lifecycle as needed. This is most relevant when importing Submissions for archive. It will be necessary to fire off any entry actions as the records move through their states. Bulk actions can be used to move all or many submissions to the appropriate end states, such as Archived or HA Received.
State changes should take place after any submission archives are imported.
For Health Authority Interactions, we recommend creating records for the following objects to help drive searchability and reporting on previous questions and commitments:
After you have created the Health Authority Questions, Commitments, and Health Authority Meetings records you should associate them with the other reference records by creating the appropriate Health Authority Interaction detail records:
To migrate documents, you must review your particular submission documents and map them to the most appropriate Type > Subtype > Classification in Veeva RIM. For each document type, you have the option to associate it with existing object data by setting applicable object fields.
A Veeva Submissions Archive migration involves object data, correspondence source documents, receipts, and acknowledgements (where applicable). This guide covers the most common aspects of migrating data into a Submissions Archive Vault.
For Veeva Submissions Archive, there are certain core RIM objects used by the application which are typically populated either manually or through migration. The key objects to address are Application and Submissions objects.
Thereafter, the following object data should be considered as it enables filtering capabilities on the Submissions Archive Viewer, helping users find specific content faster:
In addition, when migrating to Veeva Submissions Archive you may consider the following:
The same considerations as with Submissions apply to Submissions Archive.
For Submission object records, ensure that the Dossier Format is populated. Dossier Format is a type of Veeva RIM Controlled Vocabulary, that facilitates constructing the Source File Path visible in Submissions Archive Viewer.
For example, the Dossier Format: eCTD has a parameter: {application__v.folder_name__v}/{submission__v.xml_submission_id__v}
When eCTD is specified on the Submission record and a submission is imported to Veeva Submissions Archive, Vault uses the Application Folder Name on the parent Application record and the Sequence ID from the parent Submission record to build the first and second level folders of the content in Submissions Archive Viewer.
Ensure that all Submission records have an Actual Submission Date that is not a date in the future. The Submissions Archive import cannot proceed if the Actual Submission Date is a future date respective to the date the import is occurring.
Object migration is required prior to any Veeva Submissions Archive data migration, as the application requires Application and Submission records to be able to import a sequence.
Veeva Submissions Archive compiles information about each import into a Vault notification sent to the import-initiating user. The content in this Vault notification is concurrently added to the parent Submission record as a record attachment file named Submissions Archive Import Results-{UUID}.csv, where {UUID} is a unique identifier string generated by Vault.
Review the informational and warning messages in the email notification and the import results CSV to determine if corrective action is required. Learn more about errors, limits, and warnings when importing Submissions.
Consider if there will be a blackout period of the source system, where no further Veeva Submissions Archive content will be loaded to the source. You should determine a plan for migrating any differences between the source and target system.
Import the initial Submission for each Application first. Import by Actual Submission Date, from oldest to newest.
When importing Japanese eCTD submissions, submissions must be imported sequentially.
The primary use case for a Veeva Registrations migration is a legacy migration. A Registrations migration commonly involves migrating data, correspondence documents, and source documents. This guide covers the most common aspects of migrating data to a Registrations Vault.
The Veeva RIM product model offers some flexibility with how data is modeled.There are certain reference objects that are used by the application and any associated document. For Registrations customers, these objects consist of the reference product hierarchy and application objects.
You should give special consideration when migrating Packaging, Registration, Activity, Health Authority Interaction and IDMP/xEVMPD records.
You should review the relationship between Packaging and Product and Product Variant records. A US-based application utilizes the Product Variant, whereas EU applications under the centralized procedure pull Packaging records related to Product Variants or Complex Products.
After creating the Registration record, you should associate it with the other reference records by creating the appropriate detail records:
Registered details can be created and updated via a wizard. This is either from the Create Registrations wizard on the Application or the Manage Registered Details wizard on the Regulatory Objective.
You must create Activity records after creating their related Events.
See the Registration-specific Application considerations.
See the Registration-specific Regulatory Objective considerations.
See the Registration-specific Submission considerations.
If implementing IDMP, you must populate additional metadata and objects.
Depending on what functionality is already live and volume of data needed for migration, you must consider whether IDMP Accelerators should be enabled before or after migration.
You should import labelling documents prior to xEVMPD and IDMP go-live.
Health Authority Interactions are typically implemented as part of the Submissions implementation.
The primary use case for a Veeva Publishing migration is a legacy migration. Rather than migrating directly into Veeva Publishing, Publishing data should be included in the Veeva Submissions Archive migration. This guide covers the most common aspects to consider regarding migrating data into a Publishing Vault.
The RIM product model offers some flexibility with how data is modelled or there are certain core RIM objects which are typically populated, which are used by the application and any associated document. For Veeva Publishing customers, these objects consist of the same core product hierarchy and application objects as when migrating Submissions data.
In addition, when using Veeva Publishing the following object should also be considered for Switzerland Submissions:
The same considerations as with Submissions apply to Submissions Publishing.
Certain metadata dictates how the submission is published, therefore it is necessary to populate the required fields. While not an exclusive list this includes elements such as:
If there are in-flight submissions, pay extra attention to missing or incorrect folder paths,file names, XML, and other fields on the CP and CPI templates.
We recommend completing in-flight submissions prior to publishing go-live. Consider recreating content plans once the Content Plan and Content Plans Items have been enriched.
Document types often change per release. If creating new Content Plan and Content Plans Items from the publishing templates, make sure the taxonomy in your Vault reflects the latest.
Ensure existing approved documents have Ready for Publishing set to Yes if they are ready for publishing.