
The Vault Java SDK is a powerful tool in the Vault Platform, allowing developers to extend Vault and deliver custom capabilities and experiences to Veeva customers. It provides a completely new experience in developing industry cloud applications, leveraging industry standard tools to develop and debug and integrating seamlessly with Vault in the cloud.
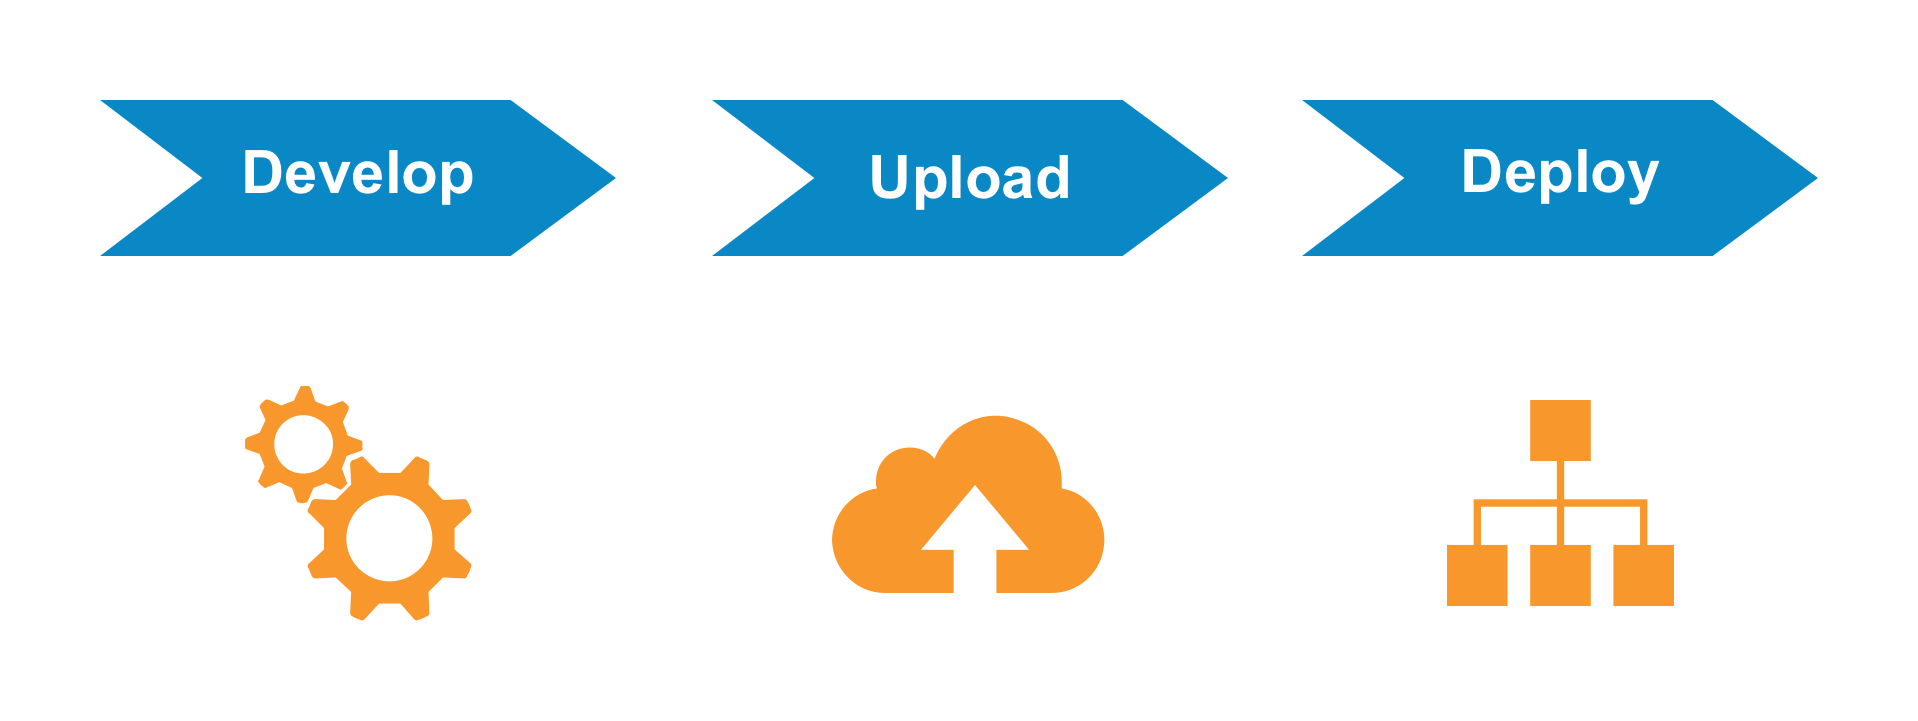
Develop: Developers can code in Java and debug using their favorite IDE by simply attaching to a Vault in the cloud. There is no need to learn a proprietary programming language or use unfamiliar development tools.
Upload: Developers or Vault Admins can easily upload source code to Vault with a familiar tool used in configuration migration. Source code is stored in Vault as metadata which is easily migrated from Sandbox to Production Vaults.
Deploy: Once the source code is uploaded, it is compiled and loaded in real-time. Custom logic is applied immediately. Developers and Admins can use the Debug Log to monitor and troubleshoot issues in the deployed code, and both the Admin UI and Vault API to manage deployed code. Learn more about deploying code to Vault.
The 22R2 release added the Run Custom Code as Java SDK Service Account setting to Admin > Settings > General Settings. If the Run Custom Code as Java SDK Service Account setting is enabled in your Vault:
The Java SDK Service Account user appears in the Users & Groups Admin tab in all Vaults but does not affect license counts.
In 22R2, this setting was off by default, but Admins could enable it from the General Settings page.
Default behavior for this setting will change as follows in upcoming releases:
Developers can use the Vault Java SDK to extend Vault by implementing custom code, such as triggers and actions.
INSERT, UPDATE, or DELETE) occurs on an object record. Developers can place custom logic BEFORE or AFTER the operation. Learn more about record triggers.
Record Actions: Execute custom code when a user invokes a user action on a record. Learn more about record actions.
Document Actions: Execute custom code when a user invokes a user action or when a document enters a certain lifecycle state. Learn more about document actions.
To develop with the Vault Java SDK, you need all of the tools for Java development, such as a Java Development Kit (JDK) and an Integrated Development Environment (IDE). You will also need a Vault to test your new Vault extensions before deploying them to production.
To get more help getting started, you can post or find an answer in the Vault for Developers community on Veeva Connect.
In this step, you will:
As the first step in the Getting Started, you need to configure your Vault with the provided SDK record trigger. Besides the custom code for the record trigger itself, the sample trigger runs on the vSDK Hello World object, which you must also add to your Vault. Instead of manually configuring your Vault, you will deploy a prepackaged set of components called a Configuration Migration Package, or VPK (.vpk). This VPK is included in the downloaded vSDK Hello World project, and you can import this into Vault in just a few clicks.
In the future, you can also use this VPK process to copy the configuration of your production environment and replicate it in your sandbox Vault. You can learn more about Configuration Migration Packages (VPKs) in Vault Help.
deploy-vpk/vsdk-helloworld-components.vpk file in your downloaded or cloned project folder. The import should take less than a minute to complete. Refresh the page to find the imported package.replace_all Vault Java SDK deployment option, which ensures your getting started environment will not have any conflicting configuration. You can learn more about replace_all and other Vault Java SDK deployment options in the SDK documentation. When the deployment is complete, you will receive a notification. Deployment should take less than 5 minutes.vsdk_hello_world__c) and vSDK Hello World Child (vsdk_hello_world_child__c) objects exist here, the VPK imported the Vault objects successfully! 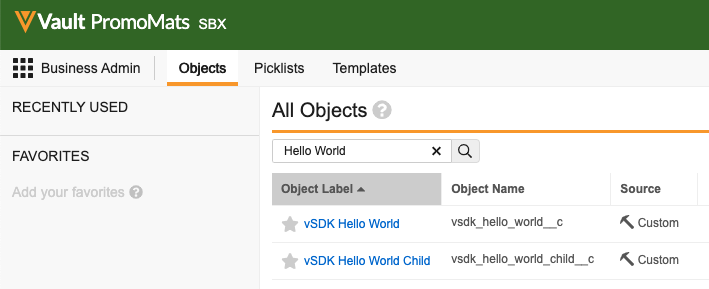
com.veeva.vault.custom.triggers.HelloWorld exists here. If the HelloWorld trigger exists, your Vault setup is complete! You can learn more about the information and options available on this page in Vault Help, such as how to download deployed code and how to turn deployed code on and off.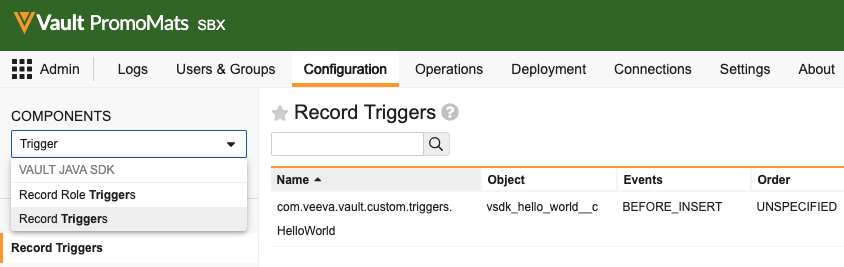
replace_all and other Vault Java SDK deployment options in the SDK documentationIn this step, you will:
The HelloWorld record trigger executes at the BEFORE_INSERT event on the vsdk_hello_world__c object. This means the trigger will execute custom code right before an object record is saved, and that this trigger only executes on vsdk_hello_world__c object records. All other objects would not trigger this record trigger.
When triggered, the custom code written for the HelloWorld trigger will set a value in the Description field on the triggering Vault object record.
To execute the HelloWorld record trigger:
BEFORE_INSERT event, which triggers the HelloWorld trigger to add a value to the Description field before the record is saved. Once the record is saved, you should see the Description field was set to “Hello, {name}!”. That’s your record trigger in action!In this step, you will:
Now that you’ve set up your Vault and executed a record trigger in the Vault UI, you can move on to writing your own custom code. To do this, let’s start with setting up your development environment.

Maven: com.veeva.vault.sdk.api:vault-sdk-api library is present in the External Libraries section. If this file is not present or the External Libraries section is empty, make sure you have access to the Internet and your browser can load repo.veevavault.com. You should also make sure your POM file is set up with the correct Vault SDK version. 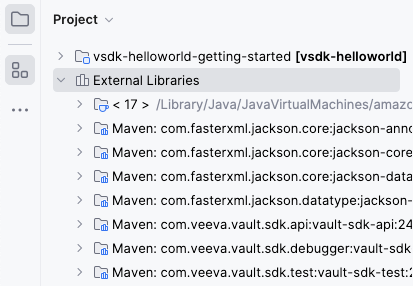
The Java SDK version in IntelliJ® must match the version you installed during the Prerequisites setup.
To set the Java SDK version in IntelliJ® to the required version:
The Java SDK library version must match the Vault version. You can update the version by editing the <vault.sdk.version> attribute in your POM file.
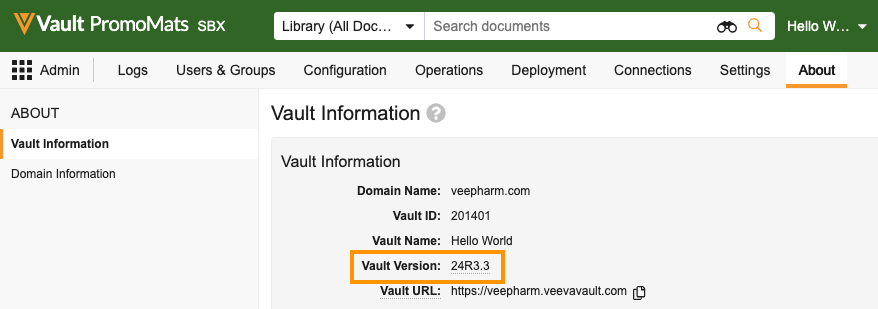
pom.xml file.Update the <vault.sdk.version> to your Vault version, using only periods (.) and not the letter R. For example, a Vault on version 24R3.3 should look like this:
<properties>
    <vault.sdk.version>[24.3.3-release0, 24.3.3-release1000000]</vault.sdk.version>
</properties>
If prompted, select Import Changes. You can also Enable Auto-Import to instruct Maven to automatically import any future changes.  In newer versions of IntelliJ®, you may need to import changes manually by right-clicking the
 pom.xml file and selecting Maven > Reload project.
In the External Libraries section of IntelliJ®, verify the Maven: com.veeva.vault.sdk.api:vault-sdk-api library shows your Vault version. If it does, your development setup is complete!
In this step, you will:
With the development environment set up, you can now modify the HelloWorld trigger in your IDE.
Right now, the HelloWorld trigger has custom logic on the BEFORE_INSERT event. In this step, you will add new custom code to trigger on the AFTER_INSERT event. We’ve already written most of this code for you, so you can focus on the structural updates needed to add code for a new event on an existing trigger.
Unlike the BEFORE_INSERT event which triggers right before the record saves, the AFTER_INSERT event triggers immediately after the record saves. When triggered, this new custom code creates a vsdk_hello_world_child__c record.
HelloWorld Java file, which is located in \src\main\java\com\veeva\vault\custom\triggers./*) on lines 35 and 74. This will uncomment lines 35 through 51, which is code for custom logic on the AFTER_INSERT event.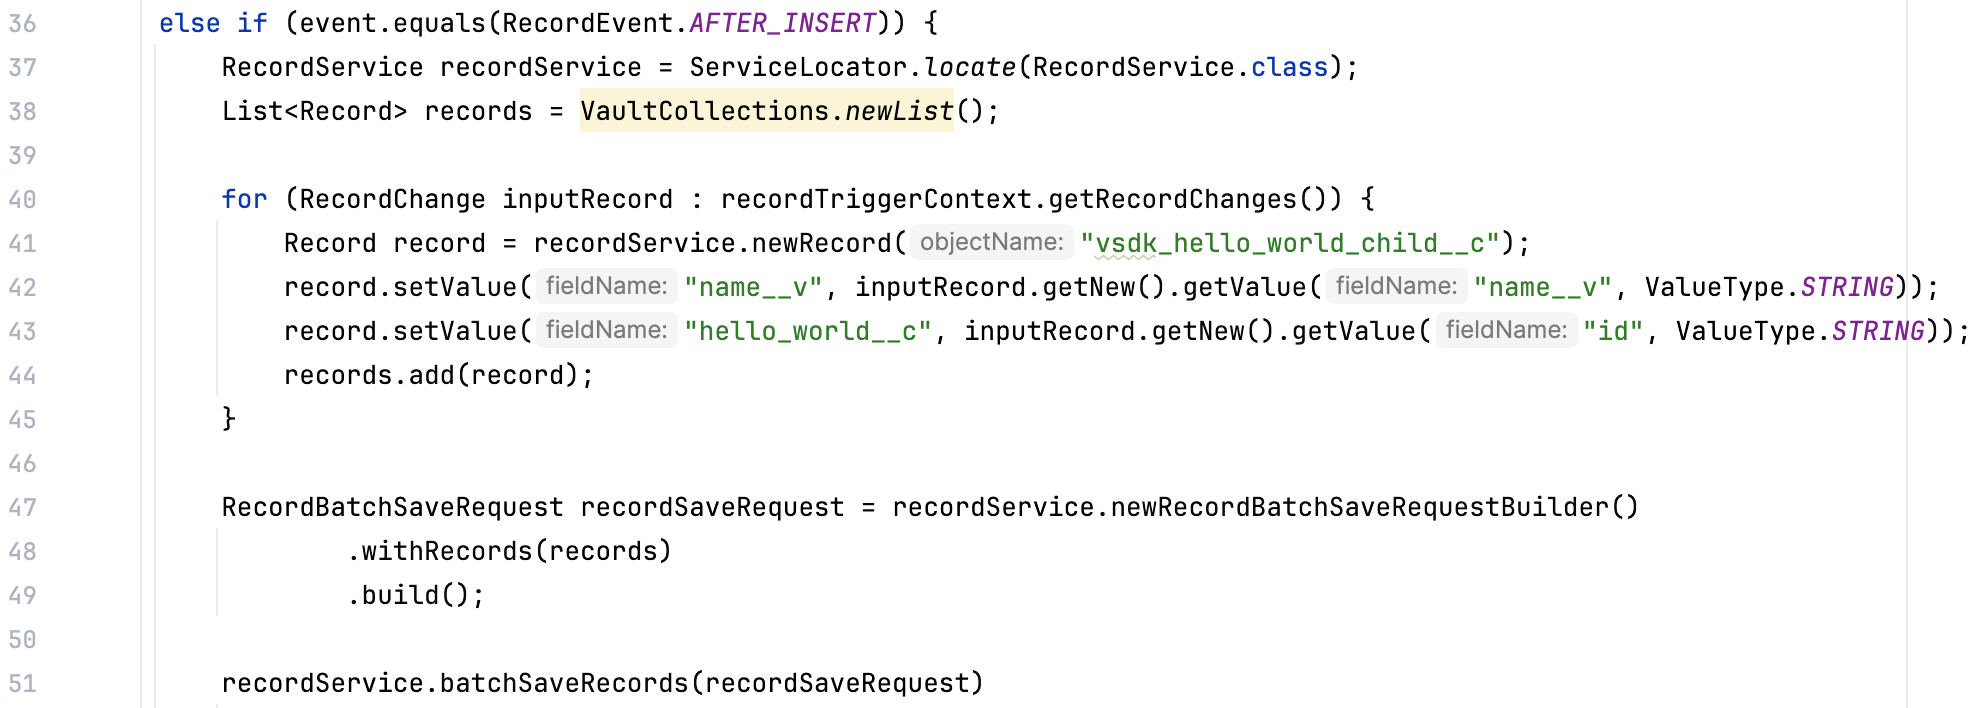
AFTER_INSERT code will run, you need to add this event to the record trigger annotation. You can do this by adding the event to the @RecordTriggerInfo annotation. In line 13, add RecordEvent.AFTER_INSERT to the event parameter in the annotation:
You’ve just written your first piece of SDK code, custom logic for an AFTER_INSERT event! In the next step, you will deploy these changes to your Vault.
@RecordTriggerInfo annotation and how this works together to build the anatomy of a record triggerBEFORE_INSERT orAFTER_INSERT eventIn this step, you will:
If you’re using IntelliJ®, Maven is already bundled with your installation. If you’re using another IDE, you may need to manually install Maven.
vsdk-helloworld-getting-started\src\main\resources and open plugin_settings_file.json.firstname.lastname@example.com with your Vault user name.vsdk-helloworld-getting-started\src\main\resources and open vapil_settings_file.json.vaultUsername, vaultPassword, and vaultDNS values with your login information.vaultjavasdk:package Maven goal. This creates the .vpk file which contains your code changes. 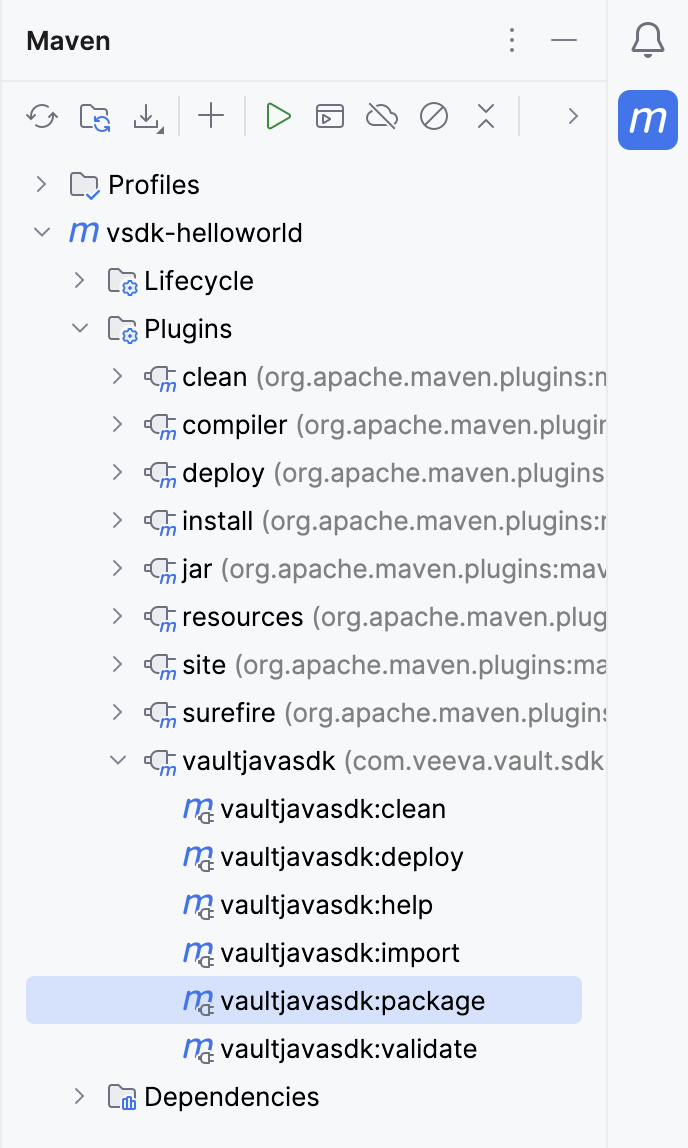
vaultpackage.xml file and a .vpk file. 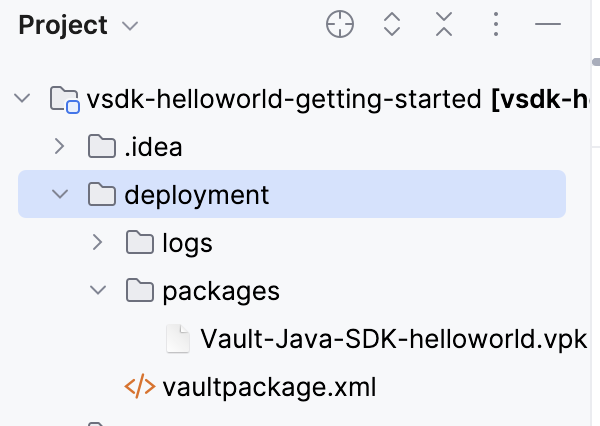
vaultjavasdk:deploy Maven goal from the Maven sidebar menu to deploy the .vpk to Vault. Deploying may take a minute. You will receive an email when Vault completes the deployment.Now that we’ve deployed the new trigger code for the AFTER_INSERT event, let’s run it again and make sure that the changes work as expected.
AFTER_INSERT event and we’re getting an error message! 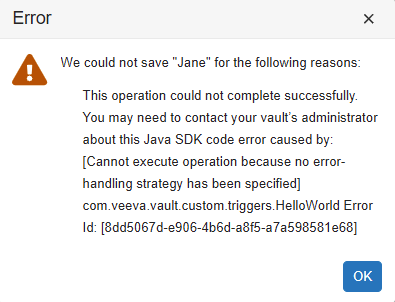
When saving records using Vault Java SDK, you must specify an error handling strategy. Because the AFTER_INSERT event is saving the record, writing code for this event requires an error handling strategy. You can learn more about error-handling and how to fix this error in the next tutorial: Using the Vault Java SDK Debugger.
Congratulations, you’ve finished the Getting Started!
To recap what we’ve learned, you now know how to:
In this tutorial, you will:
This tutorial builds from the Getting Started: Hello World! tutorial. In this tutorial, you will use the Vault Java SDK Debugger to fix the error generated in the getting started.
If you only need a quick-reference to connect to the debugger, you can skip to Debugger Setup.
This tutorial builds from the Getting Started: Hello World! tutorial. In this tutorial, you will use the Vault Java SDK Debugger to fix the error generated in the getting started.
If you only need a quick-reference to connect to the debugger, you can skip to Debugger Setup.
In this tutorial, you will:
In the Getting Started, the deployed code produced an error:
To fix this error, you must add an error-handling strategy. While error handling strategies are recommended for all SDK code, error-handling is required when saving records in Vault Java SDK. The current code in the AFTER_INSERT event creates a new record, which triggers a record save.
Our error-handling strategy will cover the following:
.onSuccesses), write a message to the Debug or Runtime logs.onErrors), throw a RollbackException and roll back the transactionWe’ve already written this code for you in the Hello World project, so all you need to do is remove the code comments.
To add the error-handing strategy to our existing trigger:
HelloWorld Java file.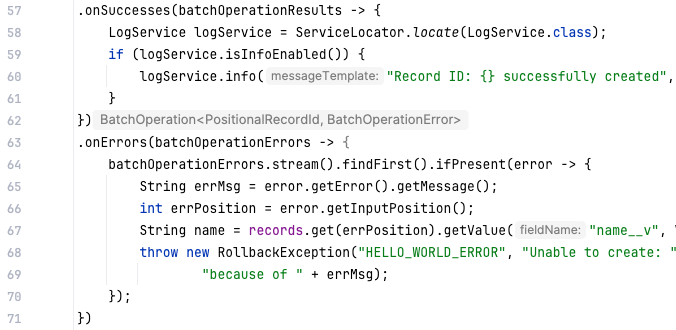
In this step, you will:
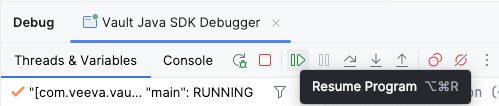
Before deploying the code changes, you may want to test it first through the Debugger. Once connected to your Vault, the Debugger allows you to run code locally on your machine without enabling the code for all users in your Vault. This allows you to test and troubleshoot code locally before deploying finished code.
You must have the standard Vault Owner security profile. Learn more in related permissions.
To set up the debugger:
Main Class: com.veeva.vault.sdk.debugger.SdkDebugger. The SDK Debugger Main Class should auto-complete as you begin to type. If it does not autocomplete, or if your IDE cannot recognize this Main Class, you may have completed a previous step incorrectly.
Program Arguments:
-h {host name}: The host name of your Vault. For example, myvault.veevavault.com. You should not include https://.-u {user name}: Your Vault user name, which you use to log in.-p {password}: Your Vault password.-s {sessionId}: You can choose to authenticate using other tools, such as a browser or PostmanTM, and provide an authenticated sessionId in this switch instead of providing -u and -p.-?: Display debugger help and exit.
If your connection to the debugger is successful, you will see a console message stating Welcome to the Vault Java SDK Debugger and additional information such as your user, host, and debugger version.
You may encounter the following errors when running the debugger:
Your Vault Java SDK library version does not match the Vault version [XX.X.X]. Update your Java SDK library version to match the vault.: Update the <vault.sdk.version> in your pom.xml file to match the Vault version. If the error persists after verifying you’ve completed the steps correctly, you may need to reference our more extensive POM Setup section.Your debugger Java version does not match the vault Java version [17]: Set the IntelliJ® Java SDK version to 17.A Request Profiler session is already in progress for this vault: You must wait for the profiler session to finish before you can attach the debugger. Learn more about the SDK Request Profiler.Instead of running the code, you can place breakpoints and debug the Vault extension class line by line.


event variable is assigned a value of BEFORE_INSERT. The code will now step through the BEFORE_INSERT section of code logic. 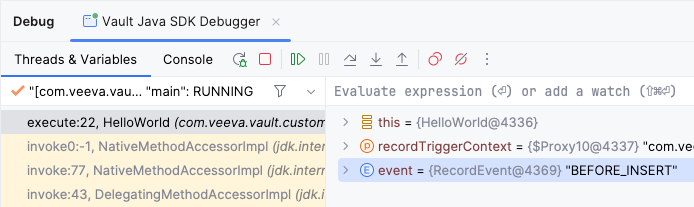
event variable is now assigned a value of AFTER_INSERT. The code will now step through the AFTER_INSERT section of code logic.Now that you’ve debugged the code locally and confirmed that the trigger is working as expected, you need to deploy the code to Vault so that the custom code executes for all users. Then, you will run the code one more time in Vault to verify that the deployment succeeded and your code changes work as expected.
To deploy code to Vault with the Maven plugin:
vaultjavasdk:package Maven goal. The deployment folder will be updated with a new .vpk file with your code changes.vaultjavasdk:deploy Maven goal from the Maven sidebar menu to deploy the code to Vault. You will receive an email when Vault completes the deployment.To run our newly deployed trigger code in Vault:
Congratulations, you’ve completed the Vault Java SDK Debugger Tutorial!
To develop code, you need to have a Maven project. You need to make sure your POM file is set up correctly, and your src folder is under the javasdk folder.
The artifacts (.jars) for the Vault Java SDK are distributed by a Maven Repository Manager. This allows you to easily download the Vault Java SDK and all its dependent libraries by simply setting up a Maven project pointing to the Maven Repo Manager in the pom.xml file.
This file has three sections you may need to edit:
<properties><repositories><dependencies>The <vault.sdk.version> in your POM file must match the version of the Vault you are developing on. Note that when developing on limited release Vaults, the Vault Java SDK feature set is Beta and subject to change.
When Vault is upgraded to a new release or if you’re switching between Vaults during development, the <vault.sdk.version> element in the properties section must be updated accordingly to reimport the correct version of the Vault Java SDK from the repository.
You can find your Vault version in Admin > Settings > General Settings. You don’t need to worry about your Vault’s build number.
The <vault.sdk.version> must be in the following format:
[{vault_version}-release0, {vault_version}-release1000000]
{vault_version}: Your Vault version, using only periods (.) and not the letter R.For example, a Vault on version 18R3.0 should look like this:
<properties>
    <vault.sdk.version>[18.3.0-release0, 18.3.0-release1000000]</vault.sdk.version>
</properties>
Your <repositories> section should look like this:
<repositories>
    <repository>
        <id>veevavault</id>
        <url>https://repo.veevavault.com/maven</url>
        <releases>
            <enabled>true</enabled>
            <updatePolicy>always</updatePolicy>
        </releases>
    </repository>
</repositories>
This dependency will pull the Vault Java SDK and all the libraries it depends on from the repository, and allows you to connect to the debugger.
Your <dependencies> section should look like this:
<dependencies>
    <dependency>
        <groupId>com.veeva.vault.sdk</groupId>
        <artifactId>vault-sdk</artifactId>
        <version>${vault.sdk.version}</version>
    </dependency>
    <dependency>
        <groupId>com.veeva.vault.sdk.debugger</groupId>
        <artifactId>vault-sdk-debugger</artifactId>
        <version>${vault.sdk.version}</version>
    </dependency>
</dependencies>
To use the QualityOne SDK, you must add an additional dependency:
    <dependency>
        <groupId>com.veeva.vault.app.qualityone.publicapi</groupId>
        <artifactId>qualityone-publicapi</artifactId>
        <version>${vault.sdk.version}</version>
    </dependency>
Developing Vault Extensions means writing your own implementation of specific Vault extension interfaces, such as RecordTrigger or RecordAction. For example, a record trigger must implement the RecordTrigger interface and annotate the class with the @RecordTriggerInfo to provide deployment information.
The following is a skeleton code example of a trigger class implementation:
package com.veeva.vault.custom.triggers;

import com.veeva.vault.sdk.api.data.RecordTriggerInfo;
import com.veeva.vault.sdk.api.data.RecordTrigger;
import com.veeva.vault.sdk.api.data.RecordEvent;
import com.veeva.vault.sdk.api.data.RecordTriggerContext;
import com.veeva.vault.sdk.api.data.RecordChange;


@RecordTriggerInfo(object = "object_name__c", events = {RecordEvent.BEFORE_INSERT})
public class ObjectTrigger implements RecordTrigger {

    public void execute(RecordTriggerContext recordTriggerContext) {

        // process each input record.
        for (RecordChange recordChange : recordTriggerContext.getRecordChanges()) {
       }
    }
}
Generally, a Vault extension’s implementation uses services provided by the Vault Java SDK. With these services, you can apply custom business logic such as retrieving and performing data operations according to business requirements.
Learn more about services.
While developing Vault extensions is essentially programming in Java, there are some language and JDK restrictions to ensure your code runs securely in Vault.
You should observe the following general guidelines when developing Vault extensions:
RollbackException for exception handlingVault Java SDK does not allow instantiation of traditional Java collection classes to create maps, lists, or sets. Instead, you must use the methods provided by the VaultCollections interface. Once you create a collection, you can use all allowlisted methods from the JDK Map, List, and Set interfaces.
Restrictions are checked during validation, which happens when you deploy code to Vault from a VPK. For example, if your code uses a third-party library or non-allowlisted class, it will not pass validation and deployment will fail. We recommend validating your code often during the development process to catch issues early.
You can do this with the Validate Package endpoint.
POST /api/{version}/services/package/actions/validate
To use this endpoint, you must create a Vault Package File (VPK) as input.
You can view, download, delete, enable or disable deployed extensions in the Admin UI, located in Admin > Configuration > VAULT JAVA SDK. Learn more about the Admin UI in Vault Help.
When testing Vault code locally through the debugger, the code is only active locally while the debugger is running. To make the code run for all users in your Vault, you must deploy it.
To deploy code, a Vault Admin must enable configuration packages in your Vault. Learn how to enable configuration packages in Vault Help.
Deploy code in three steps:
With this deploy method, you can accomplish any of the following:
If you need other deploy options, such as deploying or deleting a single file in the target Vault, see Managing Deployed Code. However, deploying a single file rather than a VPK is considered bad practice and should be used sparingly.
Note that your Vault user must have the correct permissions to deploy code. See the related permissions table for more information.
You can also create, validate, import, and deploy a VPK using the Vault Java SDK Maven Plugin.
Before you can create your VPK, you must verify that your source code is in the proper file structure and prepare a valid vaultpackage.xml manifest file. This manifest file tells Vault whether you’re adding, replacing, or removing code.
Create a VPK by zipping your javasdk folder and the vaultpackage.xml manifest file and renaming it with the .vpk extension. For more detailed instructions, see Getting Started.
Your file structure must adhere to the following guidelines:
javasdk folder in a maven project directory hierarchy as follows: src.main.java.com.veeva.vault.customcustom. For example, custom.triggers or custom.actions..java source files or 50MB of data in a single deploy. If you have more than 1,000 source files or a VPK larger than 50MB, the entire deploy will fail.Your manifest file must be named vaultpackage.xml and must be located in the root of your file structure.
Example vaultpackage.xml:
<vaultpackage xmlns="https://veevavault.com/">
  <name>PKG-DEPLOY</name>
  <source>
    <vault></vault>
    <author>mmurray@veepharm.com</author>
  </source>
  <summary>PromoMats RecordTrigger</summary>
  <description>Record trigger on the Product object for PromoMats.</description>
  <javasdk>
    <deployment_option>incremental</deployment_option>
  </javasdk>
</vaultpackage>
All of the following attributes must appear in the manifest file. Attributes marked as Optional must still be included, but can be left with a blank value.
| Attribute | Description |
|---|---|
<vaultpackage> | Top-level attribute to hold all other attributes. Must include xmlns="https://veevavault.com/". |
<name> | A name which identifies this package. |
<source> | A top-level attribute to hold the following sub-attributes:
|
<summary> | Provide more information about this package. Appears in the Summary section of Admin > Deployment > Inbound Packages. |
<javasdk> | A top-level attribute to hold the <deployment_option> sub-attribute. This tells Vault how to deploy your package in Vaut. Valid values are:
|
<description> | Optional: A description of your package. If omitted, the description will appear blank in Admin > Deployment > Inbound Packages. |
incremental: Add new or update existing code in the target Vault. This will never delete source files from the target Vault, but it may overwrite existing files.replace_all: Completely delete all existing source code in the target Vault and replace it with the code in this VPK. This may permanently delete source files from the target Vault.delete_all: Delete all of the existing source files in the target Vault. This setting only works if the VPK contains an empty javasdk folder, or if no such folder is included.After creating the VPK, you need to import this VPK to your Vault. This does not deploy the code, it just adds the VPK containing the code to your Vault. The following instructions import the VPK using Vault API, but you can also import through the Vault UI.
With the Import Package endpoint, import your code.
PUT /api/{version}/services/package
The body of your request must include the VPK created in the previous step.
On SUCCESS, the response contains an id for the vaultPackage. You will need this ID to deploy the package through the API.
After importing your VPK, you need to deploy it. This is the final step which makes your Vault extension run for all users. The following instructions deploy the VPK using Vault API, but you can also deploy through the Vault UI. We recommend using the UI, which has a multi-step wizard that ensures validation.
Deploy your package with the Deploy Package endpoint.
POST /api/{version}/vobject/vault_package__v/{package_id}/actions/deploy
You can find the package_id URI Path Parameter in the API response from your import request. If you lost this ID, you can also find it in Admin > Deployment > Inbound Packages.
When you run the deploy endpoint, Vault first validates the VPK. If you have any validation errors, such as using non-allowlisted classes, deployment will fail. To avoid this, we recommend validating your package frequently throughout the development process.
After successful deployment, you can view deployed extensions in the Admin UI, located in Admin > Configuration > VAULT JAVA SDK. Learn more about the Admin UI in Vault Help.
If the deployment encounters any errors, Vault stops the deployment but does not roll back any changes it already made. We recommend downloading and checking the log file for details. Learn more about deployment errors in Vault Help.
Deploying VPKs are not the only way to manage your custom code. You can view, download, delete, enable or disable deployed extensions in the Admin UI, located in Admin > Configuration > VAULT JAVA SDK. Learn more about the Admin UI in Vault Help.
You also may need more granular deploy options. For example, you may need to delete a single file rather than all files. However, we do not recommend using the following single-file deploy methods as you may introduce or delete code which breaks existing deployed code. As a best practice, you should always use VPKs to manage code deployment.
When deployed, extensions are automatically enabled. You may wish to disable an extension if you are troubleshooting a bug, or loading data into a Vault and do not want a trigger to execute. You can easily enable and disable extensions through the Admin UI, or you can use Vault API. Users must have the Admin: Configuration: Vault Java SDK: Create and Edit and permissions to enable or disable code.
PUT /api/{version}/code/{FQCN}/{enable || disable}
You can only enable and disable entry-point classes, such as triggers and actions. You cannot disable UDCs, or Vault extensions which reference other code components.
You can retrieve the source code for a single file through the Admin UI, or through Vault API. Users must have the Admin: Configuration: Vault Java SDK: Read permission to download source code.
GET /api/{version}/code/{FQCN}
You may need to add or replace a single file rather than a whole VPK. However, we do not recommend using the following single-file deploy method as you may introduce or delete code which breaks existing deployed code. As a best practice, you should always use VPKs to manage code deployment.
The following endpoint adds or replaces a single .java file in the currently authenticated Vault. If the given file does not already exist in the Vault, it is added. If the file does already exist, the file is updated.
PUT /api/{version}/code
Users must have the Admin: Configuration: Vault Java SDK: Create and Edit and permissions to use this endpoint.
In some cases, you may need to delete a single file rather than replace all or delete all files. However, we do not recommend using the following single-file deploy method as you may introduce or delete code which breaks existing deployed code. As a best practice, you should always use VPKs to manage code deployment.
Code deletion is permanent. There is no way to retrieve a deleted code file. Vault does not allow deletion of a file which is currently in-use.
You can delete a single source file through the Admin UI, or through Vault API.
DELETE /api/{version}/code
Users must have the Admin: Configuration: Vault Java SDK: Create and Edit and permission to delete code with this endpoint.
With Vault Java SDK, developers can create custom triggers which execute custom business logic whenever a specific data operation “triggers” them to run in Vault. For example, users manipulate data in Veeva applications in the Vault UI or with Vault API to create, update, and delete data. When these operations occur, Vault Java SDK provides interfaces to interact with data directly BEFORE and AFTER the data operation occurs.
This event-driven programming model allows developers to write small programs that address common business requirements which standard application configurations cannot address.
Vault supports triggers on the following types of data:
Record triggers are a Vault Java SDK entry point which executes custom business logic whenever a data operation makes changes to an object record. Users manipulate data in Veeva applications by using the UI or API to Insert, Update, and Delete records. When these operations occur, the Vault Java SDK provides interfaces to interact with the record data before and after the data operations. Using the Java SDK, users can apply custom business logic in event handlers for BEFORE and AFTER events.
This event-driven programming model allows developers to write small programs that target a specific object and event to address common business requirements which standard application configurations cannot address.
The following are some typical uses for triggers by event type:
Field Value Defaults: Default field values before creating a record.
Field Value Validations: Validate field values before saving or deleting a record.
Conditionally Required Fields: Make a field required by canceling the save operation if some condition is not met.
Create, Update, or Delete Related Records: Create, update, or delete other records after saving or deleting a record.
Start Workflow: Start a workflow after creating or updating a record.
Change State: Change the lifecycle state of a record.
To help understand how record triggers work, let’s examine a typical Save new record operation initiated by a user and walk through what a trigger does.
When the user clicks the Save button, the system captures the object, such as product__v, and event, such as BEFORE_INSERT, which looks up a registry for triggers on the given object and event and executes them in order. The system passes the data entered by the user to the trigger during trigger execution.
BEFORE_INSERT trigger logic can interact with the current record to:
QueryService to find related records by executing Vault Query Service (VQL) to return a set of related records.After saving the record, the system executes the AFTER_INSERT triggers for the same object.
AFTER_INSERT trigger logic can interact with the current record to:
RecordService to create related/child records (Create Related Records).JobService to start a workflow on the newly created record (Start Workflow).JobService to change the state of the current record (Change State).Since the current record cannot change in the AFTER_INSERT event, most of the business logic in this event interacts with other records through RecordService or performs jobs on the current record that are executed asynchronously in a separate process. Learn more about the order of operations for object field defaults in Vault Help.
You can implement record triggers as normal Java classes. You can express complex business logic within a trigger class.
The code sample below explains the anatomy of a typical, basic trigger class. This example simply defaults a field value based on another field when creating a new record.

The explanations and line numbers below refer to the code sample above.
A custom record trigger must be under the com.veeva.vault.custom package. You can have further sub-package names as you see fit to organize your triggers. For example, you might use com.veeva.vault.custom.rim.submissions.triggers to indicate custom triggers for a RIM Submissions project.
Only references to Vault Java SDK (com.veeva.vault.sdk.api.*) and a limited number of allowlisted classes, interfaces, and methods in the JDK are allowed. For example, String, LocalDate, List, etc.
The class annotation (@RecordTriggerInfo) indicates that this class is a record trigger. The annotation specifies the Object, event(s), and Order of execution.
product__v. This specifies the object that the trigger code will execute on.{RecordEvent.BEFORE_INSERT, RecordEvent.BEFORE_UPDATE}. This specifies the event(s) that the trigger code will execute on.The class name declaration must include the public modifier and implements RecordTrigger. As a best practice, class name should indicate the object affected by this trigger and some functional description, for example, ProductFieldDefaults implements RecordTrigger means a trigger on Product that defaults some field values.
You must implement this method for the RecordTrigger interface. This method has an instance of RecordTriggerContext passed in, so you can interact with the record(s) on which a user has initiated some operation.
When a user performs a record operation whether by UI or API, such as creating a new record, the record being created is the context record. The operation may have multiple context records such as in a Bulk Create.
A list of records affected by the operation can be retrieved from RecordTriggerContext#getRecordChanges, and you can loop through each record to get field values and/or set field values. Your business logic is enclosed in this loop.
You can retrieve field values from the context record. Trigger code operates as the System user, so no record level or field level security apply. All records and fields are accessible.
For new records, only new values are available. For updating records, both old and new values are available. The fieldName argument must be a valid field name in the object. For example, name__v. The fieldType argument must match the Vault field type in order to return the appropriate Java data type. Use the Data Type Map to find out how data types are mapped to objects in Vault.
You can set field value on fields that are editable. System fields, such as created_by__v and state__v, and Lookup fields are not editable.
The fieldName argument must be a valid field name in the object. The fieldValue argument must be an object of the appropriate data type for the field in the fieldName argument. Use the Data Type Map to find out how data types are mapped to objects in Vault.
The Vaut Java SDK supports record triggers on the user__sys object. Users triggers work the same way as other record triggers, with some exceptions.
Most record triggers execute whenever a data operation makes changes to an object record. Unlike most record triggers, user triggers execute only when changes are made directly to the user__sys object record in a Vault. In other words, user triggers are not invoked by indirect updates.
For example, triggers on the user__sys object are not invoked in the following scenarios:
A record role trigger executes custom business logic whenever roles are directly (manually) added or removed from an object record.
Users can manage manual role assignment in the UI with object sharing settings or from a workflow using the add or remove role system step, through Vault API, or using the Vault Java SDK RecordRoleService. Each of these methods can activate an SDK record role trigger.
When these operations occur, the Vault Java SDK provides interfaces to interact with the record data, and the record role change before and after the record role change. Using the Java SDK, users can apply custom business logic in event handlers for BEFORE and AFTER Events.
This event-driven programming model allows developers to write small programs that target a specific object and Event to address common business requirements that standard application configurations cannot address.
The following examples illustrate typical uses for record role triggers by Event type:
It is common practice to enforce validation rules on role assignment. The BEFORE Event allows the code to execute validation logic before the role assignments (or un-assignments) apply.
You can implement record role triggers as normal Java classes. You can express complex business logic within a trigger class.
The code sample below explains the anatomy of a typical, basic trigger class.
package com.veeva.vault.custom.triggers.case3;
A custom record role trigger must be under the com.veeva.vault.custom package. You can have further sub-package names as you see fit to organize your triggers.
import com.veeva.vault.sdk.api.core.RollbackException;
Only references to Vault Java SDK (com.veeva.vault.sdk.api.*) and a limited number of allowlisted classes, interfaces, and methods in the JDK are allowed. For example, String, LocalDate, List, etc.
@RecordRoleTriggerInfo(object="product__v", events={RecordRoleEvent.BEFORE, RecordRoleEvent.AFTER},
    order=TriggerOrder.NUMBER_2)
The class annotation (@RecordRoleTriggerInfo) indicates that this class is a record trigger. The annotation specifies the Object, Event(s), and order of execution.
product__v. This specifies the object that the trigger code will execute on.{RecordRoleEvent.BEFORE, RecordRoleEvent.AFTER}. This specifies the Event(s) that the trigger code will execute on.public class CheckProductRole implements RecordRoleTrigger {
The class name declaration must include the public modifier and implements RecordRoleTrigger. As a best practice, class name should indicate the object affected by this trigger and some functional description, for example, CheckProductRole implements RecordRoleTrigger means a trigger on a Product that does validation on Role assignment.
public void execute(RecordRoleTriggerContext rroletc) {
        String ROLE_TO_READ = "owner__v";
You must implement this method for the RecordRoleTrigger interface. This method has an instance of RecordRoleTriggerContext passed in, so you can interact with the role record(s) on which a user has initiated some operation.
// Get Record Role changes
        RecordRoleEvent event = rroletc.getRecordRoleEvent();
Get the record role Event from the RecordRoleTriggerContext. This trigger executes on both BEFORE and AFTER events, checking the context allows the code to check in which Event the code is executed.
List<RecordRoleChange> rrchanges = rroletc.getRecordRoleChanges();
The RecordRoleChanges() method return a list of RecordRoleChange. A recordRoleChange captures all changes done on the record role:
// Get RecordRoleChange details

            RecordRole rrole = rrchange.getRecordRole();
A recordRoleChange provides a method getRecordRole() returning the current recordRole that is being changed. In a BEFORE Event, the recordRole exposes the role assigned before the change. In an AFTER Event, the recordRole exposes the role assignments after the change.
Doctype triggers are a Vault Java SDK entry point which executes custom business logic whenever a document or document version is created, updated, or deleted. When these operations occur, Vault Java SDK provides interfaces to interact with document version data BEFORE and AFTER the data operation occurs.
This event-driven programming model allows developers to write small programs to address common business requirements which standard application configurations cannot address. For example, your organization can use doctype triggers to populate and clear field values, create related records, start SDK jobs and workflows, or perform complex validation logic.
These triggers are called doctype triggers because they are scoped to a specific Doctype, although these triggers can be scoped to all documents by using the base_document__v doctype.
Before developing document type triggers, you should be familiar with the following:
Defining when a doctype trigger fires in Vault involves three key elements:
document_type__c. If set to the Base document type (base_document__v), this trigger will fire for all documents. Only one document type can be specified per trigger.BEFORE_INSERT, AFTER_INSERT, BEFORE_UPDATE, AFTER_UPDATE, BEFORE_DELETE, or AFTER_DELETE.DOCUMENT_VERSION level or the DOCUMENT level. Each doctype trigger can only fire at one event level, and some Vault operations trigger both events. For example, creating a new document is both a document-level event and a document version event.With a few exceptions, all changes to a document’s content or metadata fire doctype triggers. These events are classified as either document version events or document-level events.
Doctype triggers do not fire on updates to:
The following sample code is a doctype trigger that prevents a document’s Name (name__v) from starting with a lowercase letter.
This trigger fires on BEFORE_UPDATE, which means whenever an existing document is updated, this trigger fires right before the document saves and checks if the name__v field starts with a lowercase letter. If it does, this trigger throws an error and prevents the save of the document.
@DocumentTypeTriggerInfo(
        documentType = "base_document__v",
        events = {DocumentVersionEvent.BEFORE_UPDATE, BEFORE_INSERT},
        level = DocumentVersionEventLevel.DOCUMENT_VERSION)
public class PreventLowerCase implements DocumentTypeTrigger {

    public void execute(DocumentTypeTriggerContext context) {
        LogService logService = ServiceLocator.locate(LogService.class);

        //get the document field metadata for name__v, to use in error messages
        DocumentMetadataService documentMetadataService = ServiceLocator.locate(DocumentMetadataService.class);
        DocumentField nameField = documentMetadataService.getField("name__v");

        for (DocumentVersionChange documentVersionChange : context.getDocumentVersionChanges()) {
            DocumentVersion documentVersion = documentVersionChange.getNew();

            //if the title starts with a lowercase character, set a row-level error (other document updates are not failed)
            String title = documentVersion.getValue("name__v", ValueType.STRING);
            if (title != null && !title.isEmpty() && Character.isLowerCase(title.charAt(0))) {
                documentVersionChange.setError("OPERATION_NOT_ALLOWED", nameField.getLabel() +  " cannot start with a lowercase character");

                if (logService.isErrorEnabled()) {
                    logService.error("Blocked document save on [{}] due to starting with a lowercase character", title);
                }
            }
        }
    }
}
Find more examples of doctype triggers in our sample code.
Doctype trigger event levels determine if a trigger fires when data operations occur at the document version level or the document level. The majority of operations in Vault are executed against document versions, but there are some operations that are performed at the document level.
Each doctype trigger can only fire at one event level, either:
Data operations that fire doctype triggers fire either DOCUMENT_VERSION or DOCUMENT scoped triggers, not both, with one exception: The only operation that can fire both a DOCUMENT and DOCUMENT_VERSION level trigger is if the API or SDK is used to delete a specific document version, and that version is the last remaining version. This will fire both the DOCUMENT and DOCUMENT_VERSION level triggers.
Doctype triggers scoped to DOCUMENT_VERSION only fire on a specific version of a document, which occur any time data on a document version changes or any time a document is upversioned. In Vault, documents are versioned much like software versioning. Document versions are in the format {major_version}.{minor_version}. For example, creating a new document starts at version 0.1. There is no version 0.0. Learn more about document versioning in Vault Help.
When creating a new draft version of an existing document, Vault increments the version number by 0.1. For example, if a document is version 1.0, the new draft is version 1.1. This is a document versioning event.
Some data change operations on a document which do not cause upversioning may be considered a document-level event, and do not fire triggers which are scoped to DOCUMENT_VERSION.
Doctype triggers scoped to DOCUMENT only fire on events that affect an entire document, rather than a specific document version. The majority of operations in Vault are executed against document versions, but there are some operations that are performed at the document level.
For example, the following operations are considered document-level events:
Not all document-level events fire triggers. Specifically, because UPDATE doctype triggers can only update the latest version of a document, document-level events which update a document do not fire triggers. In other words, all UPDATE triggers only fire on DOCUMENT_VERSION events and not on DOCUMENT events. Document-level events which update a document do not fire triggers.
For example, archiving a document in the Vault UI is considered a document-level event, but this does not fire DOCUMENT triggers. However, updating the archive__v field of a document version would fire DOCUMENT_VERSION triggers scoped to an UPDATE event.
Similarly, document check in and check out is considered a document-level event, but this does not fire DOCUMENT triggers. However, if checking in a document results in a new document version, this would fire DOCUMENT_VERSION triggers scoped to an INSERT event.
Doctype trigger events specify the type of data change that causes this trigger fire. For example, triggers can fire before or after create, update, and delete events. Create events are called INSERT in Vault Java SDK.
Available doctype trigger events:
BEFORE_INSERTAFTER_INSERTBEFORE_UPDATEAFTER_UPDATEBEFORE_DELETEAFTER_DELETEWhen reading about events in documentation, a BEFORE event refers to any event which includes BEFORE, for example, BEFORE_INSERT, BEFORE_UPDATE, and BEFORE_DELETE. Similarly, an UPDATE event refers to any event which includes UPDATE, for example, both BEFORE_UPDATE and AFTER_UPDATE.
Certain information about a document is only available to get or set during certain events. For example, you cannot set document metadata during a DELETE event, and you cannot get data during an INSERT event. Understanding data availability can help you pick the right event for your custom logic.
INSERT events are create events, and fire whenever a new document or document version is created. For example, uploading a new version of an existing document.
UPDATE doctype triggers occur whenever data on the same document version changes.
A change to a document that causes a new document version is considered an INSERT event, not an UPDATE event. For example, uploading a new version of an existing document is an INSERT event, while updating the archive__v field on an existing document version is an UPDATE event.
DELETE doctype triggers fire on delete events, either deleting an entire document or deleting a single version. When an entire document is deleted, Vault fires DOCUMENT triggers, but does not fire triggers for every subsequent deleted version.
If a user deletes a document version, Vault fires DELETE triggers scoped to DOCUMENT_VERSION. If that version is the last remaining version for the document, this instructs Vault to delete the entire document, which also fires DELETE triggers scoped to DOCUMENT.
Custom code in Vault executes as the Java SDK Service Account, which has Vault Owner-level access. Vault extension code, such as triggers and actions, can access object records with full read/write permission. This means any Vault user level, record level, or field level access restrictions do not apply. Custom code can copy or move data from object to object and delete data without regards to who the user is. It’s the developer’s responsibility to take that current user context into consideration and apply control where appropriate.
Data security should be considered when designing solutions using the Vault Java SDK.
Because the Java SDK Service Account has Vault Owner-level access, SDK code cannot directly edit fields that a Vault Owner could not edit.
For example, the following component fields on documents cannot be directly edited by a Vault Owner or with Vault Java SDK:
major_version__v and minor_version__v: Instead of editing these fields directly, these fields only change during a document versioning event.status__v: Instead of editing this field directly, you must move the document through its document lifecycle. Vault Java SDK does not support Document Migration Mode.type__v, subtype__v, classification__v, lifecycle__v: Instead of editing these fields directly, you must reclassify the document.When processing a request, the System performs the following sequence of steps:
BEFORE Action Triggers.BEFORE triggers.AFTER Action Triggers.AFTER triggers.The data available in BEFORE and AFTER event triggers depends on the operations (INSERT, UPDATE, and DELETE). For example, in an INSERT operation, you cannot get old or existing values because a new record is being inserted. Similarly, setting a field value only makes sense in the BEFORE event in INSERT and UPDATE operations. It doesn’t make sense to set field value after it has been persisted or in a DELETE operation. The following chart illustrates when you can get or set field values.
| event | Record returned by getNew() | Record returned by getOld() | ||
|
| getValue | setValue | getValue | setValue |
| BEFORE_INSERT | X | X | ||
| AFTER_INSERT | X | |||
| BEFORE_UPDATE | X | X | X | |
| AFTER_UPDATE | X | X | ||
| BEFORE_DELETE | X | |||
| AFTER_DELETE | X | |||
As illustrated above, BEFORE triggers can change field values, but these values are not persisted to the database and not updated in the VQL index yet. In this case, using the QueryService to retrieve a record being modified by a trigger will only return the old (existing) values. In order to get the values set by a trigger inside a transaction, you must use the RecordService#readRecord method. However, this method generally uses more memory. It is only recommended when you need to get field values modified by multiple triggers in a single transaction. Otherwise, we recommend QueryService to retrieve record data.
Because AFTER triggers happen after database updates and VQL indexing, you can use QueryService to retrieve both old and new values.
Certain field types in Vault have values set by the System. For example:
In general, the System populates field values after the BEFORE event. Because these field values are set by the System, the changes are not reflected in the BEFORE event. For example, getNew() and getOld() will return the same existing value or null accordingly. However, the AFTER event will return the new value set by the System in getNew() and the existing value in getOld(). For example, when creating a new document, documents using document auto-naming will have a null value for name in BEFORE_INSERT events.
In addition, because System-initiated requests do not fire triggers, triggers will not fire when the System updates a System-populated field.
If your trigger updates a document reference field, you must set the Document Version Reference to Specific Version. Learn more in Vault Help.
When a user initiates a request (INSERT, UPDATE, or DELETE) such as clicking Save in UI or sending a POST with Vault API, the system processes the request by firing the BEFORE event triggers first, then committing data to the database, and then firing the AFTER event triggers.
BEFORE triggers are often used for defaulting field values and validating data entry, whereas AFTER event triggers are mostly used to automate creating other records or starting workflow processes.
A limit of 10 triggers are allowed in each event and the order of execution can be specified. That means BEFORE and AFTER events each have their own limit of 10 triggers allowed. In addition, when any given trigger executes, it can cause other triggers (nested triggers) to fire when it either performs a role a assignment or a data operation (INSERT, UPDATE, DELETE) programmatically. The nested trigger depth cannot exceed 10 levels deep.
To summarize, when a user initiates a request (for example, INSERT), the BEFORE event triggers (up to 10) will execute in order. If any of the triggers cause other triggers to fire, the nested triggers will execute (up to 10 nested levels). After the system finishes the BEFORE triggers, the data with any changes made by the executed triggers persists, and the AFTER event triggers will fire in the same manner with trigger order and nested depth. The image below illustrates this execution flow.
If you need to share data between different triggers or actions in the same transaction, you can do so with RequestContext.

Generally, triggers fire when a user initiates a request. When the System updates records, such as Lookup Field updates, triggers do not fire.
When working with record triggers, when the System performs a Hierarchical Copy (deep copy), the insert operation will not fire any triggers.
Similarly, when working with doctype triggers, when the System deletes all document versions as a result of deleting a single document, the delete operation fires one document-level delete event and does not fire additional triggers for each deleted document version.
The trigger execution flow described above represents a transaction. In some cases, it is necessary to cancel the entire INSERT request and rollback any changes. Developers can throw a RollbackException in any trigger in the transaction, and execution will terminate immediately and roll back all changes.
Note that calling RecordChange#setError or RecordRoleChange#setError will not terminate a transaction. Instead, the trigger which caused the error will fail and the rest of the transaction will continue. In order to terminate an entire transaction, you should always throw a RollbackException.
The system will also terminate execution and rollback a request when errors occur, such as missing required field value on INSERT or exceeding allowed elapsed time limit (100 seconds).
Calls to asynchronous services such as JobService or NotificationService will execute only when the request transaction completes. This way, you can use a RollbackException to stop the transaction if necessary, preventing asynchronous services from executing unintentionally when rolling back a transaction. For example, if a DELETE event trigger calls NotificationService to send a notification, but a nested trigger later rolls back the transaction, the system should not delete the record nor send the notification. This prevents the asynchronous notification process from executing erroneously. Once the entire transaction completes successfully, all queued asynchronous services execute immediately.
Triggers should be designed to process records in bulk, especially when making service calls, such as QueryService, RecordService and RecordRoleService. These services are designed to take a list of records or record role changes as input for CRUD operations. It is much more efficient to build a list of record for input and make a single call to these services rather than make service calls one record at a time inside a loop.
Triggers that do not process records in bulk will perform poorly, especially when there are multiple triggers (including nested triggers), execution will likely exceed the maximum elapsed time (100s) or CPU time (10s) allowed. In addition, queries that return large number of records with large number of fields (including fields not used in your code) will likely exceed the maximum memory allowed (40MB).
Generally, you should never run a query or perform CRUD operations on records in a loop. Each iteration will make unnecessary service calls which can be easily batched to get the same result with a single service call.
The following poorly performing code executes a query inside a “for” loop, for each Product record in a request. That means when a request has multiple records, like from an API call or bulk update wizard, the QueryService#query call is made for each of the records. The only difference between each query is the WHERE clause contains a different Country reference field value. Performing multiple queries in this case is inefficient and time consuming. A better approach is to make a single query with a CONTAINS clause for each Country referenced by the Product records in the request.
To make performance even worse, as each query is executed to retrieve related records, a forEach loop is used to call RecordService.batchSaveRecords to save each new Country Brand record one at a time. Creating, updating, and deleting records are the most expensive and time-consuming operations. You should always batch records up in a list as input when calling batchSaveRecords.
While the better performing code requires more lines of code as illustrated below, it performs much better because it reduces data operations significantly by leveraging the Vault Java SDK’s interfaces to process records in bulk.
@RecordTriggerInfo(object = "product__v", events = RecordEvent.AFTER_INSERT)
public class ProductCreateRelatedCountryBrand implements RecordTrigger {
    public void execute(RecordTriggerContext recordTriggerContext) {

        for (RecordChange inputRecord : recordTriggerContext.getRecordChanges()) {

            QueryService queryService = ServiceLocator.locate(QueryService.class);
            String queryCountry = "select id, name__v from country__v where region__c=" + "'" + region + "'";
            QueryResponse queryResponse = queryService.query(queryCountry);

                queryResponse.streamResults().forEach(queryResult -> {
                Record r = recordService.newRecord("country_brand__c");
                r.setValue("name__v", internalName + " (" + queryResult.getValue("name__v", ValueType.STRING) + ")");
                r.setValue("country__c",queryResult.getValue("id",ValueType.STRING));
                r.setValue("product__c",productId);

                RecordService recordService = ServiceLocator.locate(RecordService.class);
                recordService.batchSaveRecords(VaultCollections.asList(r)).rollbackOnErrors().execute();

            });
        }

}
@RecordTriggerInfo(object = "product__v", name= "product_create_related_country_brand__c", events = RecordEvent.AFTER_INSERT)
public class ProductCreateRelatedCountryBrand implements RecordTrigger  {

    public void execute(RecordTriggerContext recordTriggerContext) {

        // Get an instance of the Record service
        RecordService recordService = ServiceLocator.locate(RecordService.class);
        List<Record> recordList = VaultCollections.newList();

        // Retrieve Regions from all Product input records
        Set<String> regions = VaultCollections.newSet();
        recordTriggerContext.getRecordChanges().stream().forEach(recordChange -> {
            String regionId = recordChange.getNew().getValue("region__c", ValueType.STRING);
            regions.add("'" + regionId + "'");
        });
        String regionsToQuery = String.join (",",regions);

        // Query Country object to select countries for regions referenced by all Product input records
        QueryService queryService = ServiceLocator.locate(QueryService.class);
        String queryCountry = "select id, name__v, region__c " +
                "from country__v where region__c contains (" + regionsToQuery + ")";
        QueryResponse queryResponse = queryService.query(queryCountry);

        // Build a Map of Regions (key) and Countries (value) from the query result
        Map<String, List<QueryResult>> countriesInRegionMap = VaultCollections.newMap();
        queryResponse.streamResults().forEach(queryResult -> {
            String region = queryResult.getValue("region__c",ValueType.STRING);
            if (countriesInRegionMap.containsKey(region)) {
                List<QueryResult> countries = countriesInRegionMap.get(region);
                countries.add(queryResult);
                countriesInRegionMap.put(region,countries);
            } else
                countriesInRegionMap.putIfAbsent(region,VaultCollections.asList(queryResult));
        });

        // Go through each Product record, look up countries for the region assigned to the Product,
        // and create new Country Brand records for each country.
        for (RecordChange inputRecord : recordTriggerContext.getRecordChanges()) {

            String regionId = inputRecord.getNew().getValue("region__c", ValueType.STRING);
            String internalName = inputRecord.getNew().getValue("internal_name__c", ValueType.STRING);
            String productId = inputRecord.getNew().getValue("id", ValueType.STRING);

            Iterator<QueryResult> countries = countriesInRegionMap.get(regionId).iterator();

            while (countries.hasNext()){
                QueryResult country =countries.next();
                Record r = recordService.newRecord("country_brand__c");
                r.setValue("name__v", internalName + " (" + country.getValue("name__v", ValueType.STRING) + ")");
                r.setValue("country__c", country.getValue("id", ValueType.STRING));
                r.setValue("product__c", productId);
                recordList.add(r);
            }

        }

        // Save the new Country Brand records in bulk. Rollback the entire transaction when encountering errors.
        recordService.batchSaveRecords(recordList).rollbackOnErrors().execute();
    }
}
Through the Vault Java SDK, you can create custom actions. These actions execute through the UI or API when invoked by a user. Unlike triggers, uploading action code does not make it execute. Action code requires an additional step from developers or Vault Admins to configure an action in Vault to use the uploaded code. Learn more about custom actions in the Javadocs.
Custom actions for records, called record actions, are invoked by a user on one or more specific records from the UI or API. You can configure custom record actions as any of the following:
User Action: Custom actions for records, called record actions or record user actions, are invoked by a user on a specific record from the UI or API. Learn more about Object User Actions in Vault Help. Note that if your object has types, you may wish to add the action to these object types. Learn more about assigning user actions to object types in Vault Help.
User Bulk Action: Bulk actions allow users to make changes to up to 1,000 object records at once from the Vault UI. Bulk actions cannot be annotated as any other type of action. If a user updates more than 500 records with a custom bulk action, Vault splits the update into two separate SDK transactions: one containing the first 500 records and a second containing the remainder. If one transaction throws a RollbackException, it does not rollback the other transaction. Learn more about bulk object record actions in Vault Help.
Lifecycle User Action: Actions invoked by a user on a specific object lifecycle state, from the UI or API. You can configure these actions in the Object Lifecycle configuration. Learn more about Object Lifecycle User Actions in Vault Help.
Entry Action: Actions automatically invoked when an object record enters a particular lifecycle state. You can configure these actions in the Object Lifecycle configuration. Learn more about Object Record Entry Actions in Vault Help.
Event Action: Actions automatically invoked when a user creates an object record. You can configure these actions in the Object Lifecycle configuration. Learn more about Object Record Event Actions in Vault Help.
System Action Step: Actions automatically invoked when an object record enters a particular workflow step. You can configure these actions during workflow configuration. Learn more about configuring system steps on object workflows in Vault Help.
Workflow Cancellation: Actions automatically invoked when a workflow is cancelled. You can configure these actions during workflow configuration. Learn more about cancellation actions in Vault Help.
In order to implement a custom action, the RecordAction interface requires implementing the following two methods:
isExecutable(): Optional: Return true to make the configured action visible and executable, or false to make the configured action hidden and unexecutable. This method is often used to check the current record field values, Admin configured parameter values, and user’s group/role membership in order to return true or false. Defaults to true if the method is not explicitly implemented.execute(): Add your action logic in this method. Here you can make updates to the current record, create new records, or use any of the Vault Java SDK services to interact with other records or documents. As a best practice, you should create a user-defined service containing action logic, which you can then invoke in one or more record actions.The @RecordActionInfo class annotation is also required to indicate this class is an action.
label: Label of this action. This is the label which appears for Vault Admins during action configuration, and is different from the label provided to end-users who run this action.object: If specified, the action is available for the specified object only. If omitted, the action is available across all objects.usages: If specified, the action is available for configuring in the specified usages only. For example, USER_ACTION. If omitted, defaults to UNSPECIFIED which means the action is available everywhere actions are supported with the exception of bulk actions. If Vault adds a new record action usage in future releases, code with UNSPECIFIED usage immediately becomes available for the new usage.user_input_object_type: If your action takes a user input object, you may want to identify the object type using the object type name, for example, base__v. If omitted, it means this action does not require a type for user input. Actions which require user input may not require a type.user_input_object: If your action takes a user input, object identify the object by its name, for example, product__v. If omitted, it means this action does not require user input.icon: The icon which appears in the Vault UI Action Bar for this action. Learn more about action icons.If your action updates a document reference field, you must set the Document Version Reference to Specific Version. Learn more in Vault Help.
Optionally, a dialog can be shown in the UI before and after the action execution for a class that implements the RecordAction interface.
onPreExecute: This method allows a confirmation dialog to be displayed to the user prior to the execution of a record action. A custom dialog title and message can be added.
onPostExecute: This method allows a post record action execution banner to be displayed to the user. A custom banner message can be added.
Pre- and post-action dialogs execute as separate transactions. Learn more in the Javadocs.
The following is a basic skeleton of a record action:
package com.veeva.vault.custom.actions;

        @RecordActionInfo(label="Say Hello", object="hello_world__c", icon="create__sys", usages={Usage.USER_ACTION, Usage.WORKFLOW_STEP})
        public class Hello implements RecordAction {
            // This action is available for configuration in Vault Admin.
            public boolean isExecutable(RecordActionContext context) {
                return true;
            }
            public void execute(RecordActionContext context) {
              //action logic goes here
            }
        }
Record workflow actions are custom actions which execute on an object or document workflow. Document workflows are a type of object workflow which are configured on the envelope__sys object.
If you are unfamiliar with object or document workflows, you should learn more before coding a record workflow action:
You can configure a custom action for object workflows on any of the following steps:
WorkflowEvent Enum in the Javadocs.Once configured on a workflow step, the record workflow action is automatically invoked on all events for that workflow step during workflow execution.
You cannot start a workflow, create tasks, and cancel the new tasks in the same transaction. For example, you cannot start a workflow and then cancel all tasks in a TASK_AFTER_CREATE event.
A record workflow action is a Java class that implements the RecordWorkflowAction interface and has the @RecordWorkflowActionInfo annotation.
The RecordWorkflowAction interface must implement the execute() method. This is where you place the logic for your custom action. You can use any of the available Java SDK services to create logic for your action. For example:
WorkflowInstanceService: Update workflow participantsWorkflowTaskService: Cancel workflow tasksNotificationService: Send notifications to workflow participantsRecordService: Create related recordsJobService: Begin a related workflow. Note that you can only start workflows where the Participants control set to Use roles as participants.Unlike record actions or document actions, the RecordWorkflowAction interface does not include an isExecutable() method. This means all record workflow actions are available for configuration once deployed. If you want to enable or disable a deployed record workflow action, you can do so in the UI or through Vault API.
The @RecordWorkflowActionInfo annotation has the following elements:
label: Label of the action. This is the label which appears for Vault Admins when configuring this action.object: If specified, the action is only available for object workflows associated to the specified object. To make this action available for document workflows, set this to the envelope__sys object. If omitted, the action is available across all object and document workflows.stepTypes: The workflow step types that this action can be configured against.The following is a basic skeleton of a record workflow action:
package com.veeva.vault.custom.actions;

        @RecordWorkflowActionInfo(label="Custom Approver", stepTypes={WorkflowStepType.START})
        public class CustomApprover implements RecordWorkflowAction {
            public void execute(RecordWorkflowActionContext context) {
                //action logic goes here
            }
        }
Along with the standard document actions you can configure in the Vault UI, you can create custom document actions using the Vault Java SDK to automate more specific business processes. Unlike document actions created through the Vault UI, custom document actions can run multiple sequential actions within one action, and can execute more complex conditional logic.
You can configure the following types of custom document actions:
You can find examples of document actions in our Sample Code.
A document action is a Java class that implements the DocumentAction interface and has the @DocumentActionInfo annotation.
The DocumentAction interface requires implementing the following two methods:
isExecutable(): Optional: Return true to make the configured action visible and executable. For example, you could check the current document field values or a user’s role membership in order to determine if this method should return true or false. Defaults to true if this method is not explicitly implemented.execute(): Add your action logic in this method. Here you can make updates to the current document or use any of the Vault Java SDK services to interact with other documents or records.The @DocumentActionInfo class annotation requires the following:
label: Label of the action. This label appears for Vault Admins during action configuration. This is not the label users see when running the action.lifecycle: Specifies for which lifecycle the action is available. If omitted, the action is available across all document lifecycles.usage: Specifies for which usages the action is available for configuring. For example, USER_ACTION. If omitted, defaults to UNSPECIFIED, which means the action is available everywhere actions are supported with the exception of bulk actions. If Vault adds new usages for record actions in future releases, such as WORKFLOW_STEP, actions with UNSPECIFIED usage immediately become available for the new usage.user_input_object_type: If your action takes user input, you may want to identify the user input object type. If omitted, this action does not require a type for user input. Actions which require user input may not require a type.user_input_object: If your action takes user input, identify the user input object. If omitted, this action does not require user input.icon: The icon which appears in the Vault UI Action Bar for this action. Learn more about action icons.Optionally, a dialog can be shown in the UI before and after the action execution for a class that implements the DocumentAction interface.
onPreExecute: This method allows a confirmation dialog to be displayed to the user prior to the execution of a document action. A custom dialog title and message can be added. *onPostExecute: This method allows a post document action execution banner to be displayed to the user. A custom banner message can be added.Learn more about pre- and post-action dialogs in the Javadocs.
The following is a basic skeleton of a document action:
package com.veeva.vault.custom.actions;

        @DocumentActionInfo(label="Set Expiration", usage="LIFECYCLE_ENTRY_ACTION", icon="update__sys")
        public class SetDocumentExpiration implements DocumentAction {
         // This action is available for configuration in Vault Admin.
            public boolean isExecutable(DocumentActionContext context) {
                return true;
            }
            public void execute(DocumentActionContext context) {
                //action logic goes here
            }
        }
Choose which icon users see in the Action Bar for custom record and document actions by using the icon element of a RecordActionInfo or DocumentActionInfo annotation. If no icon is specified, the default value is "", meaning no icon is displayed and the action is not eligible to appear in the most frequently used section of the Action Bar. You can choose any of the following icons:
| Label | Value | Icon |
|---|---|---|
| Create | create__sys | |
| Update | update__sys | |
| Delete | delete__sys | |
| Save | save__sys | |
| Remove | remove__sys | |
| Send | send__sys | |
| Import | import__sys | |
| Export | export__sys | |
| Generate | generate__sys | |
| Sync | sync__sys |
To debug action code, developers must deploy the code to Vault and configure a usage for the action. When the configured action is invoked through Vault, execution passes to the debugger to allow developers to step through the code. The code in your debugger will override any deployed code, allowing developers to test changes to a deployed action. Note that the class you wish to develop and debug must have the same package, class name, and annotation as the deployed code.
While entry point interfaces like actions, triggers, and jobs define how and when Vault executes custom logic, services interfaces provide getter and setter methods that allow entry point implementations to interact with operations and data in Vault. For example, a RecordTrigger implementation might useJobService to start a workflow on a record, then use RecordService to update field values on the record. You can even create your own user-defined services.
Services are available to all entry point implementations.
To use a Vault service, you’ll first need to create an instance of that service using ServiceLocator.locate. The example below creates a new instance of JobService called jobService.
JobService jobService = ServiceLocator.locate(JobService.class);
Documents and object records are the most common types of data you’ll want to interact with. DocumentService and RecordService provide methods to create, update, and delete documents, document versions, and object records.
These services also allow creating, updating, and deleting attachments.
RecordService also allows setting record migration mode for a specific transaction. When migration mode is on, Vault bypasses entry criteria, entry actions, validation rules, event actions, and reference constraints and does not send notifications when creating or updating records. While record migration mode is on, you cannot change an object’s type in the same transaction.
The trigger in the example below executes after Vault creates a vsdk_service_basics__c object record and uses RecordService to create two related records.
@RecordTriggerInfo(object = "vsdk_service_basics__c", events = {RecordEvent.AFTER_INSERT})
public class vSDKRecordService implements RecordTrigger {

    public void execute(RecordTriggerContext recordTriggerContext) {

        RecordEvent recordEvent = recordTriggerContext.getRecordEvent();
        RecordService recordService = ServiceLocator.locate(RecordService.class);
        List<Record> recordList =  VaultCollections.newList();
        RecordBatchSaveRequest.Builder recordSaveRequestBuilder = recordService.newRecordBatchSaveRequestBuilder();

        if (recordEvent.toString().equals("AFTER_INSERT")) {
            for (RecordChange inputRecord : recordTriggerContext.getRecordChanges()) {

                String name = inputRecord.getNew().getValue("name__v", ValueType.STRING);
                String id = inputRecord.getNew().getValue("id", ValueType.STRING);
                String relatedTo = inputRecord.getNew().getValue("related_to__c", ValueType.STRING);

                // Break out of the trigger code if the new record has a related "vsdk_service_basics__c" record.
                // This indicates that the records are "Copy of" records from "vSDKQueryService.java"
                // and do not need processing.
                if (relatedTo == "" || relatedTo == null) {

                    // Creates two related records by creating a new record via the RecordService.
                    // The name of records is set as "Related to: <name> x"
                    // The relation to the parent to then set with the "related_to__c" object reference field.
                    for (int i = 1; i <= 2; i++) {

                         Record r = recordService.newRecord("vsdk_service_basics__c");
                         r.setValue("name__v", "Related to: '" + name + "' " + i);
                         r.setValue("related_to__c", id);

                         recordList.add(r);
                    }
                }
            }

            recordSaveRequestBuilder.withRecords(recordList);
            RecordBatchSaveRequest saveRequest = recordSaveRequestBuilder.build();

            // If there are records to insert, the batchSaveRecords takes a RecordBatchSaveRequest as input.
            // This request should contain every new record that you are adding or updating.
            if (recordList.size() > 0) {
                recordService.batchSaveRecords(saveRequest)
                .onErrors(batchOperationErrors -> {

                    // Iterate over the caught errors.
                    // The RecordBatchOperation.onErrors() returns a list of BatchOperationErrors.
                    // The list can then be traversed to retrieve a single BatchOperationError and
                    // then extract an **ErrorResult** with BatchOperationError.getError().
                    batchOperationErrors.stream().findFirst().ifPresent(error -> {
                         String errMsg = error.getError().getMessage();
                         int errPosition = error.getInputPosition();
                         String name = recordList.get(errPosition).getValue("name__v", ValueType.STRING);
                         throw new RollbackException("OPERATION_NOT_ALLOWED", "Unable to create '" +
                             recordList.get(errPosition).getObjectName() + "' record: '" +
                             name + "' because of '" + errMsg + "'.");
                     });
                })
                .execute();
            }
        }
    }
}
When retrieving values for formula fields, Vault returns the value of the field after running the formula expression, not the expression itself.
Vault does not update object records or documents when a user or the Vault system saves without making any changes. This means that the Last Modified Date is not changed, record triggers do not execute, and Vault does not create an event in the object record or document audit history.
The services in the lifecycle package provide methods that allow custom code to interact with object and document lifecycles.
ObjectLifecycleMetadataService: Provides getter methods to retrieve metadata for object lifecycles. For example, you can retrieve all lifecycle metadata fields for a single object record, or retrieve a collection of all object lifecycles available in a Vault.ObjectLifecycleStateUserActionMetadataService: Provides methods to retrieve metadata about an object lifecycle user action.ObjectLifecycleStateUserActionService: Provides methods to execute an object lifecycle user action.The Vault Java SDK supports initiating object lifecycle user actions, which are available to users on an object record in a specific lifecycle state. User actions can begin a workflow, move the record into a new lifecycle state, etc. Learn more about object lifecycle user actions in Vault Help.
The ObjectLifecycleStateUserActionMetadataService provides methods to retrieve configuration metadata about user actions, while ObjectLifecycleStateUserActionService provides methods to execute those actions.
The following example illustrates how to retrieve configuration metadata about available lifecycle user actions.
 ObjectLifecycleStateUserActionMetadataService service = ServiceLocator.locate(ObjectLifecycleStateUserActionMetadataService.class);
      LogService logService = ServiceLocator.locate(LogService.class);

      // Retrieve metadata about user actions on a particular lifecycle state
      // Build the metadata request
      ObjectLifecycleUserActionMetadataRequest request = service.newLifecycleUserActionMetadataRequestBuilder()
          .withLifecycleName(lifecycleName)
          .withLifecycleState(lifecycleState)
          .withActionType("LIFECYCLE_RUN_WORKFLOW_ACTION") // Optional: filter the type of the user actions to be returned
          .build();

      ObjectLifecycleUserActionCollectionResponse response = service.getLifecycleUserActions(request);
      List<ObjectLifecycleUserActionMetadata> userActionMetadata = response.getUserActions();

      for (ObjectLifecycleUserActionMetadata data : userActionMetadata) {
          logService.info("User action metadata: label {}, component name {}, user action name {}," +
               "type {}, workflow name {}, record action class name {}, fully qualified name {}",
              data.getLabel(), data.getName(), data.getUserActionName(), data.getType(),
              data.getWorkflowName(), data.getRecordActionClassName(), data.getFullyQualifiedActionName());
     }

     // Retrieve metadata about user actions on an object record
     // Build the metadata request
     ObjectRecordLifecycleUserActionMetadataRequest request = service.newRecordLifecycleUserActionMetadataRequestBuilder()
         .withObjectName("object__c")
         .withRecordId("V6U000000001001")
         .withLifecycleState("inactive_state__c") // Optional: set the lifecycle state for the record, otherwise use the state the record is currently on
         .build();
     ObjectRecordLifecycleUserActionCollectionResponse response = service.getRecordLifecycleUserActions(request);
     List<ObjectRecordLifecycleUserActionDetail> details = response.getUserActions();

     for (ObjectRecordLifecycleUserActionDetail detail : details) {
         logService.info("User action is executable {}, is viewable {}", detail.isExecutable(), detail.isViewable());

         ObjectLifecycleUserActionMetadata metadata = detail.getMetadata();
         logService.info("User action metadata: label {}, component name {}, ...",
              metadata.getLabel(), metadata.getName());
     }
The following example illustrates how to retrieve and use input parameter metadata for user actions. This service returns metadata about RecordActions annotated with a user_input_object, configured as a user action.
ObjectLifecycleStateUserActionService service = ServiceLocator.locate(ObjectLifecycleStateUserActionService.class);
      // Build the request
      ObjectLifecycleUserActionInputParameterMetadataRequest request = service.newInputParameterMetadataRequestBuilder()
          .withUserActionName("Objectlifecyclestateuseraction.object__c.active_state__c.action__c")
          .build();
      ObjectLifecycleUserActionInputParameterMetadata metadata = service.getInputParameterMetadata(request);

      // Get the metadata for the input parameter
      String userInputObjectName = metadata.getUserInputObjectName();
      String userInputObjectType = metadata.getUserInputObjectTypeName():

      // Use the metadata to create a record of that object
      Record input = recordService.newRecord(userInputObjectName);
      input.setValue("name__v", "new name");
      input.setValue("field__c", "new value");
      RecordBatchSaveRequest saveRequest = recordService.newRecordBatchSaveRequestBuilder()
          .withRecords(VaultCollections.asList(input))
          .build();
      recordService.batchSaveRecords(saveRequest)
          .rollbackOnErrors()
          .execute();
      String userInputObjectRecordId = input.getValue(RECORD_ID, ValueType.STRING);

      // Use the userInputObjectRecordId to build a request to execute an action with an input
      UserActionExecutionRequest request = userActionService.newExecutionRequestBuilder()
          .withObjectName("object__c")
          .withObjectRecordId("V6U000000001001")
          .withUserInputRecordId(userInputObjectRecordId)
          .withUserActionName("Objectaction.object__c.action__c") // Use the fully qualified name of the action
          .build();
The following example illustrates how to execute an action. An action can be a user action, such as a state change, or an object action that is either available on all lifecycle states or configured on a particular state.
The UserActionExecutionRequest.Builder is used to construct the request, which is submitted in a UserActionExecutionRequest. Optionally, you can specify success and error handlers on the UserActionExecutionOperation before execution.
  ObjectLifecycleStateUserActionService userActionService = ServiceLocator.locate(ObjectLifecycleStateUserActionService.class);
      LogService logService = ServiceLocator.locate(LogService.class);

      // Build user action execution request for the record
      UserActionExecutionRequest request = userActionService.newExecutionRequestBuilder()
          .withObjectName("object__c")
          .withObjectRecordId("V6U000000001001")
          .withUserInputRecordId(userInputObjectRecordId) // Optional: if the user action is a RecordAction annotated with a user_input_object.
          .withUserActionName("Objectaction.object__c.action__c") // Use the fully qualified name of the action.
          .build();

      // Execute the user action
      userActionService.executeUserAction(request)
          .onSuccess(userActionExecutionResponse -> {
              // Logic to be executed if the user action completes successfully.
              logService.info("Successfully executed user action");
           })
          .onError(error -> {
              // Logic to be executed if the user action encounters an error when executing.
              if (error.getErrorType().equals(ActionErrorType.PERMISSION_DENIED)) {
                  logService.error("Failed to execute user action: " + error.getMessage());
              }
          })
          .execute();
DocumentLifecycleMetadataService: Provides getter methods to retrieve metadata for document lifecycles. For example, you can retrieve metadata for all document roles for a lifecycle, or retrieve a collection of all document lifecycles available in a Vault.DocumentLifecycleStateUserActionMetadataService: Provides getter methods to retrieve metadata about a document lifecycle user action, document version lifecycle user action, and user action input.DocumentLifecycleStateUserActionService: Provides methods to execute a document lifecycle user action.The Vault Java SDK supports initiating document lifecycle user actions, which are available to users on a document in a specific lifecycle state. User actions can begin a workflow, move the document into a new lifecycle state, and more. Learn more about document lifecycle user actions in Vault Help.
DocumentLifecycleStateUserActionMetadataService provides methods to retrieve configuration metadata about user actions, while DocumentLifecycleStateUserActionService provides methods to execute those actions.
The following example illustrates how to retrieve configuration metadata about available lifecycle user actions.
 DocumentLifecycleStateUserActionMetadataService service = ServiceLocator.locate(DocumentLifecycleStateUserActionMetadataService.class);
      LogService logService = ServiceLocator.locate(LogService.class);

      // Retrieve metadata about user actions on a particular lifecycle state
      // Build the metadata request
      DocumentLifecycleUserActionMetadataRequest request = service.newUserActionRequestBuilder()
          .withLifecycleName(lifecycleName)
          .withStateName(lifecycleState)
          .build();

      DocumentLifecycleUserActionMetadataResponse response = service.getUserActions(request);
      List<DocumentLifecycleUserActionMetadata> userActionMetadata = response.getUserActions();

      for (DocumentLifecycleUserActionMetadata data : userActionMetadata) {
          logService.info("User action metadata: label {}, user action name {}," +
               "workflow name {}, document action class name {}",
              data.getLabel(), data.getUserActionName(),
              data.getWorkflowName(), data.getDocumentActionClassName());
     }

     // Retrieve metadata about user actions on a document version
     // Build the metadata request
     DocumentVersionLifecycleUserActionMetadataRequest request = service.newDocumentVersionUserActionRequestBuilder()
         .withDocumentVersionId("1_2_3")
         .build();
     DocumentVersionLifecycleUserActionMetadataResponse response = service.getDocumentVersionUserActions(request);
     List<DocumentVersionLifecycleUserActionDetail> details = response.getUserActions();

     for (DocumentVersionLifecycleUserActionDetail detail : details) {
         logService.info("User action is executable {}, is viewable {}", detail.isExecutable(), detail.isViewable());

         DocumentLifecycleUserActionMetadata metadata = detail.getMetadata();
         logService.info("User action metadata: label {}, user action name {}, ...",
              metadata.getLabel(), metadata.getUserActionName());
     }
The following example illustrates how to retrieve and use input metadata for user actions. This service returns metadata about DocumentActions annotated with a user_input_object.
 DocumentLifecycleStateUserActionMetadataService service = ServiceLocator.locate(DocumentLifecycleStateUserActionMetadataService.class);
      // Build the request
      DocumentLifecycleUserActionUserInputMetadataRequest request = service.newUserInputRequestBuilder()
          .withUserActionName("sdkDocLifecycleUA134c9hshe71tc__c")
          .build();
      DocumentLifecycleUserActionUserInputMetadata metadata = service.getUserInput(request);

      // Get the metadata for the input
      String userInputObjectName = metadata.getUserInputObjectName();
      String userInputObjectType = metadata.getUserInputObjectTypeName():

      // Use the metadata to create a record of that object
      Record input = recordService.newRecord(userInputObjectName);
      input.setValue("name__v", "new name");
      input.setValue("field__c", "new value");
      RecordBatchSaveRequest saveRequest = recordService.newRecordBatchSaveRequestBuilder()
          .withRecords(VaultCollections.asList(input))
          .build();
      recordService.batchSaveRecords(saveRequest)
          .rollbackOnErrors()
          .execute();
      String userInputObjectRecordId = input.getValue(RECORD_ID, ValueType.STRING);

      // Use the userInputObjectRecordId to build a request to execute an action with an input
      DocumentLifecycleUserActionExecutionRequest request = documentLifecycleStateUserActionService.newExecutionRequestBuilder()
          .withDocumentVersionId("1_2_3")
          .withUserInputRecordId(userInputObjectRecordId)
          .withUserActionName("sdkDocLifecycleUA134c9hshe71tc__c")
          .build();
The following example illustrates how to execute an action.
The DocumentLifecycleUserActionExecutionRequest.Builder is used to construct the request, which is submitted in a DocumentLifecycleUserActionExecutionRequest. Optionally, you can specify success and error handlers on the DocumentLifecycleUserActionExecutionOperation before execution.
DocumentLifecycleStateUserActionService userActionService = ServiceLocator.locate(DocumentLifecycleStateUserActionService.class);
      LogService logService = ServiceLocator.locate(LogService.class);

      // Build user action execution request for the document version
      DocumentLifecycleUserActionExecutionRequest request = userActionService.newExecutionRequestBuilder()
          .withDocumentVersionId("1_2_3")
          .withUserInputRecordId(userInputObjectRecordId) // Optional: if the user action is a DocumentAction annotated with a user_input_object.
          .withUserActionName("sdkDocLifecycleUA134c9hshe71tc__c")
          .build();

      // Execute the user action
      userActionService.executeUserAction(request)
          .onSuccess(userActionExecutionResponse -> {
              // Logic to be executed if the user action completes successfully.
              logService.info("Successfully executed user action");
           })
          .onError(error -> {
              // Logic to be executed if the user action encounters an error when executing.
              if (error.getErrorType().equals(ActionErrorType.PERMISSION_DENIED)) {
                  logService.error("Failed to execute user action: " + error.getMessage());
              }
          })
          .execute();
The services in the workflow package provide methods that allow custom code to interact with object and document workflows. Document workflows are object workflows on the envelope__sys object.
WorkflowInstanceService: Provides methods to retrieve information for and update active workflow instances. For example, setting participants within a custom record workflow action or executing active workflow actions.WorkflowMetadataService: Provides methods to interact with workflow metadata.WorkflowTaskService: Provides methods to retrieve active workflow task instances and execute workflow task actions, such as cancelling a workflow task.The following is an example of a starting a workflow with the Vault Java SDK:
// Records to start Workflow with
String objectName = "object__c";
String record1 = "V5K000000001001";
String record2 = "V5K000000001002";
List<String> records = VaultCollections.asList(record1, record2);  // can also be list of documents if it's a document workflow

WorkflowMetadataService workflowMetadataService = ServiceLocator.locate(WorkflowMetadataService.class);

// 1) Get available workflows for given records
AvailableWorkflowMetadataCollectionRequest availableWorkflowsRequest = workflowMetadataService.newAvailableWorkflowMetadataCollectionRequestBuilder()
                                                                .withRecords(objectName, records)
                                                                .build();

AvailableWorkflowMetadataCollectionResponse response = workflowMetadataService.getAvailableWorkflows(availableWorkflowsRequest);

// Get list of available workflow for the given content listing
List<AvailableWorkflowMetadata> availableWorkflows = response.getWorkflows();

// Can loop over list of AvailableWorkflowMetadata to find/show all available workflows


// 2) Get Start step details to begin workflow
WorkflowStartMetadataRequest startMetadataRequest = workflowMetadataService.newWorkflowStartMetadataRequestBuilder()
                                                                    .withWorkflowName(workflowName)
                                                                    .withRecords(objectName, records)
                                                                    .build();

WorkflowStartMetadataResponse startMetadataResponse = workflowMetadataService.getWorkflowStartMetadata(startMetadataRequest);

// List of control sections in the start step
List<WorkflowStartStepMetadata> startStepMetadata = startMetadataResponse.getStartStepMetadataList();

for (WorkflowStartStepMetadata metadata : startStepMetadata){
    WorkflowStartStepType metaDataType = metadata.getType();  // Type of Start control (Participant, date, etc.)

    List<WorkflowParameterMetadata> parameters = metadata.getParameters(); // Parameters needed to start the workflow

    for (WorkflowParameterMetadata param : parameters) {
      String paramName = param.getName();                           // used in input parameter key
            WorkflowInputValueType valueType = param.getDataType();       // used to set the value of the control
        }
    }
}

// 3) Start workflow with these start inputs

String participantName = "viewer__c";
Long userId = 100l;
Long groupId = 500l;
List<String> userIds = VaultCollections.asList(userId.toString());
List<String> groupIds = VaultCollections.asList(groupId.toString());

String numberInput = "number__c";
int number = 123;

WorkflowInstanceService workflowInstanceService = ServiceLocator.locate(WorkflowInstanceService.class);

// Set workflow participants input
WorkflowParticipantInputParameter workflowParticipantInputParameter = workflowInstanceService.newWorkflowParticipantInputParameterBuilder()
            .withUserIds(userIds)
            .withGroupIds(groupIds)
            .build();

// Create Start instance request with the builder
WorkflowStartInstanceRequest startRequest = workflowInstanceService.newWorkflowStartRequestBuilder()
            .withWorkflowName(workflowName)
            .withRecords(objectName, records)
            .withInputParameters(numberInput, number)
            .withInputParameters(participantName, workflowParticipantInputParameter)
            .build();

// Start workflow with start request and success and error handlers
workflowInstanceService.startWorkflow(startRequest)
            .onSuccess(startResponse -> {
                String workflowId = startResponse.getWorkflowId();
                // Developer provided success handling logic here
            })
            .onError(startResponse -> {
                // Developer provided failure handling logic here
                if (startResponse.getErrorType() == ActionErrorType.INVALID_REQUEST) {
                    throw new RuntimeException(startResponse.getMessage());
                } else {
                    // ...
                }
            })
            .execute();  // needed to execute the action
The Vault Java SDK supports initiating workflow actions and workflow task actions. These actions run on active workflow instances and are available in all Vaults. If you are unfamiliar with workflow actions, you can learn more in Vault Help:
You can find the aupported workflow actions in the WorkflowActions Enum:
ADD_PARTICIPANTS: Adds participants to an active workflow.CANCEL_WORKFLOW: Cancels an active workflow.REMOVE_ITEMS: Removes documents or records from an active workflow.REPLACE_WORKFLOW_OWNER: Replaces the workflow owner of an active workflow.UPDATE_WORKFLOW_DUE_DATE: Updates the due date of an active workflow.You can find the aupported workflow actions in the WorkflowTaskAction Enum:
ASSIGN: Assigns an available workflow task. Available workflow tasks are unassigned tasks which are valid for the requesting user to accept. For example, your organization’s workflow configuration may only allow QA tasks to be assigned to users who are configured in the QA role.CANCEL: Cancels an assigned workflow task.REASSIGN: Reassigns a workflow task. The workflow task must be a valid task for the new task assignee to accept, for example, the new assignee cannot be configured in a restricted role. Completed or cancelled tasks cannot be reassigned.UNASSIGN: Unassigns a workflow task. Once unassigned, the task becomes available. Tasks cannot be unassigned if they are completed, cancelled, or not configured as available tasks.UPDATE_DUE_DATE: Updates the due date of an assigned workflow task. Vault notifies the task owner of the updated due date. If the workflow is configured to set all task due dates to the workflow due date, updates to individual task due dates will not affect the overall workflow due date. Cannot update the task due date if the due date is configured to sync with an object or document field.The Vault Java SDK does not support completing workflow tasks.
The document viewer in the Vault UI allows users to mark up and comment on documents with a wide variety of annotations. Users can choose to create comment, line, link, or anchor annotations, and can reply to other annotations.
Learn more about document annotations in Vault Help.
Developers can retrieve annotation type metadata, read field values for individual annotations, edit or delete existing annotations, and create new annotations using the Vault Java SDK. Annotations are represented by the Vault Java SDK’s Annotation interface, which provides methods to retrieve annotation type names and field values. The nested Annotation.Builder interface creates an instance of Annotation and provides methods to set annotation field values when creating or updating an annotation.
Custom code can interact with annotations using the following services:
AnnotationService: Reads annotation field data from document annotations in a Vault.AnnotationMetadataService: Reads metadata for all annotation types in a Vault.Users can create the following types of annotations:
note__sys): Corresponds to the Comment option in the UI. Users can select an area on a document to place an annotation or sticky annotation, which adds a fixed-size icon to a document.line__sys): Users can draw lines on a document and add comments about those lines. Custom SDK code cannot create line annotations, but it can update fields on existing line annotations.document_link__sys): Creates a standard document link.permalink_link__sys): Creates a link to a permalink, which persists throughout document versions. Vault checks and updates the link each time the Doc Info page loads so that it always directs users to the latest version of the document.anchor__sys): Users can add anchor annotations to text or area selections within a document.reply__sys): Replies are a special type of annotation created when a user replies to another annotation. Reply annotations include a parent annotation (reply_parent__sys) and a position index (reply_position_index__sys), which is automatically assigned by Vault upon creation of the reply.external_link__sys): Created when a user adds a link to a URL outside of Vault in the text of an annotation.PromoMats Vaults include additional annotation types related to Text and Claims Management functionality. Some of these types can’t be created directly by users, but are instead created by Vault in response to the Suggest Links user action. Learn more about Using Text and Claims Management in Vault Help.
suggested_link__sys): When a document enters a given lifecycle state, or when a user performs the Suggest Links action, Vault generates suggested links for non-exact text matches, which users must then accept or reject.approved_link__sys): Created by Vault when a user accepts a suggested link.auto_link__sys): Created automatically by Vault when a user bypasses the approval step.keyword_link__sys): Created by a user manually selecting a Text Asset or Claim (annotation_keywords__sys) based on matching fields.Each annotation may contain the following fields:
id__sys): The annotation ID.document_version_id__sys): The ID and version number of the document where the annotation appears in the format {documentId}_{majorVersion}_{minorVersion}. For example, 138_2_1.anchor_name__sys): Anchor annotations only. The name of the anchor. Allows up to 140 characters.color__sys): The name of the annotation color. Some annotation types allow users to select from a variety of colors, while others are always the same color.comment__sys): The annotation comment text. Allows up to 32,000 characters. Not all annotation types allow comments.created_by_delegate_user__sys): The ID of the delegate user who created the annotation, if applicable.created_by_user__sys): The ID of the user who created the annotation.created_date_time__sys): The date and time when the annotation was created.modified_by_user__sys): The ID of the user who last modified the annotation. If no last modified information exists, this defaults to the value of the Created By User field.modified_date_time__sys): The date and time when the annotation was last modified. If no last modified information exists, this defaults to the value of the Created Date Time field.persistent_id__sys): The persistent ID. This ID remains the same across all document versions when brought forward. Some older annotations may not have a persistent ID. You can generate one by updating or bringing forward the annotation.external_id__sys): The external ID. This field is optional and can be any non-empty string with a maximum of 250 characters.linked_object__sys): The name of the primary linked object for the annotation. Not all annotation types support linked objects.linked_records__sys): The ID(s) of the object record or records the annotation is linked to. Not all annotation types support linked records.match_text_variation__sys): PromoMats Vaults with Suggested Links enabled only. The ID of the matched_text_variation__sys object record linked to the annotation_keywords__sys record associated with the annotation.reply_count__sys): For annotation types that support replies, the number of replies to this annotation.state__sys): The name of the state of the annotation, either open__sys or resolved__sys. Not all annotation types support states.tag_names__sys): A list of the names of each tag associated with each annotation. Not all annotation types support tags.title__sys): The title of the annotation. Allows up to 1,500 characters. For annotations with text placemarks, this must be set to the selected text.type__sys): The name of the annotation type. For example, note__sys.A placemark defines where on a document or video an annotation appears. For example, a text selection, a page number, or the coordinates of an area selection. The Vault Java SDK’s AnnotationPlacemark interface provides methods to set and retrieve type names and field values for annotation placemarks.
Placemark coordinates are listed in the style of PDF quad points and are measured in pixels from the bottom-left of the page at 72 DPI. There will be 8*n coordinates, where n is the number of rectangles that make up the placemark.
There are several types of placemarks for documents, some of which are only available for certain annotation types:
arrow__sys): Users can place an arrow on a selected location in a document, adjust its size and color, and point it in any direction.ellipse__sys): Corresponds to the Circle option in the UI. Users can place a dotted line around an elliptical or round selection and adjust its size and line style.rectangle__sys): Corresponds to the Square option in the UI. Users can place a line around a square or rectangular selection and adjust its size and line style.line__sys): Specifies the location of a line drawing on a document. Custom SDK code cannot create placemarks for line annotations. Custom SDK code and Vault API cannot create line annotations.page_level__sys): Specifies a document page number with no other detail about the placement of the annotation.reply__sys): Specifies a reply’s reference to its parent as well as where among the parent’s replies this reply is located.sticky__sys): Specifies the placement of the sticky note icon.text__sys): Specifies the text selection for the annotation.The following placemark types are exclusive to annotations on videos:
video_arrow__sys): Users can place an arrow placemark on a video document.video_ellipse__sys) - Corresponds to the Circle option in the UI. Users can place an ellipse placemark a video document.video_rectangle__sys) - Corresponds to the Square option in the UI. Users can place a rectangle placemark on a video document.Annotation placemark fields dictate the appearance, size, and location of a placemark. Placemark coordinates on non-video documents are listed in the style of PDF quad points and are measured in pixels from the bottom-left of the page at 72 DPI. There will be 8*n coordinates, where n is the number of rectangles that make up the placemark.
Annotation placemarks on documents may include the following fields:
coordinates__sys): A list of all coordinates for the placemark. Text placemarks must set the title__sys field to the selected text in addition to specifying coordinates.height__sys): The height of the selection, measured in pixels at 72 DPI.page_number__sys): The document page number where the annotation appears. Page numbers start at 1.reply_parent__sys): Reply-type annotations only. The ID of the parent annotation.reply_position_index__sys): The position of a reply in a series of replies to a parent annotation. Positions start at 1.style__sys): The style of the placemark. For example, sticky_icon__sys.text_end_index__sys): Annotations placed on text selections only. The index of the last selected word on a page.text_start_index__sys): Annotations placed on text selections only. The index of the first selected word on a page.width__sys): The width of the selection, measured in pixels at 72 DPI.x_coordinate__sys): The X coordinate of the position of the top-left of the selection, measured in pixels at 72 DPI.y_coordinate__sys): The Y coordinate of the position of the top-left of the selection, measured in pixels at 72 DPI.Annotation placemarks on videos may include the following fields:
video_height__sys): The height of the selection on a video. Measured in pixels from the top-left of the video player at 940 x 573 resolution, inclusive of the letterbox or pillarbox.video_width__sys): The width of the selection on a video. Measured in pixels from the top-left of the video player at 940 x 573 resolution, inclusive of the letterbox or pillarbox.video_time_signature__sys): The time signature of a video annotation in seconds (MM:SS or HH:MM:SS format, depending on the video’s duration). May be null if the annotation is unplaced.video_x_coordinate__sys): The X coordinate of the position of the top-left of the selection on a video. Measured in pixels from top-left of the video player at 940 x 573 resolution, inclusive of the letterbox or pillarbox.video_y_coordinate__sys): The Y coordinate of the position of the top-left of the selection on a video. Measured in pixels from the top-left of the video player at 940 x 573 resolution, inclusive of the letterbox or pillarbox.Consider the following when creating certain placemark types using Vault Java SDK or Vault API:
system_managed=true).coordinates__sys field for a rectangle (rectangle__sys) placemark. Instead, provide x_coordinate__sys and y_coordinate__sys fields.coordinates__sys when possible.text_start_index__sys and text_end_index__sys if you’ve provided a value for the coordinates__sys field.text__sys) placemarks and coordinates__sys populated, title__sys must be set to selected text within the document.x_coordinate__sys and y_coordinate__sys fields: arrow__sysellipse__syssticky__sysrectangle__sysA reference is a way for an annotation to refer to an external entity. The Vault Java SDK’s AnnotationReference interface provides methods to set and retrieve type names and field values for annotation references.
There are three types of annotation references:
document__sys): Refers to a document or anchor.external__sys): Refers to an external URL.permalink__sys): Refers to a permalink__sys record.Annotation references include the following fields:
annotation__sys): Document-type references only. The ID of the referenced anchor annotation, or null for references to an entire document.document_version_id__sys): Document-type references only. The ID and version number of the referenced document in the format {documentId}_{majorVersion}_{minorVersion}. For example, 138_2_1.permalink__sys): Permalink-type references only. The ID of the referenced permalink.url__sys): External-type references only. The URL of the external reference. Allows up to 32,000 characters.See example code and learn more about the interfaces in the annotations package in the Javadocs.
When creating custom code, you may need to retrieve basic configuration information about your Vault. The VaultInformation interface provides methods to retrieve the following information about the local Vault:
admin_key__sys value. For example, en for English.admin_key__sys value. For example, en_GB for United Kingdom.timezone__sys picklist. For example, europe_london__sys.The VaultInformationService interface provides methods to retrieve the VaultInformation for remote and local Vaults.
Logging is an essential part of any application, and the LogService interface provides methods to send messages to the Debug Log and Runtime Log, which are available in the Vault UI from Admin > Logs > Developer Logs.
The following example creates a new instance of Vault Information Service and uses VaultInformationService’s getLocalVautInformation() method to retrieve the local Vault’s information. Next, the example uses LogService to log the dns, id, name, language, locale, and timezone values in the Debug Log.
LogService logService = ServiceLocator.locate(LogService.class);
VaultInformationService vaultInformationService = ServiceLocator.locate(VaultInformationService.class);
VaultInformation vaultInformation = vaultInformationService.getLocalVaultInformation();
logService.debug("dns = {}", vaultInformation.getDNS());
logService.debug("id = {}", vaultInformation.getID());
logService.debug("name = {}", vaultInformation.getName());
logService.debug("language = {}", vaultInformation.getLanguageCode());
logService.debug("locale = {}", vaultInformation.getLocaleCode());
logService.debug("timezone = {}", vaultInformation.getTimezoneName());
QueryService provides methods to create, execute, validate, and count query requests.
For example, imagine a simple VQL query to return the name and ID of all documents where the product is Cholecap.
SELECT name__v, id
FROM documents
WHERE product__v = '00P000000000119'
The example below creates a new instance of QueryService called queryService, then uses the Query Builder to create the same query as shown above.
QueryService queryService = ServiceLocator.locate(QueryService.class);
Query myQuery= queryService.newQueryBuilder()
.withSelect(VaultCollections.asList("name__v", "id"))
.withFrom("documents")
.withWhere("product__v = '00P000000000119'")
.build();
Other interfaces in the query package also provide builders that you can use with a defined query. You can use QueryExecutonRequest to execute the query, QueryValidationRequest to validate the query, or QueryCountRequest to retrieve the total number of records the query returns without a full query execution.
Use QueryOperation to execute a query and to specify success and error handlers. Vault returns query results as instances of QueryExecutionResponse. You can retrieve individual field values using QueryExecutionResult.getValue(). When querying formula fields, Vault returns the value of the field after running the formula expression, not the expression itself.
You can include Custom tokens and Vault tokens in queries.
QueryCountRequest.Builder, QueryExecutionRequest.Builder, and QueryValidationRequest.Builder provide withTokenRequest() methods which accept a TokenRequest and a QueryEscapeOverride. If you omit overrides, Vault escapes all Strings.
The following example uses the Query Builder to create a query containing two custom tokens, status_list and approved_date. It defines these tokens using the Token Request Builder to create a TokenRequest. Finally, it uses the Query Execution Request Builder to include both the Query and Token requests in a QueryExecutionRequest.
Query query = queryService.newQueryBuilder()
      .withSelect(asList("id"))
      .withFrom("documents")
      .withWhere("TONAME(status__v) CONTAINS (${Custom.status_list})")
      .appendWhere(QueryLogicalOperator.AND,
            "approved_date__c > ${Custom.approved_date}")
      .withMaxRows(50)
      .withOrderBy(asList("name__v"))
      .build();

TokenService tokenService = ServiceLocator.locate(TokenService.class);
TokenRequest tokenRequest = tokenService.newTokenRequestBuilder()
      .withValue("Custom.approved_date", LocalDate.now().minusDays(7))
      .withValue("Custom.status_list", asList("final__c","approved__c"))
      .build();

QueryExecutionRequest queryRequest = queryService
      .newQueryExecutionRequestBuilder()
      .withQuery(query)
      .withTokenRequest(tokenRequest)
      .build();
Vault resolves tokens in query responses, but not in error responses or when retrieving query strings with Query#getQueryString().
The following limitations apply:
${Custom.my_token__c}.${Vault.my_token__c}.Learn more in the Javadocs.
Record properties provide more information about a record than a query response normally provides. For example, you can retrieve a List of editable fields or the target of a hyperlink in a formula field.
You can request record properties using the QueryExecutionRequest#withQueryRecordPropertyTypes method, which accepts a List of QueryRecordPropertyType values. For example, the HIDDEN type provides a List of fields that are hidden due to Atomic Security, and the RECORD_PERMISSIONS type provides the Edit, Delete, Create, and Read permissions for the record.
Each property type has its own response object containing additional data about a record and methods to retrieve that data. For example, the QueryRedactedFieldResult response object for the REDACTED type provides the #getFieldNames() method to retrieve the names of redacted fields.
The following example uses QueryService and LogService to log record properties for my_object__c. The QueryHiddenFieldResult#getFieldNames() method checks whether possible_hidden_field__c is hidden. The QueryWeblinkResult#getWeblinks() method retrieves the target attribute for Link formula field my_weblink__c.
LogService logService = ServiceLocator.locate(LogService.class);
QueryService queryService = ServiceLocator.locate(QueryService.class);

QueryExecutionRequest request = queryService
    .newQueryExecutionRequestBuilder()
    .withQueryString("SELECT id, possible_hidden_field__c, my_weblink__c FROM my_object__c")
    .withQueryRecordPropertyTypes(VaultCollections.asList(QueryRecordPropertyType.HIDDEN, QueryRecordPropertyType.WEB_LINK))
    .build();

queryService.query(request)
    .onSuccess(response -> {
        response.streamResults().forEach(row -> {
            String id = row.getValue("id", ValueType.STRING);
            boolean fieldIsHidden = row
                .getTypedQueryRecordProperty(QueryHiddenFields.class)
                .getFieldNames()
                .contains("possible_hidden_field__c");

            QueryWebLinkTarget webLinkTarget = row
                .getTypedQueryRecordProperty(QueryWeblinkFields)
                .getWeblinks()
                .stream()
                .filter(w -> "my_weblink__c".equals(w.getFieldName()))
                .findFirst()
                .map(QueryWeblinkResult::getTarget).orElse(null);

            logService.info(String.format("Record: [%s], hidden: [%s], web link target: [%s]", id, fieldIsHidden, webLinkTarget));
        });
    })
    .onError(error -> {
        logService.error(error.getMessage());
    }).execute();
Learn more in the Javadocs.
TokenService provides methods to define and resolve Custom tokens. You can use these tokens with:
HttpService to reference tokens in the URL of an External Connection record.QueryService to reference tokens in a VQL query.QueueService to reference tokens in Spark messages.You can define custom tokens using TokenRequest.Builder as shown in the example below.
TokenService tokenService = ServiceLocator.locate(TokenService.class);
      TokenRequest.Builder builder = tokenService.newTokenRequestBuilder();

      builder.withValue("Custom.api_version", "1.0");
      builder.withValue("Custom.is_case_sensitive", Boolean.TRUE);
      builder.withValue("Custom.max_amount", new BigDecimal(100));

      TokenRequest tokenRequest = builder.build();
TokenService can only be used for Custom tokens. For Authorization tokens and Session tokens, use HttpService. For Vault tokens, use HttpService, QueryService, or QueueService.
UrlService provides methods to generate URLs to locations in Vault. You can create direct links to:
You can also generate multiple URLs of the same type in an optimized batch request.
Learn more about navigating between Custom Pages and generated URLs in the Custom Pages documentation.
The following example creates a request for a single document URL and a batch request for the same URL, and then logs the URL:
// Build a request for a single Document URL
DocumentUrlRequest docUrlRequest = urlService.newDocumentUrlRequestBuilder()
  .withDocumentId(12345L) // Example Document ID
  .withVersion(1, 0) // Example Version 1.0
  .build();

// Create a batch request for this single document URL
BatchDocumentUrlsRequest batchDocRequest  = urlService.newBatchDocumentUrlsRequestBuilder()
  .withRequests(Collections.singletonList(docUrlRequest))
  .build();

// Get the document URL(s)
BatchUrlsResponse<DocumentUrlResponse> documentUrlsResponse =
urlService.batchGetDocumentUrls(batchDocRequest);
documentUrlsResponse.getResultStream().forEach(response ->
  logService.info("Document URL: " + response.getUrl())
);
Learn more in the Javadocs.
Jobs allow developers to define and asynchronously execute a series of tasks. Jobs also allow for scheduling, so these tasks can repeatedly execute. Before developing with jobs, make sure you are familiar with the Glossary of Job Terms.
A job developed with Vault Java SDK is called an SDK job. In the Vault UI, this is a job definition with the type SDK Job.
Creating an SDK job has the following steps:
queue and the chunk_size and defines which job processor to use in the job_code attribute. Learn more about creating SDK job metadata in Vault Help.Executing an SDK job has different steps for developers and Vault Admins:
JobService to initiate jobs from custom Vault Java SDK code. Only job processors that are configured in the @JobInfo annotation as adminConfigurable are available to execute from custom Vault Java SDK code. Learn how to execute jobs with Vault Java SDK.@JobInfo annotation as adminConfigurable will appear in the Vault UI for configuration. Learn more about configuring an SDK job definition in Vault Help.See the Javadocs to learn more about the other interfaces in the job package and to see example code.
The following limitations apply to SDK jobs per Vault:
JobItem instances.JobTask is 128 KB.JobTask instances is 5000.JobParameters is 8 KB.JobParameters instances is 8000.Job queues is 25.Job instances is 1000.Job processors provide logic to process jobs in bulk. A job processor is a Java class that implements the Job interface and has the @JobInfo annotation. The @JobInfo annotation has the following attributes:
adminCancellable: Determines if this job processor permits the cancellation of job instances which are in the QUEUED or QUEUEING state. This does not fully control the ability for a job instance to be cancelled, for example, jobs in the SCHEDULED state can always be cancelled. Learn more about jobs eligible for cancellation in Vault Help. You can use Vault API or VQL to retrieve the status of a job instance.adminConfigurable: Determines if this job processor is available for Vault Admins to configure as a Job Definition in the Vault UI and if custom SDK code can invoke this job processor.idempotent: Indicates if this job processor is idempotent.isVisible: Determines if a job will appear in the Scheduled, Running, and History tables in the Job Admin UI. Learn more about the Vault UI’s Job Status page in Vault Help.You can invoke a job processor using triggers and actions in Vault Java SDK code. A job processor can also form the logic for a new job definition. Learn more about job definitions in Vault Help.
You can use the Job interface with the following methods to create a job processor:
Job#init method prepares data and performs other initialization logic. Job#process method executes tasks on the previously initialized data.Job#completeWithSuccess method runs if all previously processed tasks completed successfully.Job#completeWithErrors method runs if any of the previously processed tasks encountered errors.You must associate your custom job processor with a job by adding it to the Job Code field of an SDK Job Metadata record, which corresponds to the job_code field of the Jobmetadata component. Learn more about administering SDK job metadata in Vault Help.
The following is a basic skeleton of a job processor:
@JobInfo(adminConfigurable = true, idempotent = true, isVisible = true)
public class CustomSdkJob implements Job {

    public JobInputSupplier init(JobInitContext context) {

    }

    public void process(JobProcessContext context) {

    }

    public void completeWithSuccess(JobCompletionContext context) {

    }

    public void completeWithError(JobCompletionContext context) {

    }
}
You can use JobService to initiate a job from custom Vault Java SDK code.
To initiate a job from code, you must first define the job parameters. The JobParameters interface provides methods to set the start time, title, and parameter values for the job.
To set a job parameter value, you can pass a String to JobParameters#setValue. Alternatively, the JobParamValue interface allows you to create more complex job parameter values. For example, the following code creates a custom job parameter value for record IDs:
@UserDefinedClassInfo()
public class CustomSdkJobParameters implements JobParamValue {

    private List<String> recordIds;

    public List<String> getRecordIds() {
        return recordIds;
    }

    public void setRecordIds(List<String> recordIds) {
        this.recordIds = recordIds;
    }
}
After defining the job parameters, identify the job to run by passing the name of the Jobmetadata component for the job to the JobService#newJobParameters method.
The following example identifies the job as custom_sdk_job__c and sets the job parameters with the user-defined CustomSdkJobParameters value. It then calls JobService#run to start the job 2 minutes after invocation. This calls the job processor associated with custom_sdk_job__c.
public void updateRecordsAsynchronously(List<RecordChange> recordChanges) {

    JobService jobService = ServiceLocator.locate(JobService.class);

    List<String> recordIds = VaultCollections.newList();

    recordChanges.forEach(recordChange -> recordIds.add(recordChange.getNew().getValue("id", ValueType.STRING)));

    if (!recordIds.isEmpty()) {
        JobParameters jobParameters = jobService.newJobParameters("custom_sdk_job__c");

        CustomSdkJobParameters customSdkJobParameters = new CustomSdkJobParameters();
        customSdkJobParameters.setRecordIds(recordIds);

        jobParameters.setValue("custom_parameters", customSdkJobParameters);
        jobParameters.setJobRunTime(ZonedDateTime.now().plusMinutes(2));

        jobService.run(jobParameters);
    }
}
In addition to the above services, the Vault Java SDK provides the following:
DocumentMetadataService: Provides methods to retrieve document and document field metadata.DocumentRoleService: Provides methods to read and update document roles.ObjectMetadataService: Provides methods to retrieve metadata for objects, object types, object fields, object type fields, object validation rules, and object type validation rules.RecordRoleService: Provides methods to read and update record roles.RecordDisplayService: Provides methods to format object record values as UI display values for fields with Format Masks. This enables the display of user-facing object record values for message prompts and notifications.Learn more about services in the data package and see code examples in the Javadocs.
ConnectionService: Provides methods that can be used with DocumentService to build Vault to Vault connections.IntegrationRuleService: Provides methods to retrieve and evaluate integration rules, which define data mapping for Vault to Vault integrations.HttpService: Provides methods to make HTTP requests. Frequently used as an HTTP Callout to Vault API for functionality not yet available within the Java SDK.CsvService: Provides methods for reading and writing CSV data.JsonService: Provides methods for reading and writing JSON data.NotificationService: Provides methods to create and send notifications.TranslationService: Provides methods to retrieve translated messages and Label Sets, and to replace message tokens with values. Learn more about how to implement a Message Catalog.UserActionUIService: Provides methods to set UI behavior for user actions.EmailService: Provides methods to interact with emails sent to Vault. Learn more about Email to Vault.UserDefinedModelService: Creates new user-defined model instances.UserDefinedService: Used to create custom user-defined services that can be used by other Vault Java SDK code.GroupService: Provides methods to retrieve information about user groups.PicklistService: Provides methods to retrieve picklist information.RuntimeService: Provides methods for handling Vault Java SDK runtime.MatchedDocumentService: Provides methods to add, remove, lock, and unlock matched documents, and to include and exclude automatically matched documents. Learn more about working with EDLs and matched documents in Vault Help.Learn more in the Javadocs. For more code examples using services, see our sample code.
The RequestContext interface provides access to the context of a transaction. This allows you to pass data from the initial firing to subsequent triggers within the same transaction.
For example, initiating a request from an action which causes other triggers to execute, including nested triggers. As triggers execute through a thread of execution, some triggers along the execution sequence may need context from previously executed logic. This is especially needed when executing the same trigger multiple times within the same request transaction, for example, once for the current record, then subsequent execution in nested triggers on the same object. The subsequent firing may need to run different logic than the initial firing.
You can share some data using RequestContext to set a named context and get the named context value anywhere along a request transaction in downstream triggers. The maximum amount of data you can share is 5 MB per transaction request. The value you can set must be one of the value types specified in RequestContextValueType, or an implementation of the RequestContextValue interface.
Note that a value stored in RequestContext requires an explicit getValue and setValue whenever you want to change the value. If you change the state of your RequestContextValue object, you must call setValue to put the mutated object back into the RequestContext.
To properly debug uses of RequestContext, all code that uses the context should be in the debugger. If not, the value of the context may be inaccurate, especially if you have a context value set by code already deployed to Vault and that code is absent from your debugger. Any code that uses getValue and setValue should be in your debugger.
The following is an example of using RequestContext. First, a trigger named ProductBuildRegionMap sets up a RequestContext:
@RecordTriggerInfo(object = "product__v", name = "product_region__c", events = {RecordEvent.BEFORE_INSERT})
public class ProductBuildRegionMap implements RecordTrigger {
   public void execute(RecordTriggerContext recordTriggerContext) {
       List<String> productRegions = VaultCollections.newList();

       recordTriggerContext.getRecordChanges().stream().forEach(recordChange ->
          productRegions.add(recordChange.getNew().getValue("region__c",ValueType.STRING)));

       // Create a new region country map for all regions in this request and set the map into the "regionCountryMap"
       // request context, so that this map can be used by other triggers that execute after this one.
       RegionCountryMap regionCountryMap = new RegionCountryMap(productRegions);

       RequestContext.get().setValue("regionCountryMap", regionCountryMap);
   }
}
Next, we have a user-defined class which implements the RequestContextValue set up in ProductBuildRegionMap.
@UserDefinedClassInfo(name = "regioncountrymap__c")
public class RegionCountryMap implements RequestContextValue {

   private Map<String, List<String>> regionCountryMap = VaultCollections.newMap();

   RegionCountryMap (List<String> productRegionId){
       // Constructor to create a regionCountryMap <region, countries> by querying the Region object
       // to retrieve countries in the provided regions.
   }
   Map<String, List<String>> getMap () {
       return regionCountryMap;
   };
}
Lastly, our ProductCreateRelatedBrands trigger executes after the ProductBuildRegionMap trigger. It retrieves the RequestContextValue and modifies the Map inside the context.
@RecordTriggerInfo(object = "product__v", name = "product_region__c", events = {RecordEvent.AFTER_INSERT})
public class ProductCreateRelatedBrands implements RecordTrigger {

   public void execute(RecordTriggerContext recordTriggerContext) {
       // Get the RegionCountryMap from the request context
       RegionCountryMap regionCountryMap = RequestContext.get()
               .getValue("regionCountryMap", RegionCountryMap.class);
       // Get the map of regions and countries
       Map<String, List<String>> map = regionCountryMap.getMap();

       // ... create specific brands for each country in a region

       // Remove a region from the map if brands for that region already exists and set the map back to the
       // request context in order to update request context with the changed map.
       map.remove("Asia");

       RequestContext.get().setValue("regionCountryMap", regionCountryMap);
   }
}
RequestContext supports the following user types, which are listed in the RequestContextUserType Enum:
INITIATING_USER: The user who initiated the request. This can be either a human user or the Vault System. This value is immutable.REQUEST_OWNER: The user who currently owns the request. This will usually be the same as the INITIATING_USER, but the value can change during a workflow.HttpService and ConnectionService each provide methods to determine if a request will succeed with a specified user type and to create a new request with a specified user type.
RequestExecutionContext provides contextual information about the current request. The following example determines if the current request takes place within a workflow and, if it does, retrieves the workflow ID, workflow name, and workflow owner ID. Learn more in the javadocs.
LogService logService = ServiceLocator.locate(LogService.class);

if (RequestContext.get().containsRequestExecutionContext(WorkflowRequestExecutionContext.class)) {
   WorkflowRequestExecutionContext workflowRequestExecutionContext = RequestContext.get().getRequestExecutionContext(WorkflowRequestExecutionContext.class);

   logService.debug("workflowId = {}", workflowRequestExecutionContext.getWorkflowId());
   logService.debug("workflowName = {}", workflowRequestExecutionContext.getWorkflowName());
   logService.debug("workflowOwnerId = {}", workflowRequestExecutionContext.getWorkflowOwnerId());
}
else {
   logService.debug("Not in a workflow");
User-defined classes (UDC) allow you to implement reusable logic into a single class, rather than repeating the same logic across multiple triggers on different objects. User-defined classes are then used by Vault extensions, such as triggers and actions. Developers can also use UDCs as an object to store complex data.
You can use UDCs to apply object-oriented solution designs by having interfaces, abstract classes, and class implementations in separate UDCs.
Unlike Vault extensions which execute when a user or the System initiates an operation, UDCs only execute by calls from other classes.
UDCs can use any of the following libraries and services:
A user-defined class is a Java class which uses the @UserDefinedClassInfo class annotation. For example, the following illustrates a user-defined class ValidationUtils:
@UserDefinedClassInfo
public class ValidationUtils {
    boolean isNameFormatted (Record record) {
        String name = record.getValue("name__v", ValueType.STRING);
        if (name.length() < 100 && !name.substring(0,2).equals("BAC"))
            return true;
        else
            return false;
  }
}
You can use a UDC in any Vault Java SDK extension, such as a trigger or an action class, as well as other UDCs. The following example illustrates a trigger using the ValidationUtils user-defined class:
@RecordTriggerInfo(object="product__v", events={RecordEvent.BEFORE_INSERT})
public class Example implements RecordTrigger {
    public void execute(RecordTriggerContext recordTriggerContext) {
        ValidationUtils validationUtils = new ValidationUtils();
        for (RecordChange inputRecord :
            recordTriggerContext.getRecordChanges()) {
                if (!validationUtils.isNameFormatted(inputRecord)){
                    // set Name field to format required for this object
                }
            }
    }
}
While debugging a trigger or action, you can step into UDCs to debug them. Because UDCs are not directly executable, you must step into them when calling them from an extension class.
A user-defined models (UDM) allows you to create reusable data access objects, or models, and annotate their getters and setters as user-defined properties. You can then use models with JsonService to translate data to and from JSON, or with HttpService to send and receive data using Vault API.
With UDMs, you can:
HttpService to query Vault API, then return the response body as a model, which deserializes the response JSON into fields defined by the model’s user-defined properties.QueryService, stream VQL query results that are mapped automatically to a UDM.JsonService, pass Vault data into a model which, based on its user-defined properties annotations, serializes the data into a JSON string which can be used as input for a REST API or stored in a Long Text field in an object record.JsonService, deserialize a JSON string to a UDM.A user-defined model (UDM) is an interface that uses the @UserDefinedModelInfo annotation and extends the UserDefinedModel interface. For example, the following is an example of a UDM that represents three fields on a single document: id, name__v, and product__v.
@UserDefinedModelInfo(include = UserDefinedPropertyInclude.NON_NULL)
public interface BasicDocModel extends UserDefinedModel {

   @UserDefinedProperty()
   BigDecimal getId();
   void setId(BigDecimal id);

   @UserDefinedProperty(name = "name__v", aliases = {"name", "name__c"})
   String getName();
   void setName(String name);

   @UserDefinedProperty(name = "product__v", include = UserDefinedPropertyInclude.ALWAYS)
   ProductModel getProduct();
   void setProduct(ProductModel product);

}
A UDM can extend another UDM. For example, a PresentationDocModel might extend the BasicDocModel.
The @UserDefinedProperty annotation can only be used on an interface with the @UserDefinedModelInfo annotation. All @UserDefinedProperty annotations must have a defined getter method with no parameters and a valid return type. Setter methods must have one parameter of a valid type. See the Javadoc for valid types for getters and setters. The name parameter is the JSON field name that will be serialized from and deserialized to this property. If the JSON field name is not always the same, you can define one or more aliases to be deserialized to this property. If the JSON field name value exactly matches the getter and setter name pattern, the name parameter can be omitted as shown for getId() and setId() below.
You can set one or more default values using the defaultValue or defaultValues parameter. You can only set default values for properties whose type is BigDecimal, Boolean, String, or a collection of Strings.
@UserDefinedProperty(name = "pageoffset", aliases = {"offset"})
BigDecimal getPageOffset();

@UserDefinedProperty(defaultValue = "New Document")
String getName();

@UserDefinedProperty
BigDecimal getId();
void setId(BigDecimal id);
The UserDefinedPropertyInclude enum specifies how JsonService should serialize values and is set by the include parameter of a user-defined model or property. If no value is set for a user-defined property, serialization defaults to the behavior of the user-defined model it belongs to. During deserialization, JsonService ignores any fields that are not defined in the user-defined model. Learn more in the Javadoc.
@UserDefinedModelInfo(include = UserDefinedPropertyInclude.ALWAYS)
public interface MyModel extends UserDefinedModel {

@UserDefinedProperty(include = UserDefinedPropertyInclude.NON_NULL)
String getData();
}
Use UserDefinedModelService to create a new, empty model instance in a trigger or action. You can then use JsonService to serialize and deserialize data. You can also use HttpService to create an HTTP request that accepts one or more user-defined models (UDMs) as the request body, or returns a UDM as the response body.
UserDefinedModelService modelService = ServiceLocator.locate(UserDefinedModelService.class);
BasicDocModel docModel = modelService.newUserDefinedModel(BasicDocModel.class);

JsonService jsonService = ServiceLocator.locate(JsonService.class);
String newJSON = jsonService.convertToString(docModel);
Once deployed, UDMs are visible in the Vault UI from Admin > Configuration > User-Defined Models.
User-defined services (UDS) allow you to wrap reusable logic into a service that can be used by other Vault Java SDK code, such as triggers, actions, or user-defined classes. Much like Vault Java SDK services, UDS are stateless singletons whose methods, once exited, return their allocated memory to the maximum memory execution limit: only the method parameters and return value counts toward the memory limit. Since UDS are stateless, nothing is retained beyond the service method execution.
UDS only execute by calls from other classes, differentiating them from Vault extensions that execute when a user or the system initiates an operation.
Locate the user-defined service using ServiceLocator, just like Vault Java SDK services. Once located, execute the service with a normal Java method call.
Unlike user-defined classes, the memory UDS use in their methods is freed up when the method exits. Only the method return value counts towards the total SDK extension memory limit. However, it is important to note that just like SDK services, UDS do not store any data after the method exits. If data needs to be stored, or if common methods need to be shared between triggers or actions, a user-defined class should be used.
To use a UDS, extend UserDefinedService and create a class implementing the UserDefinedService extension. The following examples illustrate how to perform a product search with a UDS.
Create a new service by extending UserDefinedService and using the @UserDefinedServiceInfo annotation.
@UserDefinedServiceInfo
public interface ProductSearchClass extends UserDefinedService {
    boolean doesProductExist();
}
Implement the new interface that includes reusable code.
@UserDefinedServiceInfo
public class ProductSearchClassImpl implements ProductSearchClass {
    @Override
    public boolean doesProductExist() {
        // Reusable code
        return true;
    }
}
Locate the service and execute method from a Vault extension such as a trigger or an action.
ProductSearchClass productSearchClass = ServiceLocator.locate(ProductSearchClass.class);
boolean productExists = productSearchClass.doesProductExist();
When the SDK debugger is attached to a Vault session, the UDS executes on the client side, just like a user-defined class. Therefore, for any SDK invocations the service makes, the size of the objects returned by the invocations counts towards memory usage. The memory used by those objects is not decremented when the service method exits.
Objects returned by the service method do not count towards the Vault extension memory limit when the SDK debugger is attached to a Vault session.
Beginning in v24.3, developers can create custom API endpoints using the WebApi entry point. A web API is a Java class that implements the WebApi interface and uses the @ExecuteAsUser and @WebApiInfo annotations.
By default, Web API requests execute as the Request Owner, who is the authenticated user. You can change the default user by using ExecuteAsService within a block of code.
You must specify the following in the WebApiInfo annotation:
endpointName: A String containing the endpoint name, which is used in the URI. Must be snake case, for example, my_endpoint_name.minimumVersion: A String containing the minimum Vault API version required to use the Web API. For example, v24.3. Calling a custom API with a version lower than the minimum results in a failure.apiGroup: The Webapigroup the API belongs to. This determines the permission set required to use the API.Each Web API must be assigned to a Web API Group. Admins can manage Web API Groups from Admin > Configuration > Web API Groups.
You can create Web API Groups using the MDL Webapigroup component.
RECREATE Webapigroup my_apis__c (
label('My APIs'),
description('A group for my custom Web Apis');
Each Vault can have up to 100 Webapigroups.
Web API Groups must be assigned to Permission Sets. Admins can manage user access to Web API Groups from Admin > Users & Groups > Permission Sets > {permission_set} > API.
The URI is determined by the endpointName value set in the WebApiInfo annotation in the following format:
POST https://{vaultDNS}/api/{version}/custom/{endpointName}
For example, the following annotation sets an endpointName value of my_endpoint_name.
@WebApiInfo(endpointName = "my_endpoint_name", minimumVersion = "v24.3", apiGroup = "my_api_group__c")
In a Vault with the DNS myvault.veevavault.com, this creates a custom endpoint with the following URI:
POST https://myvault.veevavault.com/api/v24.3/custom/my_endpoint_name
Web APIs only allow POST requests and accept either valid application/json or multipart/form-data input. Requests can include one (1) binary content file, but binary content cannot be read or parsed using the Vault Java SDK.
Web APIs always return a status code of 200 and must return a response status of either SUCCESS, FAILURE, or WARNING. You can create JSON data as response binary content or return a FileReference.
The following example creates a response with a JSON payload.
JsonObject data = jsonObjectBuilder.build();

return webApiContext.newWebApiResponseBuilder()
    .withData(data)
    .withResponseStatus(WebApiResponseStatus.SUCCESS)
    .build();
You can use WebApiError.Builder to set custom error types and messages for your Web API to return when the response status is FAILURE. Add your custom errors to FAILURE responses using WebApiFailureResponse.Builder.
return webApiContext.newWebApiFailureBuilder()
    .withErrors(
        VaultCollections.asList(
            webApiContext.newWebApiErrorBuilder()
                .withType("MY_CUSTOM_ERROR_TYPE")
                .withMessage("A custom error occured")
                .build()
        )
    ).build();
The example above creates the following response:
{
    "responseStatus": "FAILURE",
    "errors":[
       {
        "type":"MY_CUSTOM_ERROR_TYPE",
        "message":"A custom error occured"
       }
    ]
}
Developers are responsible for versioning their changes.
Web APIs are subject to all current Vault Java SDK and Vault API limits, including the Burst Limit and Auth API Burst Limit. Additionally, Vault processes only one (1) concurrent thread per user. Up to 20 additional requests per user will be added to a queue. After reaching the limit of 20 requests in the wait queue, subsequent requests from the same user return an error.
Developers can create a maximum of 100 Web APIs and 100 Web API Groups.
Input and output payloads are limited to 4 GB for binary content or 30 MB for JSON.
When creating Inbound Email Addresses in the Vault Admin UI, Admins select an Email Processor, which defines how Vault automatically creates documents, records, and attachments from emails sent to the address. In addition to those provided by the System, you can create custom Email Processors with the Vault Java SDK. Learn more about Email to Vault in Vault Help.
An email processor is a Java class that implements the EmailProcessor interface and uses the @EmailProcessorInfo annotation. Additionally, email processors use:
EmailProcessorContext to retrieve an EmailItem, which represents a single email__sys record.EmailItem interface to retrieve source files, attachments, and field data from an email.EmailService to retrieve the body of an email as HTML or plain text.DocumentService to create documents.RecordService to create object records.Notificationservice to send notifications.Learn more in the Javadocs.
The EmailProcessorInfo annotation defines the senders from whom the email processor will accept emails. In this example, the processor accepts emails from one or more specific groups defined in the Inbound Email Address configuration. The label element defines the value Vault displays for the processor in the Admin UI.
@EmailProcessorInfo(allowedSenders = EmailSenderType.VAULT_GROUPS, label = "Create Legal Document")
The following example creates a document using a custom document type called Email Inquiry Document, but you can use any standard or custom document type in your Vault. The processor gets an email item, then uses DocumentService to create a document and set the source file and field values. If the Allow attachments option is enabled for the specified document type, Vault automatically creates document attachments from any files attached to an email.
@EmailProcessorInfo(allowedSenders = EmailSenderType.VAULT_USERS, label = "Create Email Inquiry Document")
public class EmailInquiryProcessor implements EmailProcessor {

    @Override
    public void execute(EmailProcessorContext context) {

        EmailItem emailItem = context.getEmailItem();
        DocumentService documentService = ServiceLocator.locate(DocumentService.class);
        DocumentVersion documentVersion = documentService.newDocument();
        documentVersion.setSourceFile(emailItem.getEmailFile());
        documentVersion.setValue("name__v", emailItem.getSubject());
        documentVersion.setValue("type__v", VaultCollections.asList("email_inquiry__c"));
        documentVersion.setValue("lifecycle__v", VaultCollections.asList("general_lifecycle__c"));
        documentVersion.setValue("status__v", VaultCollections.asList("draft__c"));
        documentService.createDocuments(VaultCollections.asList(documentVersion));
    }
}
The example below uses RecordService to create an object record from an email. Instead of getting the email source file, this processor first calls getEmailBodySize to ensure that the body can be loaded into memory, then uses getEmailBody() from EmailService to copy the body of the email to a Long Text field, email_body__c, as plain text. If the body exceeds 40mb (4,000,000 b), the email processor instead sets the field to an “Email body exceeds maximum size allowed” message.
@EmailProcessorInfo(allowedSenders = EmailSenderType.VAULT_USERS, label = "Create Object Record")
public class ObjectEmailProcessor implements EmailProcessor {

   @Override
   public void execute(EmailProcessorContext context) {

       EmailItem emailItem = context.getEmailItem();
       EmailService emailService = ServiceLocator.locate(EmailService.class);
       RecordService recordService = ServiceLocator.locate(RecordService.class);
       Record record = recordService.newRecord("email_to_object__c");
       record.setValue("name__v", emailItem.getSubject());
       record.setValue("sender__c", emailItem.getSender().getEmailAddress().getFullAddress());
       int bodysize = emailItem.getEmailBodySize(EmailBodyType.TEXT_PLAIN);
       if (bodysize < 4000000) {
           record.setValue("email_body__c", emailService.getEmailBody(emailItem.getId(), EmailBodyType.TEXT_PLAIN));
       } else record.setValue("email_body__c", "Email body exceeds maximum size allowed.");
       recordService.batchSaveRecords(VaultCollections.asList(record)).rollbackOnErrors().execute();
   }
}
To provide a localized experience, Admins and Vault Java SDK developers can create translations for messages displayed to Vault end users. To do this, they either add messages with MDL or use the Message Catalog in Vault Help.
After creating messages, developers use TranslationService to retrieve the messages. Learn more in the Javadocs.
Admins coordinate message translation into any Vault supported language using the Bulk Translation tool in Vault Help.
Create the custom Messagegroup with at least one Message using MDL. For example, call the Execute MDL Script endpoint to add the message group and associated messages to Vault:
RECREATE Messagegroup person_validation__c (
   label('Person Validation Messages'),
   Message email_format__c(
      default_value('${email_input} is not a valid email address.')
   ),
   Message mobile_format__c(
      default_value('${mobile_input} is not a valid mobile number.')
   )
);
In addition to conforming to the standard MDL rules, message groups and messages have additional restrictions:
Messagegroup contains a maximum of 500 messages.Message must follow the format ${token_name}, where “token_name” is a string starting with a letter and followed by zero or more letters and underscores.Once the messages are added to Vault, they can be called by code. However, for multiple languages to be supported, an Admin must translate the messages. For untranslated messages, Vault displays the default_value from the MDL, in Vault’s base language, regardless of a user’s preferred language.
Translate messages using the Field Labels option of the Bulk Translation tool in the Vault UI. Learn more about localizing messages in Vault Help.
Messages can only be translated into Vault supported languages.
In the export CSV, messages have the message__sys Type. Their Key follows the pattern Messagegroup#Message. For example: person_validation__c#email_format__c.
After the translated messages are imported into Vault, use TranslationService to add them to your custom code. Learn more in the Javadocs.
At runtime, users see messages in their preferred language. If no translation exists, Vault’s base language, the MDL default_value, is used.
In addition to translating field labels, Vault allows Admins to create Label Sets to specify alternative Vault UI labels within a single language. This supports use cases where different groups of users within the same country or region may use different terminology to describe the same thing.
You can create Label Sets via MDL and upload field values via Vault API. Once created, you can use TranslationService to add them to your custom code. Learn more in the Javadocs.
Duplicate records in Vault can happen due to migrations, integrations, or day-to-day activities and may be difficult to resolve. Vault provides a solution to duplicate records by allowing you to merge two records together. You can only initiate record merges through Vault API or the Vault Java SDK, and you cannot initiate a record merge through the Vault UI.
When merging two records together, you must select one record to be the main_record_id and one record to be the duplicate_record_id. The merging process updates all inbound references (including attachments) from other objects that point to the duplicate record and moves those over to the main record. Field values on the main record are not changed, and when the process is complete, the duplicate record is deleted.
The following example uses RecordService to execute two record merges within the account__v object:
 LogService logService = ServiceLocator.locate(LogService.class);
      RecordService recordService = ServiceLocator.locate(RecordService.class);
      RecordMergeSetInput recordMergeSetInput1 = recordService.newRecordMergeSetInputBuilder()
          .withDuplicateRecordId("V6G000000001005")
          .withMainRecordId("V6G000000001002")
          .build();


          RecordMergeSetInput recordMergeSetInput2 = recordService.newRecordMergeSetInputBuilder()
          .withDuplicateRecordId("V6G000000006002")
          .withMainRecordId("V6G000000001002")
          .build();


          RecordMergeRequest request = recordService.newRecordMergeRequestBuilder()
          .withObjectName("account__v")
          .withRecordMerges(VaultCollections.asList(recordMergeSetInput1, recordMergeSetInput2))
          .build();


          recordService.mergeRecords(request)
              .onSuccess(success -> {
                  String jobId = success.getJobId();
                  logService.info(String.format("Successfully started merge with job [%s]", jobId));
                  })
                  .onError(recordMergeOperationError -> {
                      recordMergeOperationError.getErrors().forEach(error -> {
                          String errorMessage = error.getError().getMessage();
                          RecordMergeOperationErrorType errorType = error.getErrorType();
                          if (errorType.equals(RecordMergeOperationErrorType.INVALID_DATA)) {
                              logService.info(String.format("Failed to start merge due to INVALID_DATA. Error: [%s]", errorMessage));
                          } else if (errorType.equals(RecordMergeOperationErrorType.OPERATION_NOT_ALLOWED)) {
                               logService.info(String.format("Failed to start merge due to OPERATION_NOT_ALLOWED. Error: [%s]", errorMessage));
                          }
                        });
                    })
                    .execute();
Learn more about executing record merges with the Vault Java SDK in the Javadocs.
Before you can execute a record merge, your Vault must be correctly configured. For example, the Vault object must have merges enabled and the initiating user must have permission to execute merges. Learn more about the configuration required for record merges in Vault Help.
RecordMergeSetInput, one main and one duplicate recordRecordMergeSetInputs in a single requestduplicate records into the same main record, but you cannot merge the same duplicate record into more than one main recordYour organization may want to create custom Record Merge Event Handlers which execute custom logic immediately when a record merge begins or after a record merge completes. You can initiate a record merge operation through Vault API or the Vault Java SDK. Record Merge Event Handlers execute regardless of the merge operation origin, for example, starting a merge from the SDK or the API. The @RecordMergeEventHandlerInfo annotation indicates that a class is a Record Merge Event Handler and specifies the object where this handler will execute. Each Vault object can only have one (1) Record Merge Event Handler.
The RecordMergeEventHandler interface contains the logic for your record merges. Custom logic can execute either:
onMergeStart(): Invoked when the merge starts.onMergeComplete(): Invoked when the merge completes.For example, your organization may need a record merge event handler if you have an external integration that relies on records that may be undergoing a merge. onMergeStart(), the handler can send a message to the integration that it should pause integration activities. onMergeComplete(), the handler can send another message that integration can resume again.
The following example is a skeleton for a Record Merge Event Handler:
@RecordMergeEventHandlerInfo(object = "account__v")
      public class RecordMergeEventHandlerSample implements RecordMergeEventHandler {


     @Override
     public void onMergeStart(RecordMergeEventStartContext context) {
         LogService logService = ServiceLocator.locate(LogService.class);


         String objectName = context.getObjectName();
         String jobId = context.getJobId();
         List mergeSets = context.getRecordMergeSets();
         for (RecordMergeSet mergeSet : mergeSets) {
             String dupRecordId = mergeSet.getDuplicateRecordId();
             String mainRecordId = mergeSet.getMainRecordId();
             logService.info(String.format("Started merge of duplicate record [%s] into main record [%s] for object [%s] job [%s]", dupRecordId, mainRecordId, objectName, jobId));
             //do something
         }
     }
     @Override
     public void onMergeComplete(RecordMergeEventCompletionContext context) {
         LogService logService = ServiceLocator.locate(LogService.class);


         String objectName = context.getObjectName();
         String jobId = context.getJobId();
         List mergeSetResults = context.getRecordMergeSetResults();
         for (RecordMergeSetResult mergeSetResult : mergeSetResults) {
             String dupRecordId = mergeSetResult.getDuplicateRecordId();
             String mainRecordId = mergeSetResult.getMainRecordId();
             RecordMergeCompletionStatus status = mergeSetResult.getStatus();
             if (status == RecordMergeCompletionStatus.SUCCESS) {
                 logService.info(String.format("Succeeded in merge of duplicate record [%s] into main record [%s] for object [%s] job [%s]",  dupRecordId, mainRecordId, objectName, jobId));
                 //do something for success
             } else if (status == RecordMergeCompletionStatus.FAILURE) {
                 logService.info(String.format("Failed in merge of duplicate record [%s] into main record [%s] for object %s job %s",  dupRecordId, mainRecordId, objectName, jobId));
                 //do something for failure
             }
         }
     }
 }
After writing your handler code, you must deploy your Record Merge Event Handler to make it active in your Vault. You can view all of the extensions currently deployed to your Vault in Admin > Configuration > Vault Java SDK.
Learn more about Record Merge Event Handlers in the Javadocs.
With the Vault Java SDK, you can build custom Vault integrations to automate business processes across different Vaults or with an external system. Spark Messaging allows your Vault to send messages from a Vault extension, and HTTP callout allows you to callback for any data you need. These operations perform asynchronously, allowing performant and seamless integration.
For example, a new change control record in Veeva QMS causes a trigger to fire which sends a Spark message to Veeva Registrations. This message starts a set of regulatory activities in Veeva Registrations, and HTTP callout calls back to Veeva QMS for any necessary information about the change control.
See our sample code for more examples of Vault Integrations.
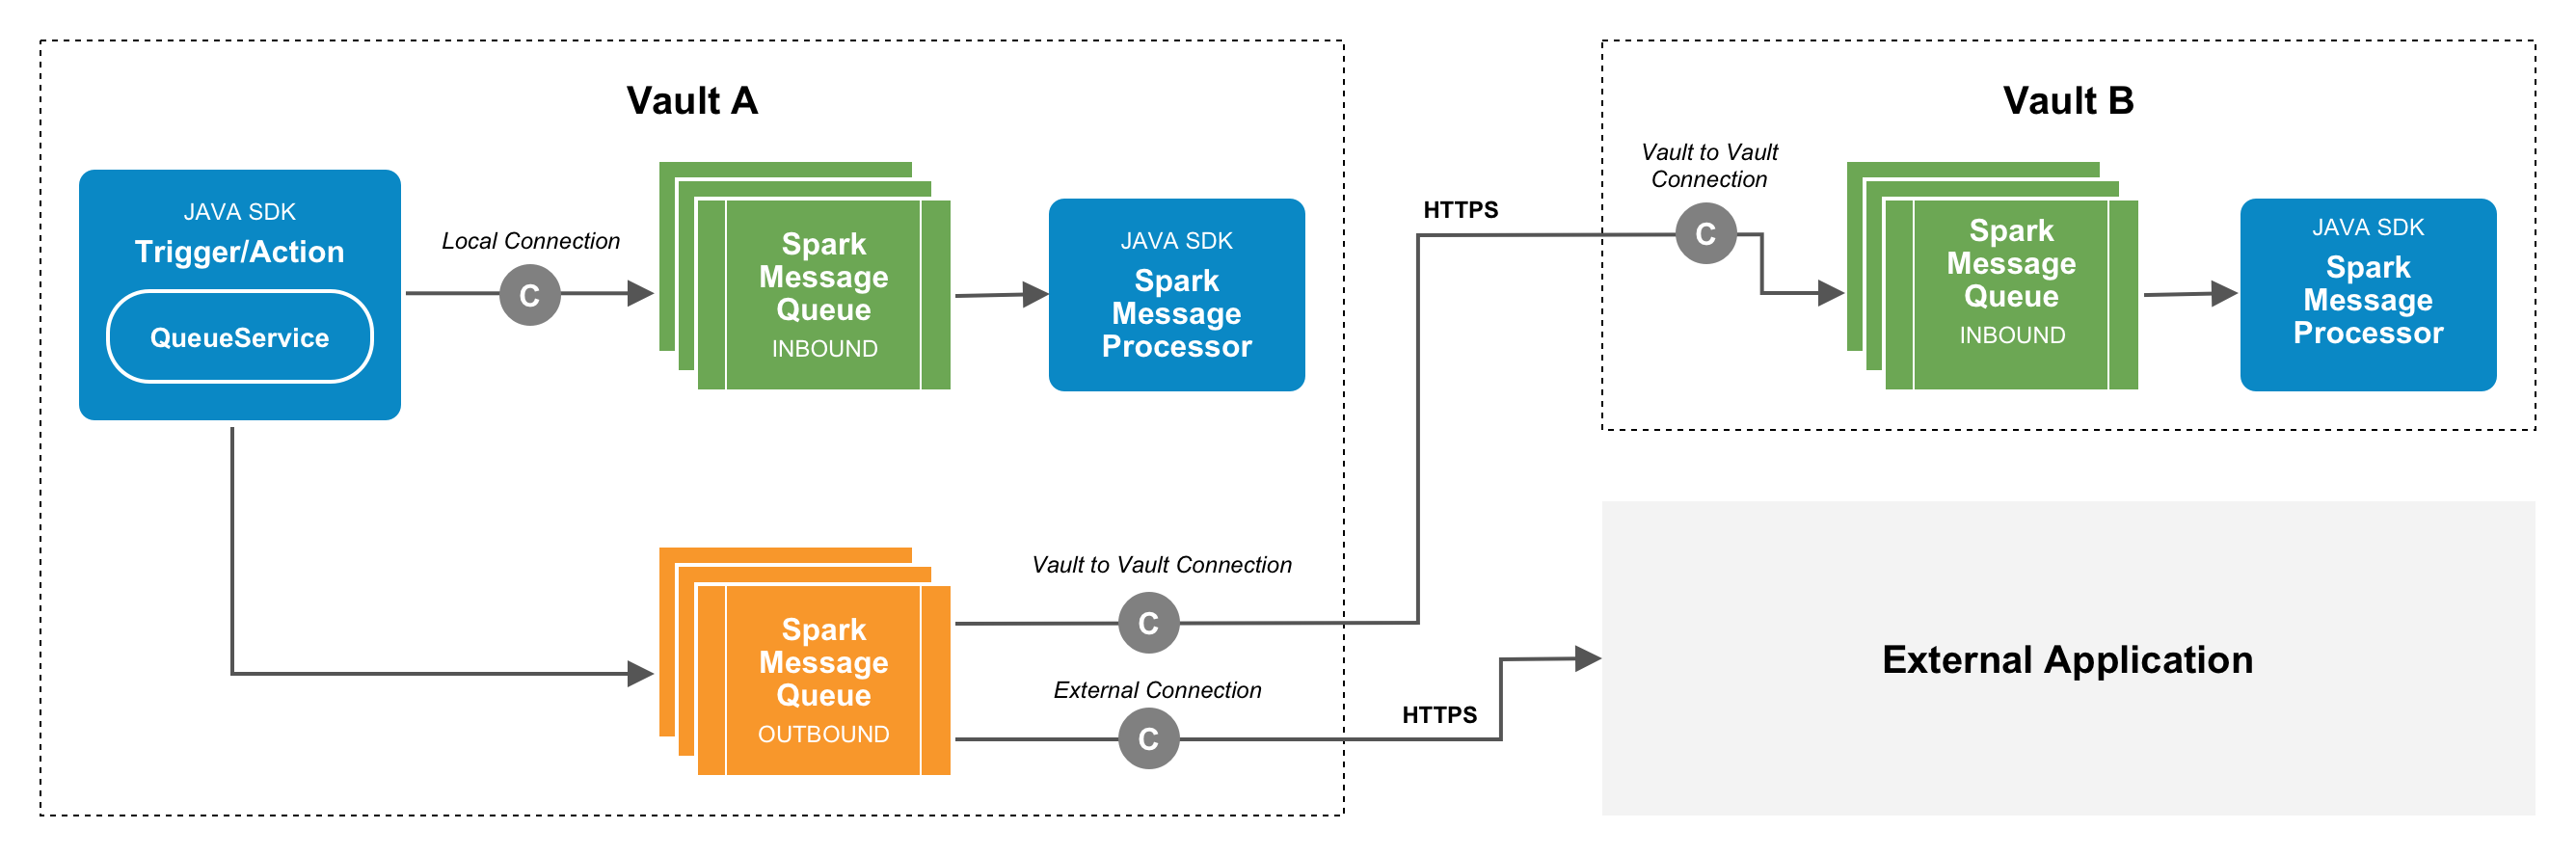
In the diagram above, a trigger or action in Vault A calls QueueService which, through a Local Connection, adds a message into an Inbound Spark Message Queue. At the same time, without needing a connection, QueueService also adds messages into an Outbound Spark Message Queue.
The Inbound Queue sends the message to the attached Spark Message Processor to handle the message. This a local integration where a Spark message can perform operations within the current Vault.
The Outbound Queue sends messages to two places. One message goes to Vault B through a Vault to Vault Connection where it received by an inbound queue. The inbound queue then processes this message with its attached Spark Message Processor. This is a Vault to Vault integration where a message from one Vault can “spark” actions in a completely different Vault.
The other message sent by the outbound queue goes through an External Connection to an External Application. The external application must be prepared to handle the incoming message. This is an external integration where Vault can communicate with a completely separate application.
After receiving Spark messages, any of these applications (whether a Vault or external application) can call Vault API to gather more information. For example, the Spark message processor in Vault B may use HTTP Callout to request additional information from Vaut A while processing the message. Learn more about Spark and HTTP Callout below.
Custom SDK code cannot reference standard, system-managed Vault to Vault connections. This helps avoid security vulnerabilities between functional teams. Learn more about standard Vault connections in Vault Help.
Spark Messaging is a message notification system that allows for loosely coupled, asynchronous, near real-time integration between Vaults or external applications. Spark messages are lightweight, signed messages designed to quickly send small amounts of data. If you need more information in your request, it’s expected you will use HTTP Callout to request additional information.
Messages are processed by a queuing system to provide reliable delivery. Outbound messages are placed in an outbound queue, and delivered messages enter an inbound queue. Once delivered, the inbound messages received from another Vault are processed by a Spark message processor.
For example, you may need to replicate digital assets from a PromoMats Vault to a publishing website. With Spark messaging, you can notify the publishing website when digital asset documents are approved. This in turn allows the publishing website to call Vault to retrieve details of the digital asset and format it for publishing. Without Spark Messaging capability, it would be necessary for the publishing website to periodically check for any newly created digital assets.
See our sample code for more examples of Spark Messaging.
Before you can send Spark messages, you must set up your Vault.
Spark messages are always in a consistent format. The following is an example of a Spark message:
POST / HTTPS/1.1
Content-Type: application/json
Host: regionxyz.its.proxy.veevavault.com
Connection: Keep-Alive
User-Agent: Veeva Vault Spark Message Agent
X-VaultAPISignature-CertificateId: 00001
X-VaultAPISignature-ExecutionId: a123bede-32cb-4dbc-a7d9
X-VaultAPISignature-RequestId: ffjkek809809fjklkfjlkjf89
X-VaultAPISignature-RequestDateTime: 2012-04-25T21:49:27.719Z
X-VaultAPISignature-RequestNotBefore: 2012-04-25T21:48:27.719Z
X-VaultAPISignature-RequestNotAfter: 2012-04-25T21:54:27.719Z
X-VaultAPISignature-RequestType: spark_message
X-VaultAPISignature-URL: https//www.etech.com/Fservices/vaultmessage
X-VaultAPISignature-VaultId: 1000023
X-VaultAPI-Signature: DMXvB8r9R83tGoNn0ecwd5UjllzsvSvbItzfaMpN2nk5HVSw7XnOn49IkxDKz8YrlH2qJXj2iZB0Zo2O71c4qQk1fMUDi3LGpij7RCW7AW9vYYsSqIKRnFS94ilu7
X-VaultAPI-SignatureV2: ZEn78/hRc5Xip9/S2zAeJoaeD0ZkC1go3hOABF3dW/+/P+ATEZZiq/8L39ohTj052e+/F35ggteJtiXpddyStRrA9fYkDuAMDcQLhJ6tTIlHmL6jz6/0hjqavm5VbeGLAxcTqnSDDtKmXN4uBPsuV83reVekeDDkeRVZ2MkbPR7rkXNLt4AA1DhLS4vstwpAhHapuIWyt06npuB6HNfZL

{
  "vault_name" : "Megatech RIM Vault",
  "vault_host_name" : "biorad-rim.veevavault.com",
  "queue_name" : "study_sync_with_med_innovation__c",
  "enter_queue_timestamp" : "2012-04-25T21:49:25.719Z",
  "send_message_timestamp" : "2012-04-25T21:49:27.719Z",
  "send_attempt" : 2,
  "message_id" : "bb28d4ca-3a37-4fef-91ae-93c3a4ec1d8d",
  "message" : {
               "attributes": {
                              "object" : "product_brand__c",
                              "has_related" : true,
                              "related_count" : 100,
                              "authorization" :
                                  "A109315AC45D0FA76A5891FE25B2FCBB1AEBDBDDF
                                   25008682BEC50BF43F5DD9A96700A962515703060
                                   53E4571108799F7141A1857A571786AEF5A626655
                                   7B380"
                             },
               "items": [
                          "OP0000000010I13",
                          "OP0000000000I09",
                          "OP0000000022T06"
                        ]
               }
}
Note that message headers may show in a different case depending on the receiving host, so developers should be prepared to handle the headers as case-insensitive.
| Name | Description |
|---|---|
Host | Vault’s outbound proxy host name. |
User-Agent | The client software originating the request. For Spark messaging, this will always be Veeva Vault Spark Message Agent. |
X-VaultAPISignature-CertificateId | A certificate ID unique to this message. The application receiving this message must use this ID to retrieve the public key. |
X-VaultAPISignature-ExecutionId | A unique ID to identify the execution thread. |
X-VaultAPISignature-RequestId | A unique request ID, such as Message ID. |
X-VaultAPISignature-RequestDateTime | The time this message was sent. |
X-VaultAPISignature-RequestNotBefore | The time when this message first becomes valid. You should not attempt to verify a message before this time. |
X-VaultAPISignature-RequestNotAfter | The time when this message first becomes invalid. You should not attempt to verify a message after this time. |
X-VaultAPISignature-RequestType | The type of request, either spark_message or http_callout. |
X-VaultAPISignature-URL | The URL of the request from the QueueService.putMessage(Message) call. This is the intended recipient of the message. |
X-VaultAPISignature-VaultId | The Vault ID which sent this message. |
X-VaultAPI-Signature | For Vault version 20R1.0: The message signature, signed with Vault’s private key. You need this value to verify the message. |
X-VaultAPI-SignatureV2 | For Vault version 20R1.2+: The message signature, signed with Vault’s private key. You need this value to verify the message. |
The message body is a JSON object with the following attributes:
| Name | Description |
|---|---|
vault_host_name | A Vault’s DNS host name. |
queue_name | The name of the outbound queue the message came from. |
enter_queue_timestamp | The time in UTC this message entered the queue. Specifically, this is the exact time SDK code called QueueService.putMessage(Message). |
send_message_timestamp | The time in UTC this message was sent, or left the queue. |
send_attempt | The number of delivery attempts made for this message. Learn more about message delivery. |
message_id | The message ID. |
message | A JSON object which contains the sub-attributes attributesand items. View this object in the javadocs. |
attributes | A sub-attribute of the message JSON object which contains the attributes specified by Message#setAttribute(). SDK developers can add up to 10 custom attributes in a single message. Each attribute cannot exceed 100 characters. A common attribute is authorization, set with a token. You can also tie an integration_point__sys to a Spark message to create user exceptions. |
items | A sub-attribute of the message JSON object which contains a an array of Strings for each item added with QueueService. SDK developers can add up to 500 items in a single message. Each item cannot exceed 100 characters. |
If message delivery fails, Vault will immediately retry the delivery one (1) time. If this immediate retry fails, Vault retries at diminishing intervals using an exponential backoff algorithm for the next six (6) hours.
For example:
And so on until the total time spent attempting to deliver the message is six (6) hours. Note that the time waited between retries will never exceed 15 minutes.
When the final delivery retry fails, Vault’s behavior is determined by the Spark Message Delivery Event Handler specified in the Spark Queue. To implement custom behavior for failed Spark messages, see Message Delivery Event Handler.
Spark Messages are signed using a private key to create a digital signature. External applications can then verify this signature with a public key.
To verify a Spark message, you need the following three things:
X-VaultAPISignature-CertificateId..pem file.GET /api/{version}/services/certificate/{X-VaultAPISignature-CertificateId}
Note that message headers such as X-VaultAPISignature-CertificateId may show in a different case depending on the receiving host, so developers should be prepared to handle the headers as case-insensitive.
For Vaults on version 20R1.0, the message signature is from the request header X-VaultAPI-Signature.
For Vaults on version 20R1.2+, the message signature is from the request header X-VaultAPI-SignatureV2.
The String-to-verify must be in the following format:
X-VaultAPISignature-* headers in the request must be in the following format: Lowercase(<HeaderName1>)+":"+Trim(<value>)+"\n" \n)The following is an example of a Spark Message in String-to-verify format:
x-vaultapisignature-certificateid:00001
x-vaultapisignature-executionid:a123bede-32cb-4dbc-a7d9
x-vaultapisignature-requestdatetime:2012-04-25T21:49:27.719Z
x-vaultapisignature-requestid:ffjkek809809fjklkfjlkjf89
x-vaultapisignature-requestnotafter:2012-04-25T21:54:27.719Z
x-vaultapisignature-requestnotbefore:2012-04-25T21:48:27.719Z
x-vaultapisignature-requesttype:spark_message
x-vaultapisignature-url:https//www.etech.com/services/vaultmessage
x-vaultapisignature-vaultid:1000023
{
  "vault_name" : "Megatech RIM Vault",
  "vault_host_name" : "biorad-rim.veevavault.com",
  "queue_name" : "study_sync_with_med_innovation__c",
  "enter_queue_timestamp" : "2012-04-25T21:49:25.719Z",
  "send_message_timestamp" : "2012-04-25T21:49:27.719Z",
  "send_attempt" : 2,
  "message_id" : "bb28d4ca-3a37-4fef-91ae-93c3a4ec1d8d"
  "message" : {
               "attributes": {
                              "object" : "product_brand__c",
                              "has_related" : true,
                              "related_count" : 100,
                              "authorization" :
                                  "A109315AC45D0FA76A5891FE25B2FCBB1AEBDBDDF
                                   25008682BEC50BF43F5DD9A96700A962515703060
                                   53E4571108799F7141A1857A571786AEF5A626655
                                   7B380"
                             },
               "items": [
                          "OP0000000010I13",
                          "OP0000000000I09",
                          "OP0000000022T06"
                        ]
               }
}
https//www.etech.com/services/vaultmessage?id=1234
Once you have all three necessary pieces of information, you can use your digital signature library in your application platform to verify the signature. You can see an example of this in our code samples.
Outbound Spark messages are sent from an IP address associated with Veeva Vault. To accept Spark message delivery, modify your network and firewall rules by allowlisting *.veevavault.com.
Vault does not support authentication with Vault API for Spark message delivery.
Spark Messaging utilizes a queue system to handle messages in a First-In, First-Out manner. Each queue must also have a valid Connection. Before you can send or receive Spark messages, you must first set up this system in Vault.
A Connection holds configuration data necessary for integrations. For example, a Vault to Vault Connection contains the remote Vault ID, and an External Connection contains the external application’s URL.
Once a connection is established, you can add the Connection to a queue to send or receive Spark messages.
Learn more about setting up connections in Vault Help.
To send Spark messages, you must create an outbound queue with a valid Queue Connection, meaning the queue is properly connected to the message destination. A queue can have multiple Connections, which means a single outbound queue can send messages to multiple destinations. For example, a Vault to Vault connection and an external connection can use the same outbound queue to send messages.
To receive Spark messages, you must create an inbound queue with a valid Queue Connection, meaning the queue is properly connected to the message source. A queue can have multiple Connections, which means a single inbound queue can receive messages from multiple sources. For example, a Vault to Vault connection and an external connection can send messages to the same inbound queue. Inbound queues also require a Spark Message Processor, which provides the logic to handle received messages.
Learn more about setting up queues in Vault Help.
Once queues are set up, you can manage your queues through the Vault UI or the Vault API. For example, you can check the current status of a queue or disable queue delivery.
To troubleshoot your Spark queue configuration, you can view the Queue Logs in Admin > Logs > Queue Logs.
To send a Spark message, you must first place the message into a Vault queue with QueueService. You must do this within a Vault extension. For example, a trigger or action can call QueueService to add a message to a queue.
You must deploy your Vault extension to make it available for configuration in your Vault. You can view all of the extensions currently deployed to your Vault in Admin > Configuration > Vault Java SDK.
Learn more about QueueService in the Javadocs.
To receive a Spark message in a Vault, you must create the logic to tell Vault what you intend to do with the information inside this message. You can create this logic inside a MessageProcessor. When creating an inbound queue to accept messages, you can select the Spark message processor to use with this inbound queue.
You must deploy your Spark message processor to your Vault to make it available for use with an inbound queue. You can view all of the processors currently deployed to your Vault in Admin > Connections > Spark Message Processors.
Learn more about MessageProcessor in the Javadocs.
Implementing a custom MessageDeliveryEventHandler can override the default behavior for failed Spark messages. When the final message delivery retry fails, Vault passes contextual and delivery-failure information to the handler, which you can use in your onError() logic to determine what actions to take. For example, you could put the message back on the queue in 24 hours, notify a specific user, create a user task record, or take other actions.
When creating an outbound queue to send messages, admins can select the Spark Message Delivery Event Handler, the class implementing MessageDeliveryEventHandler. If a handler is associated with a queue, a Spark Message Delivery Event Handler User is required.
By default, handler code executes with Vault Owner level access, identified in audit logs as Java SDK Service Account on behalf of {originatingUser}, where {originatingUser} is the Spark Message Delivery Event Handler User.
You must deploy your handler code to your Vault to make it available for use with an outbound queue. If the handler is not associated with an outbound queue, the deployed code will not be executed when a Spark message delivery failure occurs. You can view all of your Vault queues in Admin > Connections > Spark Message Delivery Event Handlers.
Learn more about MessageDeliveryEventHandler in the Javadocs.
When using Spark messaging for Vault to Vault integrations, it may be necessary to transform data from the source Vault’s data model to fit within the target Vault’s data model. Integration Rules allow developers to incorporate configurable rules for mapping object and document fields between two Vaults into a MessageProcessor.
Vault only supports integration rules for Vault to Vault integrations.
Available transformation rules include:
Integration rules are fully configured and evaluated on the target Vault. This preserves the loosely coupled characteristic of Spark messaging integrations. It is the target Vault’s responsibility to process the received message.
To set up integration rules:
MessageProcessor with the following logic: X-VaultAPI-DescribeQuery to true, which returns the source Vault data model.IntegrationRuleService to evaluate your integration rules.Field mapping rules allow you to set the value of a field on a target object or document directly from a value returned from a VQL query to the source Vault. This is useful when you need to derive field values for a record in the target Vault from data coming from the source Vault.
For example, you may want to provide the Name of a record from the source Vault as a cross-reference within an object field on the target Vault.
When you create an HTTP Callout for a field rule, you may need to add functions such as RICHTEXT() or TONAME() based on the query field type. You can retrieve the field type using getQueryFieldType.
The example below retrieves the type of an object field, then appends the appropriate VQL function to the query field before adding it to a list, which can be included in an HTTP Callout.
@MessageProcessorInfo()
public class ExampleProcessor implements MessageProcessor {
   public void execute(MessageContext context) {

      IntegrationRuleService service = ServiceLocator.locate(IntegrationRuleService.class);
      GetIntegrationRulesRequest request = service.newGetIntegrationRulesRequestBuilder().build();
      GetIntegrationRulesResponse response = service.getIntegrationRules(request);
      for (IntegrationRule integrationRule : response.getIntegrationRules()) {

         List<String> selectFields = VaultCollections.newList();
         for (FieldRule fieldRule : integrationRule.getFieldRules()) {
            ObjectFieldType objectFieldType  = fieldRule.getQueryFieldType(ObjectFieldType.class);

            switch (objectFieldType) {
               case LONGTEXT:
                  selectFields.add("LONGTEXT(" + fieldRule.getQueryField() + ")");
                  break;
               case RICHTEXT:
                  selectFields.add("RICHTEXT(" + fieldRule.getQueryField() + ")");
                  break;
               default:
                  selectFields.add(fieldRule.getQueryField());
            }
         }
      }
   }
}
Reference lookup rules allow you to set the value of a field on a target object or document indirectly from a value returned from a VQL query to the source Vault, using a lookup. This is useful in cases where a reference value differs between the source and target Vault.
For example, you can indicate that the Country value “US” in the source Vault is equivalent to “United States” in the target Vault.
Reference Lookups support the following data types, listed in the ReferenceLookupType Enum:
As a best practice, you should use global identifiers such as external_id__v to map data. You should only use reference lookups in cases where this is not possible.
Rather than using predefined values for reference lookups, you can also create dynamic reference lookups with the target_field_lookup field. For example, Admins can configure a field rule for a child object that uses parent__cr.name__v for an object reference instead of using predefined values. This eliminates the need to maintain reference lookup values, and instead developers can code their integrations to dynamically resolve object references.
The target_field_lookup field is only available if:
query_field_type is a Vault object. Target field lookups are not yet supported for documents.target_object_field is an object reference field corresponding to an object with an outbound relationship to this field rule’s target_object.If the data type in the source Vault does not match the data type in the target Vault, or if you need to map a data type not listed in the ReferenceLookupType Enum, Admins can manually map data types using the GENERIC option.
GENERIC supports any-to-any data type mapping except for multi-value fields. For example, Boolean (Yes/No) fields are supported, and multi-value picklists are not supported. As a best practice, only use GENERIC if your required data type is not available.
Field default rules allow you to set the value of a field on the target object or document to a default value. This is useful in cases where you want all records created via the integration to have a default value for a field. For example, you may want the Description field to say “created by a Vault Integration.”
You can also use field default rules in combination with field mapping or reference lookup rules. For example, you can specify a fallback value in cases where the query to the source Vault does not return a value.
When creating field defaults with the MDL Fieldrule subcomponent, note the following requirements for the field_default attribute based on field type:
true or false{yyyy}-{mm}-{dd}{yyyy}-{mm}-{dd}T{hh}:{mm}:{ss}.{mmm}Zname__v for the picklist value. For example, requires_triage__c.name__v for the picklist values, separated by a comma. For example, saturday__c,sunday__c.With Spark user exceptions, your Vault to Vault integrations can display custom exception messages to Business Admins in the Vault UI. This helps Business Admins track and resolve any errors that occur with your integrations.
For example, if your integration fails to process an incoming message, you can create custom SDK logic to create a User Exception Message (exception_message__sys) record to capture the failure and display information to a Business Admin. This record can contain information for how to troubleshoot, what action is necessary, who to contact if the failure persists, and so on.
User exception messages are tied to individual Integration Points (integration_point__sys). Because of this, you cannot leverage user exception messages without setting up integrations and integration points. Learn more in Vault Help.
Creating exceptions which appear in the Vault UI is as simple as creating User Exception records with RecordService.
First, your Spark message format must include an attribute pointing to the corresponding integration_point__sys API name. This ties all of your user exceptions to the appropriate integration point. It doesn’t matter what you name this attribute, but we recommend a meaningful name, such as integration_point.
To add an attribute to a Spark message, call Message#setAttribute(). For example:
    QueueService queueService = ServiceLocator.locate(QueueService.class);
    Message outboundMessage = queueService.newMessage("outbound_queue__c");
    outboundMessage.setAttribute("integration_point", "integration_point_api_name");
    queueService.putMessage(outboundMessage);
Which will add the attribute to your Spark message:
"message":{
  "attributes":{
    "integration_point": "create_regulatory_event__v"
  }
}
Next, add your user exception logic inside of a MessageProcessor. This logic must create a exception_message__sys record, and can optionally create exception_item__sys child records for each item in the exception. For example:
@MessageProcessorInfo()
  public class ProcessStudy implements MessageProcessor {
    public void execute(MessageContext messageContext) {
      Message incomingMessage = messageContext.getMessage();
      String integrationApiName = "integration_api_name";
      String integrationPointApiName = incomingMessage.getAttribute("integration_point", MessageAttributeValueType.STRING);
      createUserExceptionMessage(integrationApiName, integrationPointApiName);
    }

    private void createUserExceptionMessage(String integrationApiName, String integrationPointApiName) {
      RecordService recordService = ServiceLocator.locate(RecordService.class);
      String integrationId = getIntegrationId(integrationApiName);
      String integrationPointId = getIntegrationPointId(integrationPointApiName);
      List<Record> recordsToSave = getUserExceptionMessageRecord(integrationPointApiName, integrationId, integrationPointId);
      recordService.batchSaveRecords(recordsToSave)
        .rollbackOnErrors()
        .execute();
    }

    private List<Record> getUserExceptionMessageRecord(String integrationPointApiName, String integrationId, String integrationPointId) {
      RecordService recordService = ServiceLocator.locate(RecordService.class);
      Record userExceptionMessage = recordService.newRecord("exception_message__sys");
      List<String> errorTypePicklistValues = VaultCollections.newList();
      errorTypePicklistValues.add("message_processing_error__sys");
      userExceptionMessage.setValue("integration__sys", integrationId);
      userExceptionMessage.setValue("integration_point__sys", integrationPointId);
      userExceptionMessage.setValue("error_type__sys", errorTypePicklistValues);
      userExceptionMessage.setValue("error_message__sys", "Error message from IntegrationRuleService or RecordService");
      userExceptionMessage.setValue("name__v", integrationPointApiName);
      List<Record> recordsToSave = VaultCollections.newList();
      recordsToSave.add(userExceptionMessage);
      return recordsToSave;
    }
}
HTTP Callout allows custom Vault Java SDK code to make HTTP requests to other Vaults, to Vault API, and even third-party systems. Because Spark Messages are lightweight, it is likely that messages will need to make HTTP callouts for additional data.
HTTP Callout allows you to automate business processes between Vaults. For example, a new change control record in Veeva QMS causes a trigger to fire which sends a Spark message to Veeva Registrations. This message starts a set of regulatory activities in Veeva Registrations, but it needs more information. With HTTP Callout, Veeva Registrations calls back to Veeva QMS for the necessary information about the change control.
See our sample code for more examples of HTTP callout.

In the diagram above, a trigger or action in Vault A calls HttpService to make three HTTP Callout requests.
The first HTTP request is sent to Vault B through a Vault to Vault Connection. Once in Vault B, it requests information from Vault API through Vault B’s Authorized Connection User.
The second request goes through a Local Connection and calls Vault API with Vault A’s Authorized Connection User.
The third request is sent to an through an External Connection to an External Application. This application must provide resources for the request to obtain information.
HTTP Callout provides a Vault Java SDK service, HTTPService, to construct request and response objects and send requests. Requests are sent synchronously and send calls are blocking, meaning requests wait for a response until they timeout. HTTP requests happen outside of an SDK code transaction, so requests do not rollback.
HTTP request bodies are available in JSON or CSV format, through the use of JsonService and CsvService. Learn more in the Javadocs.
When creating HTTP Callouts, keep the following best practices in mind:
isLocalHttpRequestAllowed(RequestContextUserType)before calling newLocalHttpRequest(RequestContextUserType).To make an HTTP callout, you must first set up a Connection in Vault Admin. Connections can be set up for the local Vault, with another Vault, or with an external application. Local and Vault to Vault connection types can be set up with an Authorized Connection User to control what data access is allowed. External connection types may also be set up to make requests with one of the following Connection Authorization (connection_authorization__sys) types:
basic_auth__sys): The User Name (username__sys) and Password (password__sys) of the external systemclient_credentials__sys): The Client ID (client_id__sys) and Client Secret (client_secret__sys) of the external systemLearn more about Creating & Managing Connections in Vault Help.
The following types of tokens are available for Vault integrations: Authorization tokens, Session tokens, Vault tokens, and Custom tokens.
You cannot concatenate tokens.
For external connections, you can authenticate with the external application using Authorization tokens. For example, you can use Authorization tokens in an HTTP Callout request to the external application. The login credentials in a Connection Authorization (connection_authorization __sys) record can be included in the request by using the following tokens:
${Auth.Username}: For Basic Auth (basic_auth__sys) type records, the user or login name${Auth.Password}: For Basic Auth (basic_auth__sys) type records, the password for the login user${Auth.ClientId}: For Client Credential (client_credentials__sys) type records, the client ID or login name${Auth.ClientSecret}: For Client Credential (client_credentials__sys) type records, the client secret for the login user${Auth.AuthorizationValue}: “Authorization” value generated for the Authorization type associated to a connectionYou cannot use Authorization tokens to connect one Vault to another. Instead, create Vault to Vault connections in the Admin UI. Learn more about Vault to Vault connections in Vault Help.
Vault API does not allow Authorization tokens for user name and password authentication.
Session tokens can be included in a Spark message or HTTP Callout request to allow external applications to call Vault API with an authenticated session. For calls to Vault API from an external application, you can make your HTTP requests with a Session token in the Authorization header:
${Session.SessionId}: A valid Vault session token for the currently authenticated user.${Session.ConnectionUserSessionId}: A valid Vault session token for the Authorized Connection User on the Connection record.All Vaults include system-provided tokens for Vault information: vault_id__sys, vault_name__sys, and vault_dns__sys. You can define and store up to ten (10) additional tokens using the Vaulttoken MDL component type or from Admin > Configuration > Vault Tokens in the Vault UI. Once configured, Vault tokens can be used anywhere in your Vault.
For example, you might create a Vault token with the name my_subdomain__c and the value “veepharm” in your production Vault. In your sandbox Vault, you create another Vault token with the same name and the value “veepharm-sbx”. You can then set the URL to http://${Vault.my_subdomain__c}.veepharm.com in a Connection record, and Vault resolves the token to the correct subdomain for each Vault.
The following example MDL command creates a my_subdomain__c Vault token with a value of “veepharm-sbx”:
RECREATE Vaulttoken my_subdomain__c (
   label('Veepharm Sandbox'),
   active(true),
   clone_behavior('clear__sys'),
   type('string__sys'),
   system_managed(),
   value('veepharm-sbx')
   );
Custom tokens are defined using TokenService and are resolved at runtime. For example, you might create custom logic in a user-defined service to calculate batch size, then pass the batch size value to a ${Custom.batch_size__c} token. Learn more about token service.
Some Vault extension interfaces are only available in QMS Vaults.
In QMS Vaults, Quality External Notifications provide a way to send emails and share documents with users outside of your Vault. When an object has external notifications enabled, Admins can add the Create Distribution Groups Membership action to the object lifecycle to automatically populate distribution groups based on matching fields. In addition to the configuration options provided in the Vault Admin UI, developers can create custom logic to populate distribution group membership using the Vault Java SDK.
Learn more about configuring External Notifications in Vault Help.
A Create Distribution Group Membership action is a record action that uses interfaces from the externalnotification package, which is only available to QMS Vaults.
The extenalnotification package includes:
ExternalNotificationGroupMembershipService to retrieve and update distribution groups and their membership.ExternalNotificationMembershipReadOperation to provide error handling when retrieving the members of a distribution group.ExternalNotificationUpdateOperation to provide error handling when updating the members of a distribution group.ExternalNotificationMembership to retrieve all active distribution groups for a record.QualityDistributionGroupMembership to retrieve configuration details for a distribution group, and to retrieve and update the list of Person record IDs for the distribution group using an ExternalNotificationUpdateRequest.ExternalNotificationMembershipUpdateRequest.Builder to build an ExternalNotificationUpdateRequest.The following example shows a record action that uses ExternalNotificationMembership to retrieve the current distribution groups and their membership. It then uses ExternalNotificationMembershipService to add two new members and remove a third from the distribution group.
@RecordActionInfo(
    label="Update Existing Notification Membership",
    icon="generate__sys",
    usages={Usage.USER_ACTION}
)
public class UpdateExternalNotificationMembershipAction implements RecordAction {

    @Override
    public boolean isExecutable(RecordActionContext recordActionContext) {
        return true;
    }

    @Override
    public void execute(RecordActionContext recordActionContext) {
        for (Record record : recordActionContext.getRecords()) {
            String objectName = record.getObjectName();
            String recordId = record.getValue("id", ValueType.STRING);

            ExternalNotificationGroupMembershipService externalNotificationGroupMembershipService =
                ServiceLocator.locate(ExternalNotificationGroupMembershipService.class);

            externalNotificationGroupMembershipService.getExternalNotificationMembership(objectName, recordId)
                .onError(membershipReadError -> {
                    throw new RollbackException(
                        membershipReadError.getErrorType().toString(),
                        membershipReadError.getMessage()
                    );
                })
                .onSuccess(externalNotificationMembership -> {
                    Map<String, QualityDistributionGroupMembership> distributionGroupMembershipsByName =
                        externalNotificationMembership.getDistributionGroupMembershipsByName();

                    // Add Person 1 and Person 2, remove Person 3
                    QualityDistributionGroupMembership distributionGroupMembership1 =
                        distributionGroupMembershipsByName.get("dist_1__c");
                    if (distributionGroupMembership1 != null) {
                        Set<String> personIds = VaultCollections.newSet();
                        personIds.addAll(distributionGroupMembership1.getRecipients());
                        personIds.add("V0I000000001001"); // Person 1
                        personIds.add("V0I000000003004"); // Person 2
                        personIds.remove("V0I000000001004"); //Person 3
                        distributionGroupMembership1.setRecipients(personIds);
                    }


                    ExternalNotificationMembershipUpdateRequest membershipUpdateRequest =
                        externalNotificationGroupMembershipService.newExternalNotificationMembershipUpdateRequestBuilder()
                            .withDistributionGroupMemberships(distributionGroupMembershipsByName.values())
                            .build();

                    externalNotificationGroupMembershipService.updateExternalNotificationMembership(membershipUpdateRequest)

                        .rollbackOnErrors()
                        .execute();
                })
                .execute();
        }
    }
}
In most cases, you should include the logic to update distribution group membership within the execute() method of a record action. In cases where you want to reuse the same logic across multiple record actions, you can create a user-defined service with your distribution group logic. For example, you could call the same UDS in a user action and a user bulk action
Once you have deployed your custom Create Distribution Group Membership action, it will be available to add to supported object lifecycles in the Vault Admin UI.
Built from the Vault Email Processor feature, Admins can define how Vault automatically creates COA Inspection records from emails sent to an Inbound Email Address in the Vault Admin UI by using a QualityOne-provisioned Email Processor: the Supplier Initiated COA Email Processor.
In QualityOne QMS Vaults, the Supplier Initiated COA Email Processor allows your organization to send emails, containing your external parties COA file attachments, to Vault for document upload and record creation using an SDK entry point implementation. After creating a migration package from the implementation, Admins can import and validate the migration package to Vault, which enables the implementation under QualityOne COA Email Intake Handlers. You can customize the logic in the implementation to process information extracted from incoming emails and define COA Inspection records with the extracted information.
Learn more about setting up Automated COA Email Intake in Vault Help.
The QualityOne COA Email Intake Handlers implementation uses interfaces and annotation from the coaemailintake package available only for QualityOne QMS Vaults. The coaemailintake package includes the following:
QualityOneCoaEmailIntakeHandlerInfo annotation: QualityOneCoaEmailIntakeHandler class. QualityOneCoaEmailIntakeHandler interface: QualityOneCoaEmailIntakeHandlerResponse and QualityOneIntakeInspection to process COA email intake.QualityOneIntakeInspection to create COA Inspection object records.QualityOneCoaEmailIntakeHandlerContext interface: QualityOneCoaEmailIntakeHandler. QualityOneEmailAttachment objects, and the email body text. QualityOneIntakeInspection.Builder and QualityOneCoaEmailIntakeHandlerResponse.Builder.QualityOneEmailAttachment interface: QualityOneIntakeInspection interface: QualityOneIntakeInspection object.QualityOneIntakeInspection.Builder interface: QualityOneIntakeInspection object.QualityOneCoaEmailIntakeHandlerResponse interface: QualityOneCoaEmailIntakeHandler.QualityOneCoaEmailIntakeHandlerResponse object.QualityOneCoaEmailIntakeHandlerResponse.Builder interface: QualityOneCoaEmailIntakeHandlerResponse object used to create a COA Inspection record during the COA email intake process.QualityOneCoaEmailIntakeHandlerResponse object.Learn more about the coaemailintake package and see code examples in the Javadocs.
The artifacts (.jars) for the QualityOne SDK are distributed by a Maven Repository Manager. This allows you to easily download the QualityOne SDK and all its dependent libraries by setting up a Maven project pointing to the Maven Repo Manager in the pom.xml file. Learn more in POM Setup.
When setting up your POM file, you will need to add the QualityOne SDK to the <dependencies> section of your pom.xml file to download the QualityOne QMS Java SDK and its dependent libraries from the repository.
Add the following QualityOne SDK dependency to your pom.xml file:
    <dependency>
        <groupId>com.veeva.vault.app.qualityone.publicapi</groupId>
        <artifactId>qualityone-publicapi</artifactId>
        <version>${vault.sdk.version}</version>
    </dependency>
For example, your updated <dependencies> section would look like this:
<dependencies>
    <!-- Vault Java SDK -->
    <dependency>
        <groupId>com.veeva.vault.sdk</groupId>
        <artifactId>vault-sdk</artifactId>
        <version>${vault.sdk.version}</version>
    </dependency>
    <!-- Debugger -->
    <dependency>
        <groupId>com.veeva.vault.sdk.debugger</groupId>
        <artifactId>vault-sdk-debugger</artifactId>
        <version>${vault.sdk.version}</version>
    </dependency>
    <!-- QualityOne SDK -->
    <dependency>
        <groupId>com.veeva.vault.app.qualityone.publicapi</groupId>
        <artifactId>qualityone-publicapi</artifactId>
        <version>${vault.sdk.version}</version>
    </dependency>
</dependencies>
The value of the ${vault.sdk.version} property for importing the qualityone-publicapi library cannot be lower than 25R1.2.
The following example presents how the implementation handles incoming emails received by the Vault Email Service to the inbound email address and processes the information extracted. The QualityOneCoaEmailIntakeHandlerInfo annotation defines accepted emails when the “To” field matches the Admin-specified inbound email address named cholecap_coa_supplier_inbound__c.
@QualityOneCoaEmailIntakeHandlerInfo(inboundEmailAddress = "cholecap_coa_supplier_inbound__c")
After executing the QualityOneCoaEmailIntakeHandler, there’s a response to retrieve the list of email attachments and to create an empty list for excluded email attachments. The logic then excludes any attachments that are less than 1 megabyte in file size.
@QualityOneCoaEmailIntakeHandlerInfo(inboundEmailAddress = "cholecap_coa_supplier_inbound__c")
public class EmailIntakeHandler implements QualityOneCoaEmailIntakeHandler {

  @Override
  public QualityOneCoaEmailIntakeHandlerResponse execute(QualityOneCoaEmailIntakeHandlerContext context) {
    List<QualityOneEmailAttachment> emailAttachments = context.getEmailAttachments();
    List<QualityOneEmailAttachment> excludedAttachments = VaultCollections.newList();

    for (QualityOneEmailAttachment emailAttachment : emailAttachments) {
      if (emailAttachment.getFileSize() < (long) 1024 * 1024) {
        excludedAttachments.add(emailAttachment);
      }
    }
  }
}
Then the implementation extracts the Inspection Plan’s ID value from the email subject line and builds a QualityOneIntakeInspection object containing the Inspection Plan value and the included email attachments.
String inspectionPlan = context.getEmailSubject();

QualityOneIntakeInspection intakeInspection = context.newIntakeInspectionBuilder()
  .withValue("inspection_plan__v", inspectionPlan)
  .build();

return context.newCoaEmailIntakeProcessorResponseBuilder()
  .withIntakeInspection(intakeInspection)
  .withExcludedAttachments(excludedAttachments)
  .build();
Once the information has been processed, the implementation sends the QualityOneIntakeInspection object to Vault, triggering the Supplier Initiated COA Email Intake email processor to create new COA Inspection records and upload the email attachments as documents based on the information extracted from the QualityOneIntakeInspection object.
@QualityOneCoaEmailIntakeHandlerInfo(inboundEmailAddress = "cholecap_coa_supplier_inbound__c")
public class EmailIntakeHandler implements QualityOneCoaEmailIntakeHandler {

  @Override
  public QualityOneCoaEmailIntakeHandlerResponse execute(QualityOneCoaEmailIntakeHandlerContext context) {
    List<QualityOneEmailAttachment> emailAttachments = context.getEmailAttachments();
    List<QualityOneEmailAttachment> excludedAttachments = VaultCollections.newList();

    for (QualityOneEmailAttachment emailAttachment : emailAttachments) {
      if (emailAttachment.getFileSize() < (long) 1024 * 1024) {
        excludedAttachments.add(emailAttachment);
      }
    }

    String inspectionPlan = context.getEmailSubject();

    QualityOneIntakeInspection intakeInspection = context.newIntakeInspectionBuilder()
      .withValue("inspection_plan__v", inspectionPlan)
      .build();

    return context.newCoaEmailIntakeProcessorResponseBuilder()
      .withIntakeInspection(intakeInspection)
      .withExcludedAttachments(excludedAttachments)
      .build();
  }
}
When customizing the logic for your Supplier Initiated COA Email Processor, ensure you include the logic to extract either the Inspection Plan, Purchase Order, Purchase Order Line Item, or Material value from the subject line. Extracting either of these values helps to relate the Inspection Plan to the newly-created COA Inspection record when the Supplier Initiated COA Email Intake email processor triggers. You can customize the logic to not exclude any files from an incoming email or to exclude specific files based on your organization’s criteria. You can customize the logic in the QualityOneCoaEmailIntakeHandler interface for specific ways to handle errors. For example, you may want to set a specific COA Ingestion Status and COA Ingestion Error Type value when the interface fails to identify the subject line value or when errors occur when running the QualityOneIntakeInspection interface.
While developing Vault extensions is essentially programming in Java, there are some limits and restrictions to ensure your code runs securely in Vault.
Vault enforces limits at runtime to protect against excessive uses that may impact overall performance. Vault tracks custom code execution and terminates any code execution that reaches a limit. Vault then rolls back the transaction and presents a runtime error to the user to contact an Admin for assistance.
Vault does not enforce limits during debugging. However, Vault tracks and enforces service calls that execute on the server, such as QueryService and RecordService. If the service calls cause a limit violation error, the custom code will fail when you deploy them to Vault.

Time limits apply to an entire request, including all BEFORE, AFTER, nested triggers, and Action Triggers in a single request transaction. If a transaction fails due to a time limit violation, you can find more information about the violation in the debug log.
VaultCollections List, Set, and Map items is 10,000.If a transaction fails due to a size limit violation, you can find more information about the violation in the debug log.
Maximum memory allocated for a top-level Vault extension is 40MB. Nested extensions must work within this limit, but their execution amounts are deallocated upon completion.
For example:
Developers can help manage memory usage by creating a User-Defined Service. Return values and method parameters used by the service count toward the 40MB limit, but all other memory that is consumed inside the service will be freed when method execution is complete. Vault enforces a 400MB gross memory limit for the entire life of the transaction.
If any transaction fails due to memory limits, the entire extension fails. For example, if the nested trigger in step 3 used more than 25 MB, the entire transaction rolls back and the end-user will see an error message. Learn more about troubleshooting runtime errors.
Vault checks restrictions when a user uploads code to prevent unsafe use of Java. Validation occurs when deploying the uploaded source code to Vault. If there are any validation errors on deployment, the deployment fails and Vault sends an error message to the debug log.
The following are some examples of restrictions:
It’s important to keep restrictions in mind during development, especially since Vault does not enforce these restrictions while debugging code. Restrictions are only checked when uploading your code to Vault.
You cannot use any of the following method names:
Any reference to a method with a restricted name will fail when uploaded to your Vault.
Only RollbackException can be thrown and caught. Attempting to catch any other exception results in an error. You must use RollbackException to modify the error message shown to users. Note the exception cannot be stopped/swallowed.
Only users with the Vault Owner security profile can attach a debug session to a Vault. Learn more about managing security profiles in Vault Help.
Only Vaults in the Sandbox domain can have debug sessions attached.
The debugger cannot run while there is an active SDK request profiling session.
Limits:
You may only use allowlisted JDK classes and interfaces in your Vault extensions. All other libraries in the JDK are not allowed.

The following Vault permissions control actions for deploying and managing code in Vault. Learn more about permission sets in Vault Help.
| Permission Label | Controls |
|---|---|
| Vault Owner security profile | You must have the standard Vault Owner security profile to connect to the Vault Java SDK Debugger. |
| Admin: Vault Java SDK: Read | Ability to read Vault Java SDK code; you’ll need this permission to deploy code, validate code, export a VPK which contains code, or download source code. |
| Admin: Vault Java SDK: Create | Ability to create Vault Java SDK code; you’ll need this permission to deploy code, update existing code, or enable and disable extensions. |
| Admin: Vault Java SDK: Edit | Ability to create Vault Java SDK code; you’ll need this permission to deploy code, update existing code, or enable and disable extensions. |
| Admin: Vault Java SDK: Delete | Ability to delete Vault Java SDK code; you’ll need this permission to deploy code or delete existing source code. |
| Admin: Migration Packages: Deploy | Ability to deploy packages; you’ll need this permission on the target Vault to deploy code. |
| Objects: Inbound Package: Read | Ability to view the Inbound Package object. You must also have Read permission on all fields for this object. |
| Objects: Inbound Package Step: Read | Ability to view the Inbound Package Step object. You must also have Read permission on all fields for this object. |
| Objects: Inbound Package Data: Read | Ability to view the Inbound Package Data object. You must also have Read permission on all fields for this object. |
| Objects: Inbound Package Component: Read | Ability to view the Inbound Package Component object. You must also have Read permission on all fields for this object. |
When working with Vault field values in the Vault Java SDK, you must map the data type configured in a Vault field to a Java data type in order to manipulate the field value in Java code.
You can learn more about Vault object fields and document fields in Vault Help.
Fields with a non-null format_mask have a UI display value. To get the UI display value of fields, use RecordDisplayService or VQL’s TODISPLAYFORMAT(). For example, Time fields are stored as a String (such as 01:00:00) and displayed in the Vault UI according to the user’s locale (such as 1:00 AM or 1:00).
The ValueType interface also provides this mapping.
| Vault Field Type | ValueType | Returned Data Type |
|---|---|---|
| Text | ValueType.STRING | String |
| Yes/No | ValueType.BOOLEAN | Boolean |
| Number | ValueType.NUMBER | BigDecimal |
| Date | ValueType.DATE | LocalDate |
| DateTime | ValueType.DATETIME | ZonedDateTime |
| Picklist | ValueType.PICKLIST_VALUES | List<String> |
| Object | ValueType.STRING | String |
| Parent | ValueType.STRING | String |
| Lookup | Same as Source | Depends on ValueType |
| ID | ValueType.STRING | String |
| Multi-Value References (Documents only) | ValueType.REFERENCES | List<String> |
| Currency | ValueType.NUMBER | BigDecimal |
| LongText | ValueType.STRING | String |
| RichText | ValueType.STRING | String |
| Link | ValueType.STRING | String |
ValueType.STRING | String | |
| Phone | ValueType.STRING | String |
| Percent | ValueType.NUMBER | BigDecimal |
| Time | ValueType.STRING | String |
Typically, a developer can discover and fix most errors by debugging and testing code during development. However, in some cases, errors can occur at runtime causing custom code execution to terminate. When these errors occur, a developer needs to investigate the cause and fix the code accordingly.
Generally, there are three types of runtime errors:
NullPointerExceptionAll three types of errors cause:

As shown in the message above, Vault directs end-users to an Admin for assistance. The caused by message detail helps developers identify the cause of the error. In some cases, the error message is all a developer needs to fix the error. If a developer needs more information, they can check the Debug Log to further troubleshoot the issue.
From the Logs tab in Vault (Admin > Logs > Developer Logs), you can view the Debug Log. The debug log captures custom Vault Java SDK code execution details as well as standard messages from Vault. If enabled by an Admin, the debug log may also include information about Action Triggers.
This log is not always on by default. To capture data in the debug log, a Vault Admin must set up a debug log session for a particular user. Every request initiated by a user for which logging is enabled generates a log file. You can apply filters to narrow log entries to only include certain error types (log levels) or classes.
By default, the Vault Owner and System Admin security profiles have permission to view the debug log and set up debug log sessions for a particular user. You can only set up debug log sessions for 20 users per Vault. Learn more about Debug Logs in Vault Help.
The log file may contain the following message types:
LogService#debug()LogService#error()LogService#warn()LogService#info()LogService#logResourceUsage()The log file captures the following information:
Start Execution and End Execution. This is particularly helpful to identify nested triggers which fire as a result of other trigger code.Vault Java SDK Error:.[standard].For example, a trigger error in the debug log may look like this:
2024-05-08 18:18:05,345 Recordtrigger.com.veeva.vault.custom.CreateRecords SYSDATA {"executionId":"http-VLT-US-EAST-1-PRODUCTION-5-12316004-132-1715192285304","vaultId":123456,"userId":123456,"transactionId":"d8796e64-df16-4642-b6d6-c67e518397f3"}
2024-05-08 18:18:05,345 Recordtrigger.com.veeva.vault.custom.CreateRecords SYSINFO *****Start Execution:[com.veeva.vault.custom.CreateRecords]*****
2024-05-08 18:18:05,348 Recordtrigger.com.veeva.vault.custom.CreateRecords DEBUG Validating input parameters.
2024-05-08 18:18:05,349 Recordtrigger.com.veeva.vault.custom.CreateRecords SYSINFO *****End Execution:[com.veeva.vault.custom.CreateRecords]*****
2024-05-08 18:18:05,349 Recordtrigger.com.veeva.vault.custom.CreateRecords SYSINFO com.veeva.vault.sdk.api.core.LogService#debug(java.lang.String, [Ljava.lang.Object;) - [count=1, elapsed(ms)=1]
2024-05-08 18:18:05,349 Recordtrigger.com.veeva.vault.custom.CreateRecords SYSINFO com.veeva.vault.sdk.api.core.LogService#isDebugEnabled() - [count=1, elapsed(ms)=1]
2024-05-08 18:18:05,399 Recordtrigger.com.veeva.vault.custom.CreateRecords PERF CPU(ns)=151437 elapsed(ms)=1 memory(b)=1008
2024-05-08 18:18:05,403 Recordtrigger.com.veeva.vault.custom.CreateRecords ERROR ErrorId[d8881313-71f7-429f-a81b-2a700496fd6c] java.lang.Throwable: Vault Java SDK Error: [Encountered [2] error(s) in batch.] Error Id: [d8881313-71f7-429f-a81b-2a700496fd6c]
    at ...(Unknown Source)
Caused by: java.lang.Throwable: [Input Position [0] Error [{type='PARAMETER_REQUIRED', subtype='null', message='Missing required parameter [abbreviation__c]'}], Input Position [1] Error [{type='PARAMETER_REQUIRED', subtype='null', message='Missing required parameter [abbreviation__c]'}]]
For service calls only, the debug log also contains granular information about how long it took each call to execute.
| Parameter | Description |
|---|---|
count | The number of times this method executed. For example, count=3 means this method executed three (3) times. |
elapsed | The amount of time in milliseconds for all counts to complete execution. For example, if count=3, the elapsed time is the amount of time it took all three executions to complete. |
avg | The average amount of time in milliseconds it took each count to complete. For example, if count=3 and elapsed=3ms, it took each count 1ms to complete on average. This value is floored. For example, if the average is 1.9ms per count, this average rounds down to 1ms. If the average time is less than 1ms, this average rounds down to 0ms. |
For example, a call to RecordService in the debug log may look like this:
2017-11-29 05:57:39,995 Recordtrigger.com.veeva.vault.custom.triggers.CreateRecords INFO com.veeva.vault.sdk.api.data.RecordService#newRecord(java.lang.String) - [count=3, elapsed=3ms, avg=1ms]
If your Vault extension uses HTTP Callout to make an HTTP request, there is additional information about each request in the debug log.
| Parameter | Description |
|---|---|
HttpRequest | The HTTP method and the URL for this request. |
HttpResponse | The HTTP response code for this request. |
For example, an HTTP request in the debug log may look like this:
2017-11-29 05:57:39,281 Recordtrigger.com.veeva.vault.custom.triggers.CreateRecords INFO HttpRequest:[POST:https://myvault.veevavault.com/api/v18.3/vobjects/product__v]
2017-11-29 05:57:39,313 Recordtrigger.com.veeva.vault.custom.triggers.CreateRecords INFO HttpResponse:[200]
The LogService allows developers to send a message directly to the Debug Log to help troubleshoot issues. This is especially helpful when troubleshooting an issue that only occurs at runtime, meaning it’s not reproducible in debugging. For example, a developer can write a variable value to the debug log at runtime.
Refer to the Javadocs for details about using this service.
Vault’s SDK Request Profiler allows developers to create SDK request profiling sessions, which allow developers to troubleshoot and improve custom SDK code quality by analyzing results at the SDK request level. Through Vault API, developers can create profiling sessions that capture all SDK requests that occur while the session is active. Profiling sessions can be configured for either one specific user, or for all users.
Users with the Admin: Logs: Vault Java SDK permission can create profiling sessions. When created, profiling sessions begin immediately and run for either 20 minutes or up to 10,000 SDK requests, whichever comes first. To end a session early, developers can use the End Session endpoint. Once ended, a session’s status is processing__sys while Vault prepares the data, which may take about 15 minutes. Once the status is complete__sys, the data is available for download with the Download Profiling Session Results endpoint.
Profiler logs expire after 30 days. At the end of 30 days, Vault deletes the log and all log files. The Profiler Log is also available in the Vault UI from Admin > Logs > Developer Logs. Learn more about the Profiler Log in Vault Help.
Admins can download profiling results as a CSV through the Vault Admin UI and Vault API, which includes one row per SDK request with the following data:
For more specific information about the log data, see the Download Profiling Session Results API request.
Runtime Logs capture additional logging for Vault Java SDK transactions. Unlike the Debug Log, which is enabled per user, the Runtime Log is enabled per Vault. Because the runtime logs are always running, these logs can provide more consistent and reliable logging over the debug log. However, logging more than runtime exceptions may cause Vault performance degradation. Runtime logs capture data in 5-minute intervals. Daily logs are available for download in the Vault UI (Admin > Logs > Developer Logs) and Vault API. Daily logs are stored for 30 days.
The content captured in the Runtime Logs depends on settings set by an Admin in the Vault UI under Settings > General Settings:
LogService#error()LogService#error(), and LogService#warn()LogService#error(), LogService#warn(), and LogService#info()Runtime log entries are captured 15 minutes after the Vault Java SDK transaction completes. If you’ve recently encountered an error which is not captured in the runtime log, wait for the transaction to finish and check again.
Runtime logs capture data in 5-minute intervals with the following limits:
LogService logging: Maximum 40 KBIf a limit is reached, the Runtime log captures a LIMIT entry with the error details and stops capturing data. After the current 5-minute period elapses, logging resumes automatically.
The LogService allows developers to send a message directly to the Runtime Log to help troubleshoot issues. This is especially helpful when troubleshooting an issue that only occurs at runtime, meaning it’s not reproducible in debugging. For example, a developer can write a variable value to the runtime log at runtime.
Refer to the Javadocs for details about using this service.
From the Logs area in Vault (Admin > Logs), you can view the Queue Logs. You must have the Configuration: Queues: Queue Log permission to view this log. This log only contains information about Spark queues.
By default, the queue logs only capture undelivered Spark messages. For example, when a message in a queue fails to deliver after the maximum number of retry attempts. Once a message is written to the queue log, Vault removes this message from the queue.
To capture information about all Spark message delivery, you must set the Trace Queue Delivery through the Vault UI. This captures delivery information for the selected queues for 20 minutes.
Vault produces a daily log for each of the previous 30 days. After 30 days elapse, the logs begin to delete, starting from the oldest log.
The queue log captures the following information:
| Column | Description |
|---|---|
TimeStamp | The time this message entered the log, in the format YYYY-MM-DDTHH:MM:SSZ. For example, 7:00am on January 15, 2016 would use the format 2016-01-15T07:00:00Z. |
VaultId | The ID of the Vault where this queue is located. |
QueueName | The name of the queue, such as outbound_queue__c. |
ConnectionName | The ID of this queue’s Connection object, such as V17000000000101. |
MessageId | The unique message ID, which is defined as X-VaultAPISignature-RequestId in the request header. |
EntryType | The type of queue log entry. Values are either REMOVAL for undelivered messages removed from the queue, or TRACE for messages added through Trace Queue Delivery. |
QueueTime | The time this message entered the queue, in the format YYYY-MM-DDTHH:MM:SSZ. For example, 7:00am on January 15, 2016 would use the format 2016-01-15T07:00:00Z. |
SendTime | The last time this queue attempted to send this message, in the format YYYY-MM-DDTHH:MM:SSZ. For example, if this queue last attempted to send the message at 7:00am on January 15, 2016, the log would show 2016-01-15T07:00:00Z, even if the queue made attempts previous to this time. |
Attempt | The number of times this queue attempted to deliver this message. If the queue never attempted to send the message, this column is blank. |
StatusMessage | The status message received for this message. For example, SUCCESS or Exception occurred: with an error message. |
ResponseTime | The time this queue received the response for this message, in the format YYYY-MM-DDTHH:MM:SSZ. For example, 7:00am on January 15, 2016 would use the format 2016-01-15T07:00:00Z. |
From the Admin > Logs area in Vault, you can view a history of actions within your Vault, including actions performed with the Vault Java SDK. You can learn more about the Vault Admin Logs in Vault Help.
The System Audit History page displays Vault-level configuration and settings changes, which includes managing Vault extensions. For example, uploading a new trigger to your Vault.

Records affected by triggers indirectly through the use of the RecordService have an audit entry identifying the change with System on behalf of the user initiating the request. This allows an Admin to audit changes which may not have been directly manipulated by users, but rather by code in triggers. When a user delegates access to another user, the audit will show Java SDK Service Account on behalf of the delegating user.
In addition, when a workflow starts indirectly by code, the audit log will also indicate Java SDK Service Account on behalf of the user initiating a request. This is important because a user may create a new record that fires a trigger to start a workflow. In this case, the end user did not start a workflow, they created a new record. The audit log would then indicate that the Java SDK Service Account started the workflow on the user’s behalf.
The Document Audit History page displays document-related events, including events triggered through the Vault Java SDK. Documents affected by Vault extensions through the use of DocumentService have audit entries identifying the change with Java SDK Service Account on behalf of the user initiating the request. When a user delegates access to another user, the audit will show Java SDK Service Account on behalf of the delegating user.
We’ve created sample code for various use cases. Feel free to use these as starting points for your own custom Vault extensions.
These projects are available at the Veeva GitHub™.
If you need help, please join Vault for Developers on Veeva Connect.
| Project | Description |
|---|---|
| Service Basics | Services demonstrated in this project include:
|
| User-Defined Service | Use cases in this project include:
|
| User-Defined Model | Use cases in this project include:
|
| Object Records | Use cases in this project include:
|
| Documents | Use cases in this project include:
|
| Doctype Triggers | Use cases in this project include:
|
| Job Service | Use cases in this project include:
|
| Translation Service | Use cases in this project include:
|
| Vault to Vault using Integration Rules | Demonstrates the use of Spark Messaging to move and mapping data from a source Vault to a target Vault:
|
| Vault to Vault Document Copy | Demonstrates copying a document from a source Vault to a target Vault:
|
| External Integration | Demonstrates the use of Spark messaging to move data from a source Vault to an external AWS™ system:
|
We’ve created the following tools to assist developers in utilizing the Vault Java SDK.
| Tool | Description |
|---|---|
| Maven Plugin | Provides commands to package, validate, import, and deploy Vault Java SDK source code through the use of Maven build goals. |
| Vault Log Analyzer | A command line tool that simplifies the process of analyzing Vault API and Vault Java SDK logs. |