
This article provides guidance for advanced users who need to manually edit existing Configuration Migration Packages (VPKs) to create custom VPKs. You can find instructions for creating and deploying Vault-generated VPKs in Vault Help.
VPKs are the recommended way to migrate Vault configuration and data. VPKs help eliminate the need for the majority of manual steps, which also decreases the room for human error.
VPKs generated directly from Admin > Deployment or using Vault Compare are considered Vault-generated VPKs. They are designed to override Vault components using the RECREATE command. Vault-generated VPKs cannot handle deleting components, renaming components, or making precise changes to attributes and subcomponents while leaving everything else intact.
Vault-generated VPKs have two types:
With the growing complexity of Vaults, there is an increased need to modify Vault-generated VPKs or to create custom VPKs that use DROP, RENAME, and ALTER commands (instead of RECREATE). These VPKs are purpose-built to perform a specific set of changes without overriding other configuration you want to keep in the target system. The following sections explain the anatomy and creation of VPK packages.
Before you begin, ensure that you are able to change file extensions and zip and unzip files.
As a prerequisite to creating custom VPKs, you must be able to change the extension of files.
On Windows machines, you may need to enable File name extensions by opening Explorer and going to View > Show > File name extension.
Once it is visible, you can use Rename to change the file extension to .vpk for the package.
You can also use the terminal with the following command:
ren my_vpk_package.zip my_vpk_package.vpk
On MAC, you may need to enable Show all filename extensions by opening Finder and going to Finder > Settings > Advanced > Show all filename extensions.
Once it is visible, you can use Rename to change the file extension to .vpk for the package.
You can also use the terminal with the following command:
mv my_vpk_package.zip my_vpk_package.vpk
Configuration Migration Packages (VPKs) are structured as ZIP archives, and their content can be extracted (unzipped) and packaged (zipped) with any conventional tool that handles .zip files. These steps are not required when working with Vault-generated VPKs that you do not wish to modify.
You can extract VPK content by renaming the VPK from pkg_name.vpk to pkg_name.zip on your computer, and then unzipping the archive.
You can package VPKs by creating a ZIP archive. VPKs must have at least one components folder or one javasdk folder (or both) to be a valid package (see details in the VPK Contents section). When all steps are ready to package, select the components folder, javasdk folder, and the vaultpackage.xml and compress them into a .zip file, then change the file extension from .zip to .vpk.
The following steps illustrate how to create a new Picklist and deploy it with a VPK that you can import to any Vault:
my-first-vpk.my-first-vpk folder, create a folder called components.my-first-vpk > components folder, create a folder called 00010.Open a new file in a text editor and paste the following MDL for a Picklist:
RECREATE Picklist my_first_picklist__c (
   label('My First Picklist'),
   active(true),
   can_add_values(true),
   can_reorder_values(true),
   Picklistentry my_first_picklistentry__c(
      value('My First Picklistentry'),
      order(1),
      active(true)
   )
);
Save the file in the my-first-vpk > components > 00010 folder as Picklist.my_first_picklist__c.mdl
Open a new file in a text editor where we’ll create the MD5 Checksum file.
Generate the MD5 checksum for the Picklist.my_first_picklist__c.mdl file (WIN|MAC).
Paste the MD5 checksum to the text editor, followed by a space and Picklist.my_first_picklist__c, then save the file as Picklist.my_first_picklist__c.md5 in the my-first-vpk > components > 00010 folder.
Open a new file in the text editor and paste the following XML:
<vaultpackage xmlns="https://veevavault.com/">
<name>my-first-vpk-package</name>
<source>
    <vault>999999</vault>
    <author>your.email@yourcompany.com</author>
</source>
<packagetype>migration__v</packagetype>
<summary>My First VPK Package</summary>
<description></description>
</vaultpackage>
Save the file as vaultpackage.xml in the my-first-vpk folder.
Select the vaultpackage.xml file and the components folder and create a ZIP archive from them with your preferred method.
Change the extension of the file from .zip to .vpk (WIN|MAC).
Import the VPK package to Vault by going to Admin > Deployment > Inbound Packages and clicking Import.
Deploy the VPK package by opening the imported package, clicking on Review & Deploy, and following the on-screen instructions.
Once the deployment is complete, verify the existence of the Picklist in Business Admin.
After you have successfully unzipped a VPK, you will have access to its contents. There will be three items at the top level:
This file contains information about the VPK that will be interpreted by Vault when importing the package. It is in XML format and has the following nodes:
migration__v) or Test Data (test_data__v) packageEach deployment step is represented by a single folder. There are two types of steps in every VPK: a Component Step and a Data Step. For adding Vault Java SDK code to the VPK, refer to the dedicated section below.
The order of the steps is determined by the name of the folder. The folder must be a number in 000000 format. For example, step number 10 would be 000010. This allows you to rename folders to change their deployment order or to insert steps between them. Each deployment step must be in a separate folder.
By default, Vault will scale up the step numbers to maintain relative order, but allow you to add steps in between without having to rename all folders.
For example, between steps 000010 and 000020, you can insert step 000015 without having to rename any of the folders to keep the relative order.
A component step is used to perform an MDL Command. In the case of VPKs exported from the Deployment tab in Admin, the component steps will always be generated as RECREATE commands.
When preparing for deployment, you may wish to use DROP, RENAME, and ALTER commands instead of RECREATE. Component Steps consist of three different text files with specific extensions, which we’ll explain in the following sections. All of the files can be opened in a text editor such as Notepad, Notepad++, or Sublime Text.
The component_type.comoponent_name.mdl file contains the MDL Command that will be executed. If this VPK was generated by Vault, these will always be RECREATE commands. We recommend creating a separate step for each MDL Command.
You can use other MDL commands if you need to perform operations that are more precise than the RECREATE commands in the Vault-generated VPK:
DROP commands create a step that will delete a component.RENAME commands allow you to change the API Name of a component.ALTER commands can be used for attribute or subcomponent-level changes, applying them without completely replacing the existing configuration.To create a new MDL file, create a new file in your text editor and add an MDL command to it, then change the name and file extension of the .txt file to the following format: {component_type}.{component_name}.mdl. For example, Picklist.category__c.mdl
Example MDL file contents:
ALTER Picklist category__c (
   ADD Picklistentry new_category__c(
      value('New Category'),
      order(10),
      active(true)
   )
);
The component_type.comoponent_name.md5 file contains the MD5 checksum of the .mdl file, which is a long string of characters that helps uniquely identify the contents of the VPK. Its purpose is to ensure the MDL commands are not corrupted during import. This file is automatically created for Vault-generated VPKs and must be present at import.
If you add a new step or make changes to the .mdl files of any existing step, you will need to generate a new MD5 checksum for the .mdl file.
You can generate the MD5 checksum for the .mdl file using multiple methods. The following examples show how to create the MD5 checksum from the command line.
.mdl file is, or use the cd "folderpath" command to change directories.md5 "filename.mdl" and hit enter..mdl file is, or use the cd <folder_path> command to change directories.certutil -hashfile "filename.mdl" MD5 and hit enter.To create a new MD5 file, create a new file in your text editor and add an MD5 hash to it, then change the name and file extension of the .txt file to the following format: {component_type}.{component_name}.md5. For example, Picklist.category__c.md5.
54baca9cf605ab0917a072ee0bf7b940 Picklist.category__c
If you have modified an existing component step, you just need to replace the MD5 hash with the current one you generated in the existing .md5 file.
54baca9cf605ab0917a072ee0bf7b940 Picklist.category__c
The component_type.comoponent_name.dep CSV file contains all the dependencies at the time of export from the Source Vault. Certain configuration requires the existence of other, referenced configuration, and these dependencies are described in the .dep file. That file is then used when validating a VPK to determine if the necessary dependencies exist either in the VPK or in the Vault you’re deploying to.
The .dep file is not mandatory, however, without it, the system will be unable to check for dependencies when you validate your VPK package.
The .dep file can be created from the Vault Component Relationships (vault_component_relationships__sys) system object using the below described Vault Component Relationships Query, and prepending a column named “In Package” to indicate if the dependency is in the VPK (true) or not in the VPK (false).
![]()
If the dependency is not in the VPK (false), the system will confirm that the component is in the target Vault. If the Blocking Type is block__sys the system will prevent the deployment of the VPK.
SELECT
    blocking__sys,
    comp_rel_source_comp__sysr.label__v,
    comp_rel_source_comp__sysr.component_name__v,
    comp_rel_source_comp__sysr.component_type__v,
    comp_rel_target_comp__sysr.label__v,
    target_component_name__sys,
    target_component_type__sys,
    target_sub_name__sys,
    target_sub_type__sys
FROM
    vault_component_relationship__sys
WHERE
    comp_rel_source_comp__sysr.component_name__v = 'user__sys'
Data steps are used to deploy data into the system using CSV files via Vault Loader. This means that any Load action performed via Vault Loader can instead be done via data steps in your VPK.
Each data step will contain just one .csv file and one .xml file, even if there are multiple objects selected when creating the dataset for your VPK in the Deployment tab in Admin.
This file contains information about the data steps that Vault uses when importing the package. It is in XML format, and has the following nodes:
DSET-00004) and the Object Label (for example, Country) combined with a hyphen.true, indicates that the step is required..csv file containing the object records.action is Upsert, Update, or Delete. You can use any object field that has unique set to true in the object metadata.Object.Create, Update, Upsert, or Delete.true, initiates the loader job in Record Migration Mode.A Comma Separated Value (CSV) file containing the object record metadata. This is the same file that users would normally use with Vault Loader.
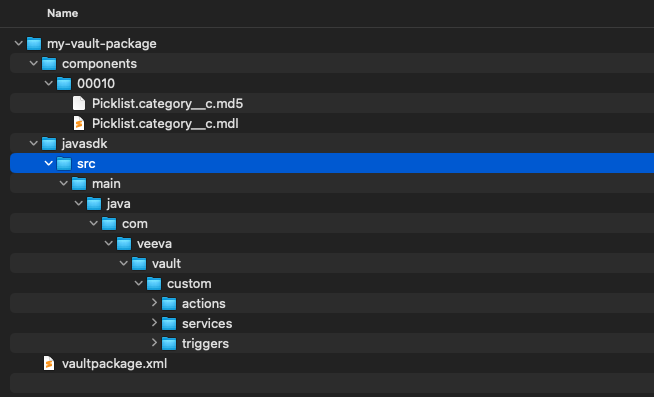
Vault Java SDK code will alway be deployed after all the steps, and does not require a deployment step folder created in the components folder. Instead, you must add the src folder of your Vault Java SDK project to the javasdk folder in the root of the VPK.
When deploying VPKs, you may encounter errors and warning messages; the most common ones are documented in Vault Help: Configuration Migration Errors & Warnings. If you have trouble understanding an error message, you can reach out to the Vault Developer Support Community on Veeva Connect.