
Use MDL (Metadata Definition Language) to manage Vault configuration. Like DDL (Data Definition Language) in databases, you can use MDL to create, describe (read), update, and drop (delete) Vault components that make up its configuration.
MDL is a powerful tool for manipulating components programmatically, but its primary use is automating tasks. While MDL mimics the behavior of Vault’s Admin UI, it is not intended for use as a default tool for basic configuration tasks or maintenance on an ongoing basis. To manage most standard configuration tasks, use the Admin UI.
MDL uses CRUD-like commands to manage components for Vault. You can use the CREATE, RECREATE, RENAME, ALTER, and DROP commands to manage Vault configuration components. Use operators to define conditions for MDL command execution. Learn more in the MDL Commands documentation.
MDL provides access to component types, which are the configuration elements of a Vault. Vault groups component types by either metadata types (Picklist, Object, Docfield, etc.) which manage the configuration of a Vault, and code types (Recordtrigger, Documentaction, Recordaction, and Userdefinedclass) which extend the functional behavior of a Vault.
See Component Type References for details of each MDL supported Vault component type.
Some component types store data in additional child components, called subcomponents. For example, each section visible to users in a Searchcollection is stored as an individual Searchcollectionsection subcomponent record. Components have a parent-child relationship with their subcomponents, meaning that a subcomponent record must belong to a parent component record.
Deleting a component record with the DROP command also deletes any associated subcomponent records. With the exception of the component types listed below, inactivating a record by changing its active attribute value to false also inactivates any associated subcomponent records. Note that reactivating a parent component record does not reactivate its children.
Inactivating records of the following component types does not inactivate associated subcomponent records:
Some component types include attribute constraints, which ensure all values for a given attribute meet certain criteria. Attribute constraints are read-only.
By default, MDL executes in the context of Vault’s base language. Vault Admins manage localizable attributes, including Java SDK custom Messages, using Vault’s translation tools.
While Vault’s REST APIs allow developers to manage Vault data, you can use Vault API to modify metadata and manage configurations for Vault.
This tutorial walks through the process of using MDL to modify configuration in Vault. You’ll use MDL to do the following:
To use and test out MDL, we recommend downloading our Postman collection and using a sandbox Vault, which is a copy of your production Vault. Learn more about Vault Sandboxes in Vault Help.
This collection allows you to execute the basic commands laid out in the steps below and verify the results in your Vault. Click the button below to import the collection into Postman.

To execute a MDL command, send a POST request to the Execute MDL Script endpoint.
curl -X POST -H "Authorization: {SESSION_ID}" \
-H "Content-Type: application/json" \
--data-binary @"mdl.txt" \
https://myvault.veevavault.com/api/mdl/execute
You can execute MDL commands one at a time or in a script. When executed as a script, MDL executes each command sequentially.
You’ll first need to create a Picklist for your Vault. The following example creates a single Picklistentry in the Picklist component. Learn more about the MDL Picklist component.
To create a picklist named vMDL Options, enter the following RECREATE command:
RECREATE Picklist vmdl_options__c (
label('vMDL Options'),
active(true),
Picklistentry hello_world__c(
  value('hello world'),
  order(0),
  active(true)
)
);
Navigate to Business Admin > Picklists to confirm that the vMDL Options picklist exists in your Vault.
Now that you’ve created a Picklist, you’re ready to create a Vault Object that uses the picklist. Learn more about the MDL Object component.
Enter the following RECREATE command:
RECREATE Object vmdl_hello_world__c (
label('vMDL Hello World'),
label_plural('vMDL Hello World'),
active(true),
description("This is sample object created for the MDL 'Getting Started' guide."),
help_content(),
in_menu(true),
allow_attachments(false),
enable_esignatures(false),
audit(false),
order(0),
dynamic_security(false),
system_managed(false),
available_lifecycles(),
object_class('base'),
allow_types(false),
user_role_setup_object(),
Field option__c(
  label('Option'),
  type('Picklist'),
  active(true),
  required(false),
  unique(false),
  list_column(false),
  order(14),
  multi_value(false),
  picklist('Picklist.vmdl_options__c'))
);
Log in to your Vault.
Navigate to Business Admin > Objects to confirm that the vMDL Hello World object exists in your Vault. 
Now that you’ve created the necessary components, you’ll want to create a vMDL Hello World object record in your Vault.
You can do this with the Postman collection or manually in the Admin UI.
Log into your Vault.
Navigate to Business Admin > Objects > vMDL Hello World.
Click Create.
Enter a Name for the object record.
Select hello world from the Option picklist.
Click Save. 
Next, you’ll use a single statement to modify both the Object and Picklist simultaneously.
Enter an ALTER command to add a second picklist entry and modify the initial entry. You should manually enter a value before running the MDL command for the new picklist entry’s value.
ALTER Picklist vmdl_options__c (
label('vMDL Options'),
MODIFY Picklistentry hello_world__c(
  value('Hello World.'),
  order(0)
),
ADD Picklistentry hello_worldv2__c(
  value('ENTER ANY VALUE'),
  order(1),
  active(true)
)
);

Use the ALTER command to add four new object fields.
ALTER Object vmdl_hello_world__c (
ADD Field hello1__c(
  label('Hello 1'),
  type('String'),
  active(true),
  required(false),
  list_column(false),
  unique(false),
  order(0)),
ADD Field hello2__c(
  label('Hello 2'),
  type('String'),
  active(true),
  required(false),
  list_column(false),
  unique(false),
  order(0)),
ADD Field hello3__c(
  label('Hello 3'),
  type('String'),
  active(true),
  required(false),
  list_column(false),
  unique(false),
  order(0)),
ADD Field hello4__c(
  label('Hello 4'),
  type('String'),
  active(true),
  required(false),
  list_column(false),
  unique(false),
  order(0))
);

Return to your Vault to create a new vMDL Hello World record. You will see the new picklist entry options as well as the four new fields on the object record.
You can do this with the Postman collection or manually in the Admin UI.
Log into your Vault.
Navigate to Business Admin > Objects > vMDL Hello World.
Click Create.
Fill in the record information: Name, Hello 1 - 4, and Options fields.
Click Save.
Now that you have created vMDL Hello World records with the original and altered fields, you can delete the object records.
Log in to your Vault.
Navigate to Business Admin > Objects > vMDL Hello World.
From the Actions menu, click Delete.
To delete both the object and picklist components, use the DROP command. Note that you must delete the object records to delete the components.
DROP Object vmdl_hello_world__c;
DROP Picklist vmdl_options__c;
Use MDL when Vault requires configuration changes across multiple components. Since you can implement MDL commands in a script, you can either execute multiple commands sequentially or within a single script.
See some of the common use cases below:
| Project | Description |
|---|---|
| Alter multiple components | Use the ALTER command to manipulate multiple components such as Object field values, Picklist values, Docfields, or Notificationtemplates |
| Migrate Component Configuration | Automate migration or synchronization of specific components programmatically. |
| Access Control | Use the the MDL commands to automatically manage security related components such as Atomicsecurityand Sharingrule. |
This example walks through updating the subject attribute on multiple Notification Templates. The Notificationtemplate MDL components contain the subject attribute. We can update it across multiple components at once by executing the following MDL commands:
curl -X POST \
  https://test.veevavault.com/api/mdl/execute \
  -H 'Accept: application/json' \
  -H 'Authorization: {vaultSessionId}' \
  -d 'ALTER Notificationtemplate my_template1__c (
   subject('\''Subject 1"'\'')
);

ALTER Notificationtemplate my_template2__c (
   subject('\''Subject 2"'\'')
);'
{
    "responseStatus": "SUCCESS",
    "script_execution": {
        "code": "GEN-S-0",
        "message": "OK",
        "warnings": 0,
        "failures": 0,
        "exceptions": 0,
        "components_affected": 1,
        "execution_time": 0.065
    },
    "statement_execution": [
        {
            "vault": "test.veevavault.com",
            "statement": 1,
            "command": "ALTER",
            "component": "Notificationtemplate.my_template1__c",
            "message": "[SUCCESS] ALTER Notificationtemplate my_template1__c",
            "response": "SUCCESS"
        },
        {
            "vault": "test.veevavault.com",
            "statement": 2,
            "command": "ALTER",
            "component": "Notificationtemplate.my_template2__c",
            "message": "[SUCCESS] ALTER Notificationtemplate my_template2__c",
            "response": "SUCCESS"
        }
    ]
}
The execution response produces both script level execution details as well as statement level details. If an error occurs, the detailed report of errors will also appear in the result. Everything before the error will have succeeded and be available in the Vaults; everything after will not run.
Vault’s Admin UI provides a very robust way for configuration migration using VPK packages. You can also create your own VPKs to perform a specific set of changes. However, it may be necessary to automate migration or synchronization of certain components programmatically. For successful migration, it is necessary to first describe the component on the source Vault and generate a RECREATE command. You can execute this command on the target Vault.
Let’s again use Notification Template as an example. We will migrate my_template1__c from a source Vault to a target Vault.
First generate a RECREATE command on a source Vault. Ensure that the session ID used to authenticate the API call is generated by authenticating to the source Vault.
curl -X GET \
  https://{sourceVault}.veevavault.com/api/mdl/components/Notificationtemplate.my_template_1__c \
  -H 'Accept: application/json' \
  -H 'Authorization: {sourceVaultSessionId}'
This generates a RECREATE command for Notificationtemplate.my_template_1__c
RECREATE Notificationtemplate my_template_1__c (
   label('My Template 1'),
   active(true),
   description(''),
   referenced_component(),
   subject('My Subject'),
   notification('My notification test'),
   email_body('My email body'),
   entity_type('document')
);
You can then execute this command on the target Vault using the session ID generated from authenticating to the target Vault.
curl -X POST \
  https://{targetVault}.veevavault.com/api/mdl/execute \
  -H 'Accept: application/json' \
  -H 'Authorization: {sourceVaultSessionId}' \
  -d 'RECREATE Notificationtemplate my_template_1__c (
   label('My Template 1'),
   active(true),
   description(''),
   referenced_component(),
   subject('My Subject'),
   notification('My notification test'),
   email_body('My email body'),
   entity_type('document')
);'
For access control, you can automatically create, update, and delete various security related components. You can use the MDL to configure this programmatically by writing code to retrieve information from a Vault and apply the changes.
This is useful when it’s necessary to generate or manage a large number of security components within a Vault or between Vaults. If you only need to modify a single object or document’s security, use the Admin UI functionality. This example walks through managing the Atomicsecurity component to hide system fields, such as Created Date and Last Modified Date, from users in the Viewer role while granting Read access on system fields for all other roles. We will configure this same behavior across all objects and lifecycle states and modify the following on a single object:
component_name: You can use any API name and Vault automatically updates the name to a concatenation of object.object_lifecycle.state.object: The object we’re applying Atomic Security toobject_lifecycle: The object lifecycle we’re applying Atomic Security tostate: The state of the lifecycle we’re applying Atomic Security toFieldssecurity: A subcomponent of Atomicsecurity that defines the role (viewer__c), the type (hide__v), and fields (created_date__v, created_by__v, modified_date__v, modified_by__v) it applies to.RECREATE Atomicsecurity component_name__c (
label('Test Object 1-Test Object Lifecy-Active'),
active(true),
object('Object.test_object_1__c'),
object_lifecycle('Objectlifecycle.test_object_lifecycle_lifecycle__c'),
state('Objectlifecyclestate.active_state__c'),
Fieldsecurity viewer__v.hide__v.field_security__c(
label('Viewer-Hide'),
active(true),
role('Objectlifecyclerole.viewer__v'),
type('hide__v'),
fields('Field.created_by__v',
'Field.created_date__v',
'Field.modified_by__v',
'Field.modified_date__v')
)
);
RECREATE Atomicsecurity component_name (
label('Test Object 1-Test Object Lifecy-Inactive'),
active(true),
object('Object.test_object_1__c'),
object_lifecycle('Objectlifecycle.test_object_lifecycle_lifecycle__c'),
state('Objectlifecyclestate.inactive_state__c'),
Fieldsecurity viewer__v.hide__v.field_security__c(
label('Viewer-Hide'),
active(true),
role('Objectlifecyclerole.viewer__v'),
type('hide__v'),
fields('Field.created_by__v',
'Field.created_date__v',
'Field.modified_by__v',
'Field.modified_date__v')
)
);
RECREATE Atomicsecurity component_name (
label('Test Object 1-Test Object Lifecy-Test'),
active(true),
object('Object.test_object_1__c'),
object_lifecycle('Objectlifecycle.test_object_lifecycle_lifecycle__c'),
state('Objectlifecyclestate.test_state__c'),
Fieldsecurity viewer__v.hide__v.field_security__c(
label('Viewer-Hide'),
active(true),
role('Objectlifecyclerole.viewer__v'),
type('hide__v'),
fields('Field.created_by__v',
'Field.created_date__v',
'Field.modified_by__v',
'Field.modified_date__v')
)
);
Using MDL, you can migrate custom Long Text fields to Rich Text fields. This is a permanent, one-way migration that cannot be undone.
The long text value is converted as plain text, even if the long text field contains valid HTML. For your new rich text field to render HTML markup, you must re-enter the value.
ALTER Object object_name__c (
    MODIFY Field field_name__c(
        type('RichText')
    )
);
Long text fields used in reference lookups cannot be converted to rich text.
If you’re familiar with commands used in DDL (Data Definition Language), you should recognize MDL commands since they share some of the same imperative verb commands: CREATE, DROP, ALTER, etc. With DDL, you typically use these commands to manage database tables. With MDL, the same general idea applies for adding, changing, or deleting components to modify Vault’s configuration metadata.
Most MDL commands follow the general syntax shown below:
COMMAND Componenttypename component_name (
  attribute_name(attribute_value),
  attribute_name(attribute_value),

  Subcomponenttypename subcomponent_name (

    attribute_name(attribute_value),
    attribute_name(attribute_value)
  )
);
The following elements are used to build most types of MDL commands:
| Element | Description | Example |
|---|---|---|
| Component Type Name | The name of the MDL component type. It is expressed as a string starting with an uppercase letter followed by lowercase letters. | Picklist |
| Component Name | The name of the MDL component. An MDL component is an instance of a component type. It is expressed as a snake_case string that ends with the applicable Veeva namespace. Component names can represent a hierarchy using dot-notation. For example, my_baseobject__c.my_objecttype__c. In this example, my_objecttype__c is a child component of my_baseobject__c. | color__c |
| Subcomponent Type Name | The name of the subcomponent type, defined within the context of the component type. Subcomponents only exist within the parent component and cannot stand alone. | Picklistentry |
| Subcomponent Name | The name of the subcomponent. A subcomponent is an instance of a subcomponent type. A subcomponent name can represent a hierarchy using dot-notation. For example, my_object__c.my_field__c | red__c |
| Attribute Name | The name of the attribute of the component or a subcomponent. It is expressed as a lowercase, snake_case string. For example, a Docfield component has a max_length attribute. | label |
| Attribute Value | The value which is set on to an attribute. The value is expressed depending on the type accepted by the attribute metadata. For example, attributes of type Number are expressed as my_number_attribute(5), while attributes of type Boolean are expressed as my_bool_attribute(true). See Attribute Data Types for more information. | 'Color' |
Upon failure, Vault returns detailed error messages.
Not all component types support all commands. See the Component Support Matrix for details.
CREATE Componenttypename component_type_name(
  attribute_name(attribute_value),
  attribute_name(attribute_value),

  Subcomponenttypename subcomponent_type_name(
    attribute_name(attribute_value),
    attribute_name(attribute_value)
  ),

  Subcomponenttypename subcomponent_type_name(
    attribute_name(attribute_value),
    attribute_name(attribute_value)
  )
);
The CREATE command creates an MDL component in Vault. The name must be unique and the command fails if the another record in that component already exists with the same name.
If a component type allows for subcomponents, you can create the subcomponents as part of the same command. For example, the following command creates a new Picklist component, color__c, with two Picklistentry subcomponents, red__c and blue__c.
CREATE Picklist color__c(
   label('Color'),
   active(true),
   can_add_values(true),
   can_reorder_values(true),

   Picklistentry red__c(
       value('Red'),
       active(true),
       order(1)
   ),

   Picklistentry blue__c(
       value('Blue'),
       active(true),
       order(2)
   )
);
RECREATE Componenttypename component_type_name(
  attribute_name(attribute_value),
  attribute_name(attribute_value),

  Subcomponenttypename subcomponent_type_name(
    attribute_name(attribute_value),
    attribute_name(attribute_value)
  ),

  Subcomponenttypename subcomponent_type_name(
    attribute_name(attribute_value),
    attribute_name(attribute_value)
  )
);
RECREATE is an upsert command that either creates or alters an MDL component in Vault. RECREATE will create a new component if it doesn’t already exist or will alter a component if the component with the same name already exists. This allows you to use the same MDL command across multiple Vault regardless of whether components already exist.
If a component type allows for subcomponents, the subcomponents can be recreated as part of the same command.
For example, imagine you want to update the Color picklist from the CREATE example above in Vaults where it exists by changing the label to Colors and adding a picklist entry for yellow. You also want to add the picklist if it does not already exist.
RECREATE Picklist color__c(
   label('Colors'),
   active(true),
   can_add_values(true),
   can_reorder_values(true),

   Picklistentry red__c(
       value('Red'),
       active(true),
       order(1)
   ),

   Picklistentry blue__c(
       value('Blue'),
       active(true),
       order(2)
   ),

   Picklistentry yellow__c(
       value('Yellow'),
       active(true),
       order(3)
   )
);
See Retrieve Component Record (MDL) in the Vault API Reference for details on how to generate a RECREATE command for a component in your Vault. To retrieve metadata of a specific component record as XML or JSON, see Retrieve Component Record (XML/JSON).
RENAME Componettypename old_component_name TO new_component_name;
The RENAME command renames a component. You can only rename custom components (components with a __c namespace) such as my_product__c. The command returns an error if a component with the same name already exists.
For example, you can rename the picklist from the examples above from color__c to colors__c to match the label.
RENAME Picklist color__c TO colors__c;
DROP Componenttypename component_name;
The DROP command deletes the component type from Vault. For example, the following command deletes the Color picklist we created in the examples above.
DROP Picklist color__c;
ALTER Componenttypename component_name(
  attribute_name(attribute_value),

  ADD Subcomponenttypename subcomponent_name(
    attribute_name(attribute_value),
    attribute_name(attribute_value)
  ),
  MODIFY Subcomponenttypename subcomponent_name(
    attribute_name(attribute_value),
    attribute_name(attribute_value)
  ),

  RENAME Subcomponenttypename old_subcomponent_name TO new_subcomponent_name,
  DROP Subcomponenttypename subcomponent_name
);
The ALTER command modifies an MDL component in Vault.
If a component allows for subcomponents, you can ADD, MODIFY, or DROP the subcomponents as part of the same command. Take the example of a Documentstagegroup component with the following configuration, which we can retrieve with Vault API’s Retrieve Component Record (MDL) endpoint:.
RECREATE Documentstagegroup general_lc__c (
   label('General LC'),
   active(true),
   description(),
   document_lifecycle('Doclifecycle.general_lifecycle__c'),
   Documentstage draft__c(
      label('Draft'),
      active(true),
      description(),
      document_lifecycle_states_ref('Doclifecyclestate.draft__c',
         'Doclifecyclestate.planned__v'),
      order(1)
      ),
   Documentstage obsolete__c(
      label('Obsolete'),
      active(true),
      description(),
      document_lifecycle_states_ref('Doclifecyclestate.obsolete__c'),
      order(3)
      ),
   Documentstage review__c(
      label('Review'),
      active(true),
      description(),
      document_lifecycle_states_ref('Doclifecyclestate.in_review__c',
         'Doclifecyclestate.reviewed__c'),
      order(2)
      )
   );
Imagine you want to modify this component by:
description attribute.obsolete__c subcomponent.approved__c subcomponent.Documentstage from review__c to review_and_approval__c.document_lifecycle_states_ref attribute for the draft__c subcomponent by adding and removing states.You can make each of these changes as a subcommand within the following ALTER command.
ALTER Documentstagegroup general_lc__c (

  # change the value of the description attribute on the Documentstagegroup component
  description('A general document lifecycle suitable for most purposes.'),

  # remove the obsolete__c Documentstage subcomponent
  DROP Documentstage obsolete__c,

  # add the approved__c Documentstage subcomponent
  ADD Documentstage approved__c(
    label('Approved'),
    active(true),
    description(),
    document_lifecycle_states_ref('Doclifecyclestate.approved__c'),
    order(3)
  ),

  # change the name of the review__c subcomponent to review_and_approval__c
  RENAME Documentstage review__c TO review_and_approval__c,

  # remove the planned__v lifecycle state from the draft__c subcomponent
  MODIFY Documentstage draft__c (
    document_lifecycle_states_ref DROP ('Doclifecyclestate.planned__v')
  ),

  # add the in_authoring__c lifecycle state to the draft__c subcomponent
  MODIFY Documentstage draft__c (
    document_lifecycle_states_ref ADD ('Doclifecyclestate.in_authoring__c')
  )
);
In addition to general MDL elements, ALTER commands can include the following:
| Element | Description | Example |
|---|---|---|
ADD/DROP Attribute Definition | The ADD or DROP attribute definition allows modification of attributes that allow multiple values by adding or removing value. | document_lifecycle_states_ref ADD ('Doclifecyclestate.in_authoring__c') |
| Subcommand | The action to execute within the ALTER command. | MODIFY |
Some components types allow you to set a list of values for certain attributes. Values should be separated by a comma (,) for example:
RECREATE Docfieldlayout general__c (
  label('General Section'),
  active(true),
  icon('VEEVA'),
  order(0),
  fields('Docfield.document_number__v',
    'Docfield.major_version_number__v',
    'Docfield.minor_version_number__v'
  )
);
These attributes will have multi_value set to true and a value set for ordered in the metadata for the component type. If ordered is set to true, then the order of items in the list has an impact on the behavior of the component.
When you add a value to a multi-value attribute using an ADD command within an ALTER command, Vault appends the new value to the end of the list. The example below appends Docfield.my_field__c to the end of the fields list from the example above.
ALTER Docfieldlayout general__c (
  fields ADD ('Docfield.my_field__c')
);
Use operators to apply conditions to MDL commands.
You can create MDL scripts that check to see whether or not a component or subcomponent record meets certain conditions before executing a command.
| Operator | Syntax | Description |
|---|---|---|
| IF EXISTS | ALTER component_type_name IF EXISTS component_name | If the component type exists, execute the MDL command. |
| IF NOT EXISTS | RECREATE component_type_name IF NOT EXISTS component_name | If the component type does not exist, execute the MDL command. |
Use the IF EXISTS operator to skip processing if a component or subcomponent does not already exist in the target Vault.
RECREATE Object IF EXISTS my_object__c (
   label('My Updated Label'),
   label_plural('My Updated Labels'),
   active(true),
   in_menu(true),
   audit(true)
);
Use the IF NOT EXISTS operator to skip processing if a component or subcomponent already exists in the target Vault.
RECREATE Picklist IF NOT EXISTS my_picklist__c (
   label('My Picklist'),
   active(true),
   can_add_values(true),
   can_reorder_values(true),
   Picklistentry my_first_entry__c(
     value('Entry 1'),
     order(1),
     active(true)
  ),
  Picklistentry my_second_entry__c(
     value('Entry 2'),
     order(2),
     active(true)
  )
);
The same MDL script can contain both IF EXISTS and IF NOT EXISTS operators.
ALTER Object IF EXISTS my_object__c (
   ADD Field IF NOT EXISTS my_field__c (
       label('My Field'),
       type('String'),
       required(false),
       list_column(true),
       active(true)
   )
);
MDL Components are instances of MDL Component Types and contain specific configuration details. For example a Component Type Docfield has a Component instance Docfield.country__v.
Metadata component types represent specific elements of Vault’s configuration. For example, the Docfield metadata component type relates to the Documents object.
You cannot delete a component with a standard namespace and can only make certain changes, for example, updating the label.
Code components, such as Recordtrigger, contain Java SDK code which extends functional behavior of Vault.
Component type names are case-sensitive and follow a convention of a capitalized first letter with no spaces or special characters. For example, Objectlifecycle is the component type name for Object Lifecycle.
Every component has a name which must be unique within the context of that component type.
Subcomponents must have a name which is unique within context of the parent component and the subcomponent type.
Names are lower-case, snake_cased and are suffixed by a double underscore (__) followed by a namespace. Names must be 40 characters or fewer excluding the double underscore and namespace.
The namespace of a component determines the owner of the component, for example, the namespace of country__v is __v which is the Veeva standard namespace. Custom components have the __c suffix. Learn about Namespace in Vault Help.
You cannot delete a component with a standard namespace and can only make certain changes such as updating the label.
Code component names are defined by their fully-qualified Java class name. A fully-qualified Java class name includes the class name prefixed by the package name. In Vault, the package name can be com.veeva.vault.custom.{} for custom Java SDK code or com.veeva.vault.{AppName} for standard system Java SDK code.
For example, a Recordtrigger HelloWorld Java SDK class exists in the com.veeva.vault.custom.triggers package. This would be described with MDL as Recordtrigger.com.veeva.vault.custom.triggers.HelloWorld.
Some components contain binary and significantly larger content which requires a separate process to migrate and reference. The following components include content:
FormattedoutputOverlaytemplateSignaturepageTo manage components with content, use a POST command to send a request to the api/mdl/files endpoint. See MDL API Reference.
This allows you to define subcomponent references in a standard way by reducing repeated effort and providing a consistent behavior.
Provide valid references to subcomponents as values for component reference attributes with subcomponent types. Use the following format for the value for the attribute type with a subcomponent reference type:
{subcomponent_type}.{subcomponent_name}
CREATE Checklistmapping example __c (

   label('Example'),
   active(true),
   target_record_object('Object.checklist__sys'),
   target_record_field('Field.target_quality_event__v')
);
The component directory de-normalizes component records into a single queryable data object named vault_component__v. Each component in a Vault will have a record in this object.
This enables Admins to use Vault Query Language (VQL) to query for all components or for specific components and to additionally verify when a component has been modified.
The vault_component__v object includes the following fields of interest:
| Name | Description |
|---|---|
component_name__v | The API name of the component. |
component_type__v | The component type of the component. |
name__v | The label of the component. |
checksum__v | The checksum of the component. |
modified_date__v | The date & time the component metadata was last modified. |
You can retrieve all available fields using the api/{{version}}/metadata/vobjects/vault_component__v API endpoint.
To execute a VQL query, send a GET or POST request to the api/{version}/query endpoint. See Vault Query Language Reference
For example, to retrieve component records from a Vault:
curl -X POST -H "Authorization: {SESSION_ID}" \
-d ‘q=SELECT name__v, component_name__v, component_type__v,modified_date__v,checksum__v from vault_component__v
https://myvault.veevavault.com/api/v19.1/query
{
    "responseStatus": "SUCCESS",
    "responseDetails": {
        "limit": 1000,
        "offset": 0,
        "size": 847,
        "total": 847
    },
    "data": [
        {
            "name__v": "Binder Section with Document",
            "component_name__v": "binder_section_with_document__v",
            "component_type__v": "Reporttype",
            "modified_date__v": "2018-11-13T18:28:02.000Z",
            "checksum__v": "b5f5bfc400fbce76824b5ff1ec574891"
        },
        {
            "name__v": "My Formatted Output",
            "component_name__v": "my_formatted_output__c",
            "component_type__v": "Formattedoutput",
            "modified_date__v": "2019-03-22T19:58:16.000Z",
            "checksum__v": "a89e4dad5d4b2dada2868fe35d561e81"
        }
    ]
}
The following example query retrieves Object components only:
curl -X POST -H "Authorization: {SESSION_ID}" \
-d ‘q=SELECT name__v, component_name__v, component_type__v,modified_date__v,checksum__v from vault_component__v where component_type__v = 'Object'
https://myvault.veevavault.com/api/v19.1/query
{
    "responseStatus": "SUCCESS",
    "responseDetails": {
        "limit": 1000,
        "offset": 0,
        "size": 70,
        "total": 70
    },
    "data": [
        {
            "name__v": "Campaign",
            "component_name__v": "campaign__c",
            "component_type__v": "Object",
            "modified_date__v": "2019-02-04T12:15:34.000Z",
            "checksum__v": "6a7ccf0b3b4a17afb9d2036c7be9fdaf"
        },
        {
            "name__v": "vMDL Hello World",
            "component_name__v": "vmdl_hello_world__c",
            "component_type__v": "Object",
            "modified_date__v": "2019-03-18T15:47:25.000Z",
            "checksum__v": "d587ae806ce06ca42dfa0207137099d6"
        }
    ]
}
XML String type attributes contain complex data defining page layouts, lifecycles and workflows, and more. In most cases, direct modification of XML is not supported or recommended, and you should instead create or modify components through the Vault Admin UI. In rare cases, you can only modify a component by updating an attribute’s XML.
To modify an existing component, we recommend using Vault API’s Retrieve Component Record (MDL) endpoint to generate a RECREATE command, then modifying the existing XML for an attribute as needed. When finished, paste the modified RECREATE command into the body of an Execute MDL Script request.
Web sections add iframes containing external content to the layout of an object record detail page. Web sections can only be created using MDL.
Web sections are defined in the page_markup attribute of a Pagelayout component. To create a new object page layout containing a web section, we recommend first creating the layout in the Vault Admin UI, then adding the web section to the existing page_markup XML as shown in the example below.
| Value | Description |
|---|---|
vault:section | Defines a section on an object detail page layout. |
vault:websection | Defines a web section within a section tag. |
| Value | Description |
|---|---|
title | The section title as it appears in the UI. For example, “Product Website”. |
name | The name of the section. For example, product_website__c. |
| Value | Description |
|---|---|
is_post_session | Boolean. If true, Vault sends the current user’s session credentials to the target URL. The default value is false. |
section_height | The height, in pixels, of the iframe embedded in the web section. For example, 500px. Must be between 40 and 730. The default value is 150px. |
view_mode_url | The URL Vault will display in the web section when the object record page is in view mode. Must follow HTTPS protocol. |
edit_mode_url | Optional: The URL Vault will display in the web section when the object record page is in edit mode. Must follow HTTPS protocol. If omitted, Vault hides this section in edit mode. |
You can add tokens to both the view mode and edit mode URLs. Tokens pass information about a user or Vault to the target URL. Web sections support the following tokens:
| Token | Description |
|---|---|
${User.id} | The id of the currently logged-in user. See Retrieve User in the Vault API Reference for details. |
${User.name__v} | The user_name__v of the currently logged-in user. See Retrieve User in the Vault API Reference for details. |
${User.email__v} | The user_email__v of the currently logged-in user. See Retrieve User in the Vault API Reference for details. |
${Vault.domain} | The vaultDNS of the Vault containing the web section. See Retrieve Domain Information in the Vault API Reference for details. |
${Vault.domain_type} | The domain_type__v of the Vault containing the web section. See Retrieve Domain Information in the Vault API Reference for details. |
${Vault.id} | The vault_id__v of the Vault containing the web section. See Retrieve Domain Information in the Vault RESTReference for details. |
Additionally, you can create dynamic tokens using any object fields that can be used in a Text type formula field. Learn more about tokens in Vault Help.
You must escape the { and } characters when adding tokens to a URL for a web section. For example:
https://myexternalsite.com/?userId=$\{User.id\}
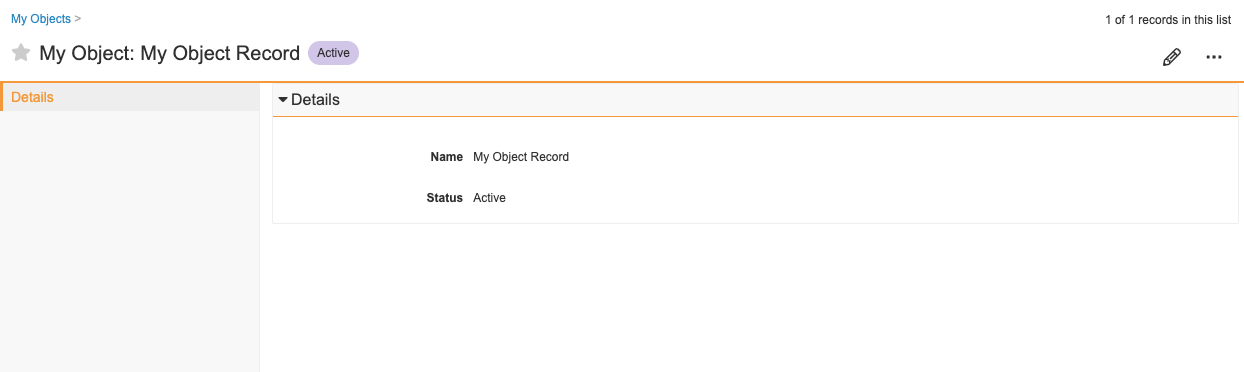
In this example, we’ll add a web section to the page layout of all My Object records. Currently, My Object pages contain one detail form section, which is named Details. The Details section contains two fields, Name and Status, and appears as shown below in the Vault UI.
The following request retrieves page layout metadata for My Object records as MDL. You can retrieve component record metadata using the Retrieve Component Record (MDL) endpoint:
GET /api/mdl/components/Pagelayout.my_object_detail_page_layout__c
RECREATE Pagelayout my_object_detail_page_layout__c (
    label('My Object Detail Page Layout'),
    page_markup({
        <vault:page xmlns:vault="VeevaVault" controller="Objecttype.my_object__c.base__v">
            <vault:section title="Details" name="details__c">
                <vault:detailform type="One-Column">
                    <vault:field reference="name__v" />
                    <vault:field reference="status__v" />
                </vault:detailform>
            </vault:section>
        </vault:page>
    })
);
Use the following template to add a web section. See Websection Attributes for more information.
<vault:section title="{section title}" name="{section_name__c}">
<vault:websection is_post_session="{true or false}" section_height="{height in px}" view_mode_url="{https://myviewmodeurl.com}" edit_mode_url="{https://myeditmodeurl.com}" />
</vault:section>
Paste your XML into the RECREATE command generated in the previous step in the place you want it to appear. For example, to make a section appear first on the page, place the XML on the line following the <vault:page> tag. To place it after another section, paste the text on the line following that section’s </vault:section> tag.
The <vault:section> and </vault:section> tags must be within the <vault:page> and </vault:page> tags and must not be within another section’s <vault:section> and </vault:section> tags.
Use the Vault REST API’s Execute MDL Script endpoint to execute your RECREATE command.
POST /api/mdl/execute
In this example, we’ll add a web section called References after the Details section and configure it to display this reference.
RECREATE Pagelayout my_object_detail_page_layout__c (
    label('My Object Detail Page Layout'),
    page_markup({
        <vault:page xmlns:vault="VeevaVault" controller="Objecttype.my_object__c.base__v">
            <vault:section title="Details" name="details__c">
                <vault:detailform type="One-Column">
                    <vault:field reference="name__v" />
                    <vault:field reference="status__v" />
                </vault:detailform>
            </vault:section>
            <vault:section title="References" name="references__c">
                <vault:websection is_post_session="false" section_height="500px" view_mode_url="https://developer.veevavault.com/mdl" />
            </vault:section>

        </vault:page>
    })
);
Detail pages for My Object records now include a web section as shown below.

MDL commands can be executed with any tool capable of making API calls, including Vault Toolbox. With Vault Toolbox, you can easily make configuration changes without needing to perform additional steps to authenticate and make API calls. Learn more about Vault Toolbox in Veeva Connect.
You can change the way a Picklist component orders Picklistentry label values by using the ALTER command to modify the order_type attribute to one of the following values:
order_asc__sys(default): Values are displayed in the order defined by their order attribute.value_label_asc__sys: Values are displayed in ascending (a-z) alphabetical order based on the user’s language or label sets.value_label_desc__sys: Values are displayed in descending (z-a) alphabetical order based on the user’s language or label sets.ALTER Picklist study_ownership__c (
order_type('value_label_desc__sys')
);
To configure a picklist to display picklist entries in a specific order, you must first set the parent Picklist component’s order_type attribute to order_asc__sys. Next, use the ALTER command to MODIFY the order() attribute of the Picklistentry sub-component. Learn more about the ALTER command.
ALTER Picklist study_ownership__c (
    MODIFY Picklistentry first_item__c ( order(0) ),
    MODIFY Picklistentry second_item__c ( order(1) ),
    MODIFY Picklistentry third_item__c ( order(2) )
);
Vault ignores the value of the order attribute and instead sorts alphabetically when the parent Picklist component’s order_type attribute is set to value_label_asc__sys or value_label_desc__sys.
Picklist order always starts at position 0, which is the first position in the order. Order values after 0 follow sequentially.
If the user enters any non-sequential or duplicate order values, Vault reorders the picklist order values into a sequential order. Duplicate orders are reordered into the order they were configured.
For example, if the user submits the following ALTER command:
ALTER Picklist study_ownership__c (
    MODIFY Picklistentry first_item__c ( order(1) ),
    MODIFY Picklistentry second_item__c ( order(8) ),
    MODIFY Picklistentry third_item__c ( order(8) ),
    MODIFY Picklistentry fourth_item__c ( order(30) ),
);
Vault reorders these picklist entries to the following order values:
RECREATE Picklist study_ownership__c (
    MODIFY Picklistentry first_item__c ( order(0) ),
    MODIFY Picklistentry second_item__c ( order(1) ),
    MODIFY Picklistentry third_item__c ( order(2) ),
    MODIFY Picklistentry fourth_item__c ( order(3) ),
);
Instead of manually constructing MODIFY commands for each Picklistentry, you can leverage a Vault Configuration Report to retrieve all the values in a picklist and then customize the order. Learn more about generating Vault Configuration Reports in Vault Help.
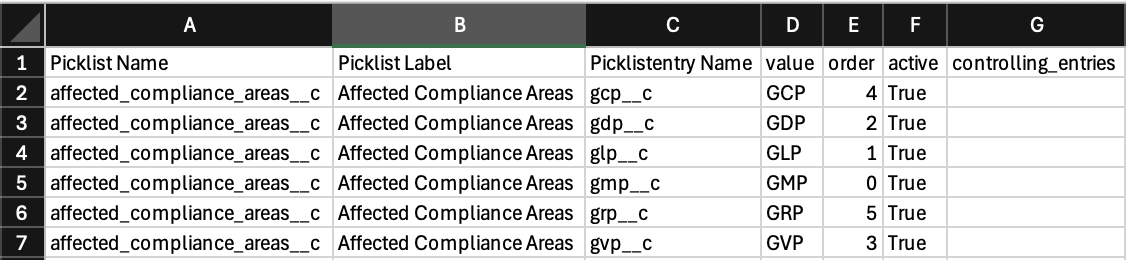
When exporting a Vault Configuration Report, you only need to include the Picklist component in the Component Types section. Once exported, navigate to the Picklist.Picklistentry tab within the Excel file, and filter the Picklist Name column for the picklist you want to modify.

Next, copy and paste those values into a new sheet where you can reorder them.
In a new column, add a formula that will construct the MODIFY commands to change the order() attribute of the Picklistentry sub-components.
The following formula assumes that the Picklistentry Name column is “C” and the first picklist entry value is in row 2:
="MODIFY Picklistentry "&C2&" ( order("&ROW(C2)-2&") )"
Expand the formula to all rows, and it should look like this:

Next, add a formula to an empty cell to construct the complete ALTER command.
The following formula assumes that the Picklist Name is in cell “A2” and the range of the MODIFY column is “H2:H7”:
="ALTER Picklist "&A2&" ( "&TEXTJOIN(", ",TRUE,H2:H7)&" );"
The formula above generates the complete MDL command, which you can then copy from column H and paste into Vault Toolbox’s Component Editor. The formula above may not function as expected depending on your Excel regional format settings. For example, you may need to replace the commas within the TEXTJOIN function with semicolons if you reside in the EU.
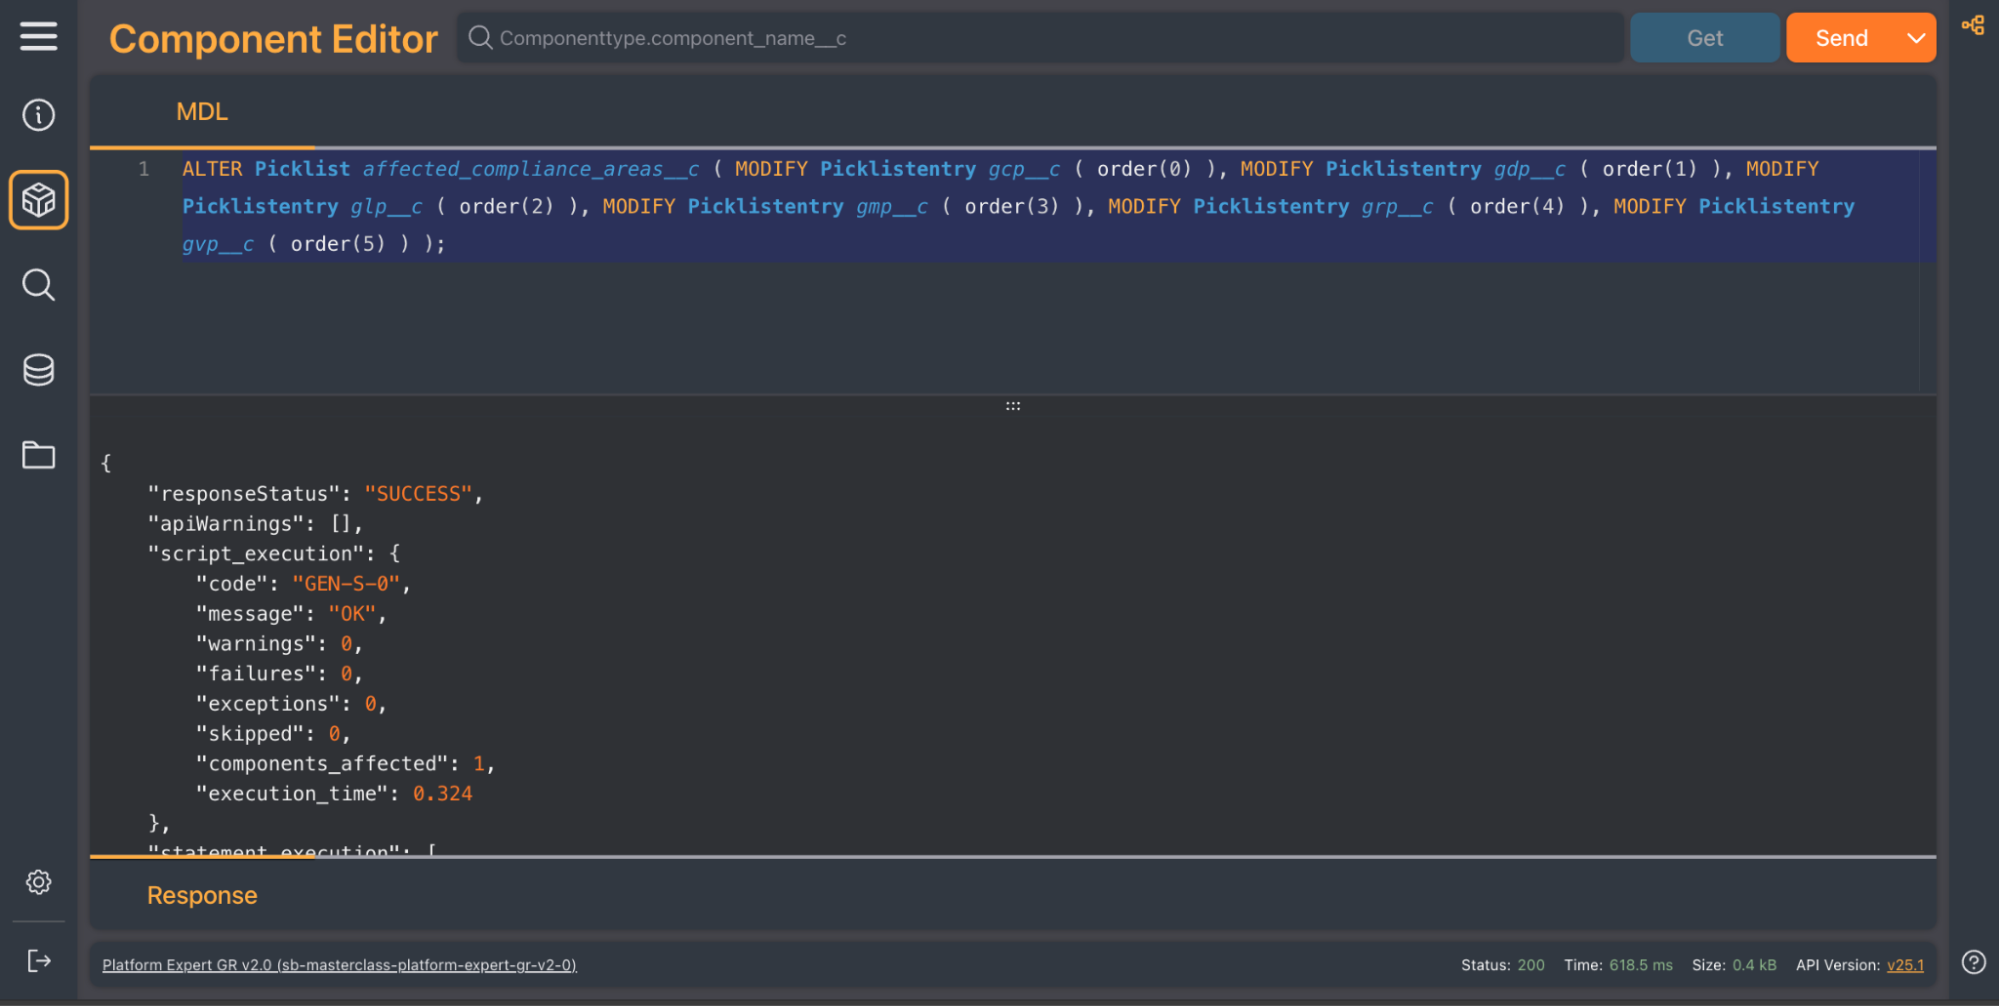
To execute the MDL command using Vault Toolbox, log in to Vault and then launch Vault Toolbox from your browser. You can use Integrated Login to authenticate with your active session. Learn more about Integrated Login for Vault Toolbox in Veeva Connect.
Navigate to the Component Editor, paste the MDL command generated in the previous section, then click Send. This will execute the command in your Vault.
If this change has been executed in a sandbox environment, you must use migration packages to replicate configuration changes in your production environment. Learn more about using configuration migration packages in Vault Help.
In your sandbox Vault:
Picklist component you modified previously to the Components section.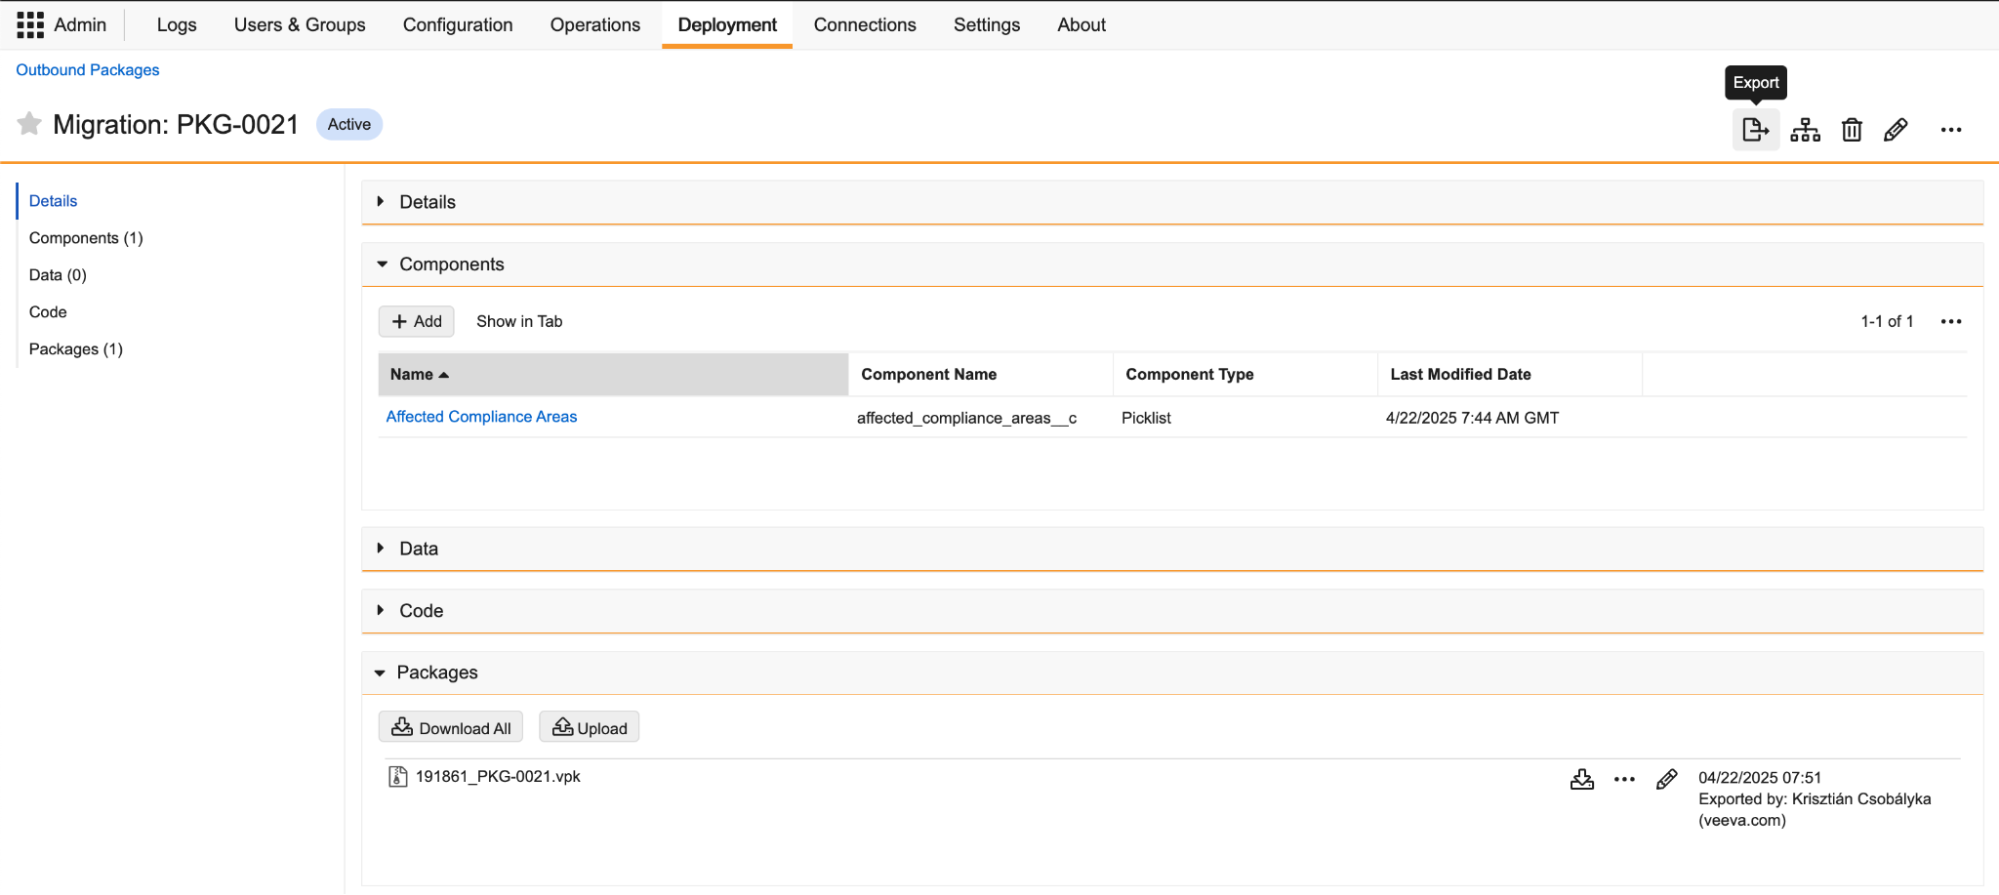
In your production Vault:
Picklist dependencies rely upon a controlling field to determine which values are available for selection in a dependent picklist field. To create or edit picklist dependencies, use the ALTER command to MODIFY the attributes of the Object.Field sub-component. Learn more about managing dependent picklists in Vault Help.
While picklist dependencies and their controlling field values are represented by a matrix in the UI, their values in MDL are represented as follows:
controlling_picklist('field_name') - defines which Yes/No (Boolean) or picklist field is the controlling fieldpicklist_dependencies('{"controlling_value":["available_value"]}') - defines a list of controlling field values, followed by an array of available dependent picklist values in JSON formatFor example, if there is a field called Region (region__c) and we want to control the available Language (language__c) values, then Region will be the controlling field and Language will be the dependent picklist field.
To set up the “matrix” of languages available in each region, you must execute an ALTER command on the object and its field, defining the region__c as the controlling_picklist, and then defining a JSON list of picklist_dependencies. Use the API names of the Picklistentry subcomponents when creating the JSON list. If the controlling field is a Boolean field, use true and false as the controlling values.
The following ALTER command modifies the picklist dependencies for the language__c picklist field on the product__v object:
ALTER Object product__v (
    MODIFY Field language__c (
controlling_picklist('region__c'),
picklist_dependencies('{"emea__c":["english__c"],"apac__c":["chinese__c","japanese__c"]}')
    )
);
To execute the MDL command using Vault Toolbox, log in to Vault and then launch Vault Toolbox from your browser. You can use Integrated Login to authenticate with your active session. Learn more about Integrated Login for Vault Toolbox in Veeva Connect.
Navigate to the Component Editor, paste the MDL command generated in the previous section, then click Send. This will execute the command in your Vault.
If this change has been executed in a sandbox environment, you must use migration packages to replicate configuration changes in your production environment. Learn more about using configuration migration packages in Vault Help.
In your sandbox Vault:
Object component you modified previously to the Components section. In your production Vault:
Vault components and subcomponents use attribute values for their configuration.
MDL attributes use the following data types:
| Data Type | Description | Validation | Example |
|---|---|---|---|
| String | Can contain letters, numbers, and spaces. | Must be wrapped in single quotes ('). Maximum number of characters allowed is defined as max_length on the attribute metadata | attribute('This is a String') |
| Boolean | Can have two values: true and false | attribute(true) | |
| Number | Contains digits. | Maximum value defined as max_value on the attribute metadata. Minimum value defined as min_value on the attribute metadata. Max number of decimal places defined as scale on the attribute metadata | attribute(1234) |
| Component | A reference to a component in the Vault. | Component type is defined as component on the attribute metadata | attribute('Doctype.my_special_doctype__c') |
| Enum | A value from a list of predefined values sorted in the order you entered them. | Allowed values list defined as enums on the attribute metadata | attribute('Red') |
| XMLString | Complex data in XML format | The specified values bust be wrapped in curly brackets ({}). The framework validates XML structure only (not the content). Vault returns the GEN-F***-II-1056 error code if invalid. Maximum number of characters allowed is defined as max_length on the attribute metadata | attribute({<xml>Some XML</xml>}) |
| LongString | A Long Text field | Maximum number of characters allowed is defined as max_length on the attribute metadata | attribute('...') |
| SdkCode | Some Java SDK source code. | Must be wrapped in a <VeevaData> node. | attribute(<VeevaData>...<VeevaData>) |
| Expression | A formula. | Maximum number of characters allowed is defined as max_length on the attribute metadata | attribute([field__c='abc']) |
| File | A reference to a binary configuration file. | attribute('bc17a630e6493266d5f629460c91748c') |
Each Vault API response includes a field called responseStatus for the overall status of the request. In addition, the status of each statement is returned in the response field for each statement_execution item. Possible values are:
SUCCESS - Successfully processed.WARNING - Successfully processed but there is an informational message.FAILURE - Could not be processed because of user error.EXCEPTION - Could not be processed because of a system error.For a status other than SUCCESS, users can inspect the errors field of statement_execution in the response:
line - The line number where the error occurred. message - The message accompanying each error type. These messages are subject to change and are not contractual parts for error handling. Developers should consider error messages for debugging and troubleshooting purposes only and should not implement application logic which relies on specific error strings or formatting.context - The attribute name where the error occurred.code - An error code specific to this type of error.{
"responseStatus": "FAILURE",
"script_execution": {
"code": "GEN-F-401",
"message": "Script execution failed",
"warnings": 0,
"failures": 1,
"exceptions": 0,
"components_affected": 0,
"execution_time": 0.1
},
"statement_execution": [
{
"vault": "z-team-promomats.veevavault.com",
"statement": 1,
"command": "CREATE",
"component": "Picklist.color__c",
"message": "[FAILURE] CREATE Picklist color__c",
"response": "FAILURE",
"errors": [
{
"line": 1,
"message": "Component already exists with attribute [name], value [color__c]",
"context": "name",
"code": "GEN-FCRE-II-1007"
}
]
}
]
}
The authenticated user must be granted access to Vault API and have permission to perform the action requested.
| Component Type | CREATE | RECREATE | ALTER | DROP | RENAME | Describe | Generate RECREATE | Queryable |
|---|---|---|---|---|---|---|---|---|
| Accountmessage | ✓ | ✓ | ✓ | ✓ | ✓ | ✓ | ✓ | ✓ |
| Appsecurityrule | X | § | § | X | X | ✓ | ✓ | ✓ |
| Atomicsecurity | ✓ | ✓ | † | ✓ | ✓ | ✓ | ✓ | X |
| Casechildconfig | ✓ | ✓ | ✓ | ✓ | ✓ | ✓ | ✓ | ✓ |
| Checklisttype | ✓ | ✓ | ✓ | ✓ | ✓ | ✓ | ✓ | ✓ |
| Clientdistribution | X | X | X | X | X | ✓ | X | X |
| Clinicalstandardmapping | ✓ | ✓ | ✓ | ✓ | ✓ | ✓ | ✓ | ✓ |
| Customwebapi | X | X | X | X | X | X | X | ✓ |
| Dashboard | ✓** | ✓** | ✓**/† | ✓ | ✓ | ✓ | ✓ | X |
| Disclosurerule | ✓ | ✓ | ✓ | ✓ | ✓ | ✓ | ✓ | ✓ |
| Disclosurexmldoctypemapping | ✓ | ✓ | ✓ | ✓ | ✓ | ✓ | ✓ | ✓ |
| Disclosurexmlfieldmapping | ✓ | ✓ | ✓ | ✓ | ✓ | ✓ | ✓ | ✓ |
| Docatomicsecurity | ✓ | ✓ | † | ✓ | ✓ | ✓ | ✓ | ✓ |
| Docfield | ✓ | ✓ | † | ✓ | ✓ | ✓ | ✓ | X |
| Docfielddependency | ✓ | ✓ | † | ✓ | ✓ | ✓ | ✓ | X |
| Docfieldlayout | ✓ | ✓ | † | ✓ | ✓ | ✓ | ✓ | X |
| Docinfopanel | X | X | X | X | X | X | ✓ | ✓ |
| Doclifecycle | ✓** | ✓** | ✓**/† | X | X | ✓ | ✓ | X |
| Docmatchingrule | ✓ | ✓ | ✓ | ✓ | ✓ | ✓ | ✓ | X |
| Docparticipantrule | ✓ | ✓ | ✓ | ✓ | ✓ | ✓ | ✓ | X |
| Docrelationshiptype | ✓** | ✓** | ✓** | ✓ | ✓ | ✓ | ✓ | X |
| Doctype | ✓ | ✓ | † | ✓ | ✓ | ✓ | ✓ | X |
| Documentaction | X | X | X | X | X | X | X | X |
| Documentcheck | ✓ | ✓ | ✓ | ✓ | ✓ | ✓ | ✓ | ✓ |
| Documentchecksection | ✓ | ✓ | ✓ | ✓ | ✓ | ✓ | ✓ | ✓ |
| Documentstagegroup | ✓ | ✓ | ✓ | ✓ | ✓ | ✓ | ✓ | ✓ |
| Emailprocessor | X | X | X | X | X | X | X | ✓ |
| Formattedoutput | ✓ | ✓ | ✓ | ✓ | ✓ | ✓ | ✓ | X |
| Inboundemailaddress | ✓ | ✓ | † | ✓ | ✓ | ✓ | ✓ | ✓ |
| Integrationrule | ✓ | ✓ | ✓ | ✓ | ✓ | ✓ | ✓ | ✓ |
| Job | ✓ | ✓ | † | ✓ | ✓ | ✓ | ✓ | X |
| Jobmetadata | ✓ | ✓ | † | ✓ | ✓ | ✓ | ✓ | ✓ |
| Labelset | ✓ | ✓ | ✓ | ✓ | ✓ | ✓ | ✓ | ✓ |
| Layoutrule | ✓ | ✓ | † | ✓ | ✓ | ✓ | ✓ | X |
| Layoutprofile | ✓ | ✓ | ✓ | ✓ | ✓ | ✓ | ✓ | ✓ |
| Lifecyclestatetype | ✓ | ✓ | ✓ | ✓ | ✓ | ✓ | ✓ | ✓ |
| Lifecyclestatetypeassociation | ✓ | ✓ | ✓ | ✓ | ✓ | ✓ | ✓ | ✓ |
| Link | ✓ | ✓ | ✓ | ✓ | ✓ | ✓ | ✓ | X |
| Matchingrule | ✓ | ✓ | † | ✓ | ✓ | ✓ | ✓ | X |
| Messagedeliveryeventhandler | X | X | X | X | X | X | X | ✓ |
| Messagegroup | ✓ | ✓ | ✓ | ✓ | ✓ | ✓ | ✓ | ✓ |
| Messageprocessor | ✓ | ✓ | ✓ | ✓ | ✓ | ✓ | ✓ | ✓ |
| Mobileshareactionconfig | ✓ | ✓ | † | ✓ | ✓ | ✓ | ✓ | ✓ |
| Mobiletab | X | ✓* | ✓ | ✓ | X | X | ✓ | ✓ |
| Notificationtemplate | ✓ | ✓ | ✓ | †† | ✓ | ✓ | ✓ | X |
| Object | ✓ | ✓ | † | ✓ | ✓ | *** | ✓ | X |
| Objectaction | ✓ | ✓ | ✓ | ✓ | X | ✓ | ✓ | X |
| Objectlifecycle | ✓** | ✓** | ✓**/† | ✓ | ✓ | ✓ | ✓ | X |
| Objectlifecyclestagegroup | ✓ | ✓ | † | ✓ | ✓ | ✓ | ✓ | ✓ |
| Objecttype | ✓ | ✓ | † | ✓ | ✓ | ✓ | ✓ | X |
| Objectvalidation | ✓ | ✓ | † | ✓ | ✓ | ✓ | ✓ | X |
| Objectworkflow | ✓** | ✓** | ✓**/† | ✓ | ✓ | ✓ | ✓ | X |
| Outboundemaildomain | ✓ | ✓ | ✓ | X | ✓ | ✓ | ✓ | ✓ |
| Overlaytemplate | ✓ | ✓ | ✓ | ✓ | ✓ | ✓ | ✓ | ✓ |
| Page | ✓ | ✓ | ✓ | ✓ | ✓ | ✓ | ✓ | ✓ |
| Pagelayout | ✓** | ✓** | ✓** | X | ✓ | ✓ | ✓ | X |
| Pagelink | ✓ | ✓ | ✓ | ✓ | ✓ | ✓ | ✓ | X |
| Permissionset | ✓ | ✓ | ✓ | ✓ | ✓ | X | ✓ | X |
| Picklist | ✓ | ✓ | ✓ | ✓ | ✓ | ✓ | ✓ | X |
| Printableviewtestscript | ✓ | ✓ | ✓ | ✓ | ✓ | ✓ | ✓ | ✓ |
| Processview | ✓ | ✓ | ✓ | ✓ | ✓ | ✓ | ✓ | ✓ |
| Qmsactionpathconfiguration | ✓ | ✓ | ✓ | ✓ | ✓ | ✓ | ✓ | ✓ |
| Qmsautomationusertemplate | ✓ | ✓ | ✓ | ✓ | ✓ | ✓ | ✓ | X |
| Qualitybatchroleassignment | ✓ | ✓ | ✓ | ✓ | ✓ | ✓ | ✓ | ✓ |
| Qualitycurriculumsmartmatchrule | ✓ | ✓ | ✓ | ✓ | ✓ | ✓ | ✓ | ✓ |
| Qualitydistributiongroupfilterset | ✓ | ✓ | ✓ | ✓ | ✓ | ✓ | ✓ | ✓ |
| Qualitydynamicenrollmentrule | ✓ | ✓ | ✓ | ✓ | ✓ | ✓ | ✓ | ✓ |
| Qualityexternalnotification | ✓ | ✓ | ✓ | ✓ | ✓ | ✓ | ✓ | ✓ |
| Qualityexternalnotificationtemplate | ✓ | ✓ | ✓ | ✓ | ✓ | ✓ | ✓ | ✓ |
| Qualityextractentityconfig | ✓ | ✓ | ✓ | ✓ | ✓ | ✓ | ✓ | ✓ |
| Qualityinboundemailaddressconfiguration | ✓ | ✓ | ✓ | ✓ | ✓ | ✓ | ✓ | ✓ |
| Qualityincidentintakelayout | ✓ | ✓ | ✓ | ✓ | ✓ | ✓ | ✓ | ✓ |
| Qualityobjectrelationshipconfig | ✓ | ✓ | ✓ | ✓ | ✓ | ✓ | ✓ | ✓ |
| Qualityreasonforchange | ✓ | ✓ | ✓ | ✓ | X | ✓ | ✓ | ✓ |
| Qualityrecordcheck | ✓ | ✓ | † | ✓ | ✓ | ✓ | ✓ | ✓ |
| Qualityrecordcheckinsight | ✓ | ✓ | ✓ | ✓ | X | ✓ | ✓ | ✓ |
| Qualityrecordchecklifecycleassociation | ✓ | ✓ | ✓ | ✓ | ✓ | ✓ | ✓ | ✓ |
| Qualityreportabilitydecisiontreeconfig | ✓ | ✓ | ✓ | ✓ | ✓ | ✓ | ✓ | ✓ |
| Qualityteam | ✓ | ✓ | † | ✓ | ✓ | ✓ | ✓ | X |
| Qualityteamlifecycleassociation | ✓ | ✓ | ✓ | ✓ | ✓ | ✓ | ✓ | ✓ |
| Queue | ✓ | ✓ | ✓ | ✓ | ✓ | ✓ | ✓ | ✓ |
| Recordaction | X | X | X | X | X | X | X | X |
| Recordmergeeventhandler | X | X | X | X | X | X | X | ✓ |
| Recordroletrigger | X | X | X | X | X | X | X | ✓ |
| Recordtrigger | X | X | X | X | X | X | X | ✓ |
| Relatedrecordsetup | ✓ | ✓ | ✓ | ✓ | ✓ | ✓ | ✓ | ✓ |
| Recordworkflowaction | X | X | X | X | X | X | X | X |
| Renditionprofile | ✓ | ✓ | † | ✓ | ✓ | ✓ | ✓ | X |
| Renditiontype | ✓ | ✓ | ✓ | ✓ | ✓ | ✓ | ✓ | X |
| Report | ✓** | ✓** | X | ✓ | ✓ | ✓ | ✓ | ✓ |
| Reportexceltemplate | ✓ | ✓ | ✓ | ✓ | ✓ | ✓ | ✓ | ✓ |
| Reporttype | ✓** | ✓** | ✓** | ✓ | ✓ | ✓ | ✓ | X |
| Rimdoctypeconfig | ✓ | ✓ | ✓ | ✓ | ✓ | ✓ | ✓ | ✓ |
| Rimeventchangedetail | ✓ | ✓ | ✓ | ✓ | ✓ | ✓ | ✓ | ✓ |
| Rimeventchangetype | ✓ | ✓ | ✓ | ✓ | ✓ | ✓ | ✓ | ✓ |
| Rimobjectconfiguration | X | X | ✓ | X | X | ✓ | ✓ | ✓ |
| Rimobjectmapping | X | X | ✓ | X | X | ✓ | ✓ | ✓ |
| Rolepermissionset | ✓ | ✓ | † | ✓ | ✓ | ✓ | ✓ | ✓ |
| Savedview | ✓ | ✓ | † | X | X | ✓ | ✓ | X |
| Sdkjob | X | X | X | X | X | X | X | ✓ |
| Searchablefield | ✓ | ✓ | ✓ | ✓ | ✓ | ✓ | ✓ | ✓ |
| Searchcollection | ✓ | ✓ | † | ✓ | ✓ | ✓ | ✓ | ✓ |
| Securityprofile | ✓ | ✓ | † | ✓ | ✓ | ✓ | ✓ | X |
| Selfevidentcorrection | ✓ | ✓ | †† | †† | †† | ✓ | ✓ | ✓ |
| Sharingrule | ✓ | ✓ | † | ✓ | ✓ | ✓ | ✓ | X |
| Signaturepage | ✓ | ✓ | ✓ | ✓ | ✓ | ✓ | ✓ | ✓ |
| Stationconfiguration | ✓ | ✓ | ✓ | ✓ | ✓ | ✓ | ✓ | ✓ |
| Tab | ✓ | ✓ | ✓ | ✓ | ✓ | ✓ | ✓ | X |
| Tabcollection | ✓ | ✓ | ✓ | ✓ | ✓ | ✓ | ✓ | ✓ |
| Tag | ✓ | ✓ | † | ✓ | ✓ | ✓ | ✓ | X |
| Tagsecurityrule | X | § | § | X | X | ✓ | ✓ | ✓ |
| Userdefinedclass | X | X | X | X | X | X | X | ✓ |
| Userdefinedmodel | X | X | X | X | X | X | X | ✓ |
| Userdefinedservice | X | X | X | X | X | X | X | ✓ |
| Vaulttoken | ✓ | ✓ | ✓ | ✓ | ✓ | ✓ | ✓ | X |
| Visualhierarchyconfiguration | ✓ | ✓ | ✓ | ✓ | ✓ | ✓ | ✓ | ✓ |
| Webapigroup | ✓ | ✓ | ✓ | ✓ | ✓ | ✓ | ✓ | ✓ |
| Workflow | X | X | X | X | X | X | X | ✓ |
| Icon | Description |
|---|---|
| ✓ | MDL Operation is supported. |
| ✓* | MDL operation is supported for existing components but cannot be used to create new components. |
| ✓** | MDL Operation is supported, but the Component Type contains field(s) that use proprietary XML. Direct modification of the XML is not supported or recommended. Instead, creating and/or updating the component is better suited through the Admin UI. |
| † | MDL Operation may not be supported for some multi-value attributes. |
| †† | MDL Operation is supported for custom components but is not supported for system components. |
| X | MDL Operation is not supported. |
| *** | Operation is supported through /api/{{version}}/metadata/vobjects endpoint only. |
| § | MDL Operation is supported only to create or alter custom subcomponents. |